background image

11

English

INTR

ODUCTION 

PREP

ARA

TION 

W

ATCHING TV 

USING FUNCTIONS

USEFUL TIPS


CONNECTING DEVICES

INFORMA

TION 

These operations are accessible by remote control. 

Some may also be accessible by controls on the main unit.

Initial Setup

This section will guide you through the unit’s initial setting 
which includes selecting a language for your on-screen menu
and autoprogram, which automatically scans and memorizes 
viewable channels.

Before you begin:

Make sure the unit is connected to antenna or cable.

1

 After 

making all the necessary connections,

press   to turn on the unit.
•  It may take a few moments to turn on the unit for the 

first time.

• 

[Initial Setup]

menu appears automatically after the

unit is turned on.

2

  Use

/

to select the on-screen language from the 

choices (English / Español / Français) on the right side of the 
TV screen, then press 

OK

.

3

  Use

/

to select 

[Antenna]

for TV channels or 

[Cable]

for CATV channels, then press 

OK

.

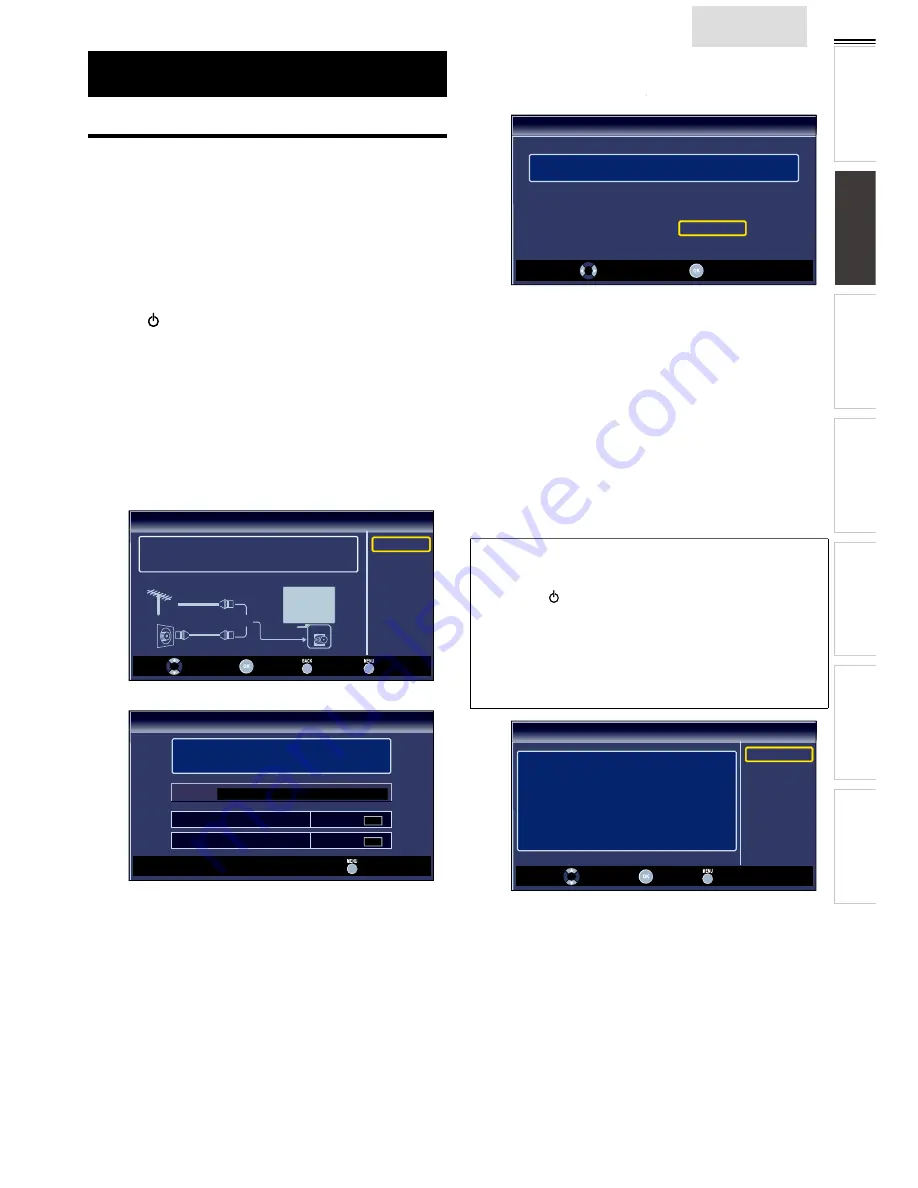
Initial Setup

Make sure the antenna is connected to ''ANT. IN'' jack.
Select your signal source.

ANT.IN


Antenna

Cable

Or

Antenna

Cable
Skip

Select

OK

Back

Skip

• 

[Autoprogram]

will begin.

Initial Setup

Please wait while the system is scanning for channels. 

Auto programming may take more than 20 minutes to 

complete.

0% 

Digital channels

0 ch 

Analog channels

0 ch 

Skip

4

Use 

/

to select the desired location setting, then press 

OK

.

[Home]

is ENERGY STAR

®

R

R  quali

fi

 ed setting.

Initial Setup

Select “Retail” or “Home” for your location.

Retail

Home

Select

OK

• Select 

[Retail]

 store, the unit will be set up with 

predefined setting for retail displays. In this setting, the

.

power consumption may possibly exceed the limited 

requirement of the ENERGY STAR

®

R

R  qualification.

•  Select 

[Home]

, the unit is set to maximize the energy 

efficiency for home setting and it can be adjusted

through a choice of picture and sound quality according 

to your preference. Use this setting to remove the

E-Sticker if visible from the display. 

 p. 23

•  When the initial setup is completed, the lowest

memorized channel with the confirmation message of 

the location setting will be displayed on the TV screen.

• You must set 

[Home]

in step 

4

. Otherwise, 

[Picture]

and 

[Sound]

settings you adjusted will not be

memorized after the unit goes into standby mode.

Note

•  If you are not receiving a signal from your cable service, contact 

the Cable provider.

• If you press

or 

MENU

 during autoprogram, this setup of  TV 

channels will be canceled.

• The initial autoprogram function can be executed for either 

[Antenna]

or 

[Cable]

 only once. When you change the

connection  (Antenna / Cable),  set

[Autoprogram]

 again. 

p. 17

• If there is no signal input from the antenna terminal and no 

operation for several seconds after you turn on the unit, helpful 

hints appears. Follow the instructions listed on the TV screen.

Initial Setup

No channel is registered.

Try Autoprogram again?

Verify that you have a cable connected to the "ANT. IN" jack 

on the back of the TV, the channel installation process 

searches this connection. If you are using a cable or satellite 

box, please confirm the input which you have connected to the 

box and press “SOURCE” key on the remote control to select 

the appropriate source input.

 Retry
 Later

Select

OK

Skip

After an initial setup is completed...

•  If you want to scan the channels automatically again.

[Autoprogram] 

 p. 17

• You can add the desired cable and analog channels 

unmemorized by autoprogram.

[Add Channels] 

 p. 18

•  If you want to change to another language.

[Language]   

 p. 23

•  If you want to change the location setting.

[Location]


 p. 23

Содержание LC 401SS2

Страница 1: ...e Appelez notre num ro gratuit ou visitez notre site web l adresse Necesita ayuda Llame por favor sin costo visite nuestro sitio web en EN Owner s Manual FR Manuel du Propri taire ES Manual del Propie...

Страница 2: ...accessories specified by the manufacturer 12 Use only with the cart stand tripod bracket or table specified by the manufacturer or sold with the apparatus When a cart is used use caution when moving t...

Страница 3: ...being tilted by a child and an adult leaning pulling standing or climbing on it A falling unit can cause serious injury or even death LAMPINLCDCONTAINSMERCURY DISPOSEACCORDINGTOLOCAL STATEORFEDERALLA...

Страница 4: ...4 Child Safety SYL Eme_Child Safety_1EMN24522_v1 1 2008 12 17 18 05 53...

Страница 5: ...ortant Safety Instructions 2 Trademark Information 3 Child Safety 4 INTRODUCTION Features 5 Supplied Accessories 6 Symbols Used in this Manual 6 Attaching the Base 6 Mounting the Unit onYour Furniture...

Страница 6: ...bottom to ensure it is being installed in the correct direction Spread a thick and soft cloth over a table as shown at step 2 Place the main unit face down onto it Make sure not to damage the screen 2...

Страница 7: ...playback p y E reverse D forward p 22 Press to search backward or forward through the disc p F pause p 22 Press to pause the disc playback p C stop p 22 Press to stop the disc playback p 20 OPTIONS p...

Страница 8: ...on and go into standby mode To completely turn off the unit you must unplug the AC power cord 6 Infrared sensor window Receives infrared rays transmitted from the remote control 7 Standby indicator Li...

Страница 9: ...njoy this unit as a PC monitor 16 Antenna Input jack p 10 17 S Video Composite Video Audio L R Input jacks for VIDEO 1 p 26 18 Component Video Audio L R Input jacks p 10 26 19 Digital Audio Output jac...

Страница 10: ...he cable receiver satellite box If you connect to the unit s ComponentVideo Input jacks connect Analog Audio cables to the Analog Audio L R Input jacks right beside the ComponentVideo connector jacks...

Страница 11: ...ENERGY STAR R R qualification Select Home the unit is set to maximize the energy efficiency for home setting and it can be adjusted through a choice of picture and sound quality according to your pref...

Страница 12: ...justment Use VOL to adjust the volume Volume 30 will be displayed for a few seconds when adjusting the volume Silence Mode Press MUTE to turn off the sound temporarily Mute will be displayed for a few...

Страница 13: ...e Unscaled displays a picture in its original size For 4 3 video signal Normal Wide 16 9 Movie expand Zoom Normal displays a 4 3 picture at its original size Sidebars appear on both edges of the scree...

Страница 14: ...ideo1 The information display will automatically disappear in 1 minute ECO You can turn on ECO Mode to conserve power ECO mode ON is ENERGY STAR R R qualified setting Press ECO once to turn on ECO Mod...

Страница 15: ...ures Language USB Picture Page 16 Adjusting the picture mode or customize the picture quality as your preference Sound Page 16 Adjusting the sound mode equalizer and some other sound functions Setup P...

Страница 16: ...the desired option then press OK On Reduces noise in an image Off Sets noise reduction to off Note This function is disabled when PC input is selected Setting will be in gray Sound Before you begin Y...

Страница 17: ...na 2 Adjust the following items Autoprogram If you switch wires e g between antenna and CATV or if you move the unit to a different area after the initial setting or if you restore the DTV channels yo...

Страница 18: ...Number buttons to enter the number of the channel you want to add then press OK 11 Picture Sound Setup Features Language USB Add Channels For analog channels select a channel to be added using number...

Страница 19: ...to change the settings for digital caption service 1 Use to select Digital Caption Service then press OK 2 Use to select the desired digital caption service then press OK Off Select if you do not want...

Страница 20: ...k ECO fun Link HDMI CEC Location E Sticker Current Software Info On Home 2 Use the Number buttons to enter the 4 digit numbers for your PIN code Setup Features Enter PIN When you have not set up your...

Страница 21: ...the desired rating then press OK repeatedly to switch between View and Block Picture Sound Setup Features Language USB US TV Ratings Lock FV V S L D TV MA TV 14 TV PG TV G TV Y7 TV Y Select View Block...

Страница 22: ...external device that is compatible with the fun Link function Off Disables all fun Link Auto Device Off You can set your device to turn off by interlocking from this unit s power Use to select the de...

Страница 23: ...using procedure below 1 Use to select E Sticker then press OK 2 Use to select Off then press OK Off You can turn off E Sticker Top E Sticker is displayed on top of theTV screen Bottom E Sticker is dis...

Страница 24: ...n the top of the next column Item Detail More Detail Press 1 to display file details below Name Album Date Size and Next Press 1 again to remove file details Start show Press 4 or OK to start the slid...

Страница 25: ...e file is not supported an error message appears When the USB storage device is not recognized try reconnecting it again Motion JPEG file with an extension of avi can only be recognized An extension o...

Страница 26: ...recorder Blu ray DVD recorder with the component video output jacks w with the component video output jacks audio cables audio cables nent video cables compon n mpon cables c o ompo t video cables com...

Страница 27: ...ection and it requires stereo mini plug conversion cable for Analog Audio signal as well DVI OUT audio audio cables cables mini audio cable mini audio cable n ca r r convers HDMI DVI c c HDMI DVI conv...

Страница 28: ...connected to their corresponding colored jacks on the unit When I enter a channel number it changes automatically Many digital channels have alternate channel numbers The unit changes the numbers aut...

Страница 29: ...a distorted picture or hear an unusual sound You may be getting interference from electrical appliances automobiles motorcycles or fluorescent lights Try moving the unit to another location to see if...

Страница 30: ...me of analog broadcasting standards Off the air NTSC signals are no longer being sent by major broadcasting stations in the USA PIN code A stored 4 digit number that allows access to parental control...

Страница 31: ...anguages the default language will be English Other Specifications Terminals Antenna Input VHF UHF CATV 75 unbalanced F type Audio Input RCA jack L R x 8 500mV rms CompositeVideo Input RCA jack x 2 1V...

Страница 32: ...32...

Страница 33: ...stored on any media contained within the product or other additional product or part not cov ered by this warranty Recovery or reinstallation of programs data or other information is not covered under...

Отзывы: