background image

-8-

EN

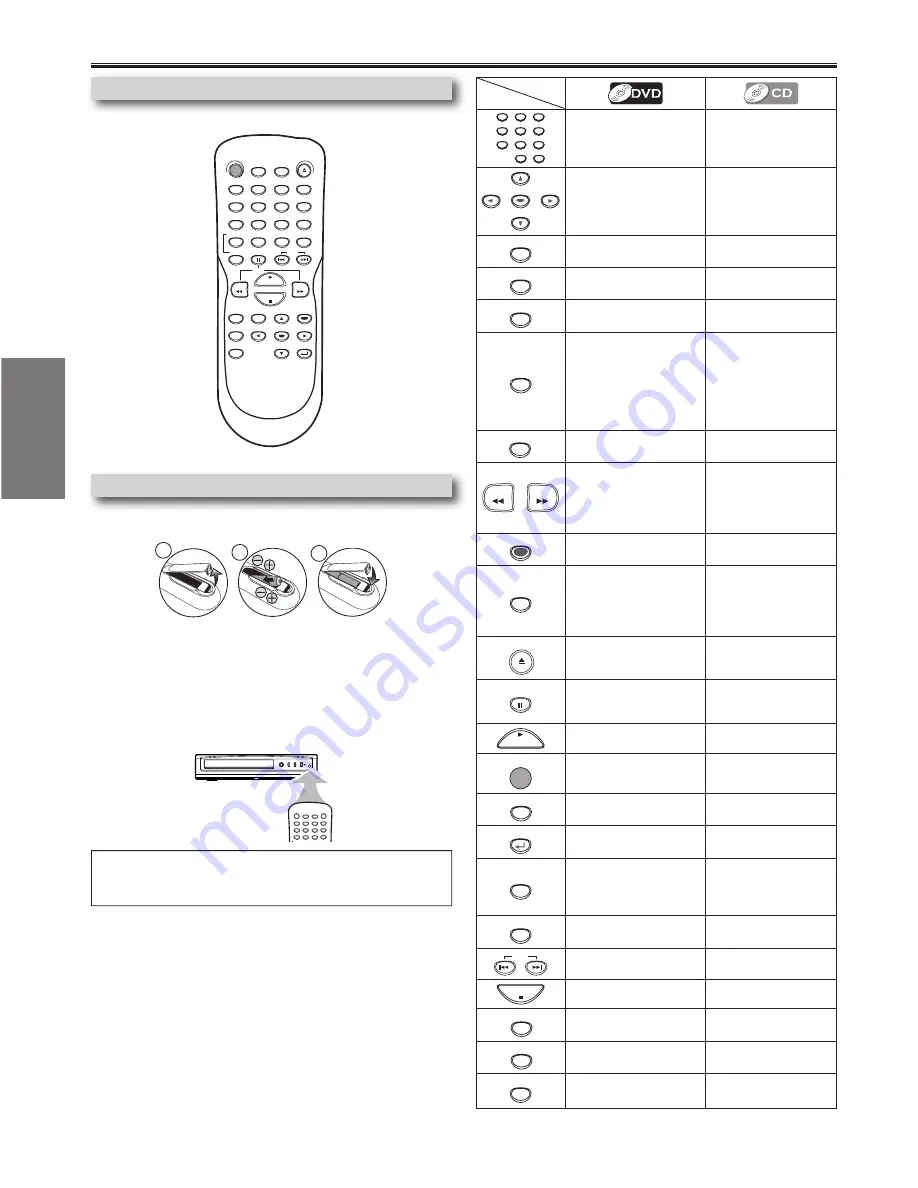
Installing the Batteries for the Remote Control

  Install two AA batteries (supplied) matching the polarity indicated inside battery 

compartment of the remote control.

Remote Control

Keep in mind the following when using the remote control:
• Make sure that there is no obstacle between the remote control and the 

remote sensor on the unit.

• The maximum operable ranges from the unit are as follows.
 - 

Line of sight

:  


approx. 2 feet (7m)

 - 

Either side of the center

approx. 16 feet (5m) within 0°

 - 

Above


approx. 16 feet (5m) within 15°

 - 

Below


approx. 10 feet (m) within 0°

Hint

• Do not mix alkaline and manganese batteries.
• Do not mix old and new batteries.

2

1

3

2

1

3

2

1

3

2

3

1

Setup

About the Remote Control

Button

(Alphabetical order)

Disc

1

2

3

4

5

6

7

8

9

0

+10

• To select chapter or title 

directly.

• To select track 

directly.

ENTER

• To move the cursor and 

determine its position.

• To move the cursor 

and determine its 
position.

A-B

• To repeat between your 

chosen point of A and B.

• To repeat between your 

chosen point A and B.

ANGLE


• To select camera 

angles on a disc.

------

AUDIO

• To select audio lan-

guage on a disc.

• To select STEREO, 

L-ch or R-ch.

CLEAR

• To clear the markers.
• To clear the numbers.
• To cancel the point for 

A-B repeat.

• To clear the markers.
• To remove status 

number in program input.

• To clear the numbers 

entered incorrectly.

• To cancel the point 

for A-B repeat.

DISPLAY

• To display the current 

disc mode.

• To display the current 

disc mode.

REV

FWD

• To search forward/back-

ward through a disc.

• To begin slow forward/

reverse playback in the 
pause mode.

• To search forward/

backward through 
a disc.

MENU

• To call up the Menu on 

a disc.

------

MODE

• To set black level on/off.
• To set virtual surround 

on/off.

• To arrange the 

playing order or play 
randomly.

• To set virtual sur-

round on/off.

OPEN/CLOSE

• To open or close the 

disc tray.

• To open or close the 

disc tray.

PAUSE

• To pause disc playback.
• To advance playback 

one frame at a time.

• To pause disc play-

back.

PLAY

• To begin disc playback.

• To begin disc play-

back.

POWER

• To turn the unit on/off.

• To turn the unit on/off.

REPEAT

• To play a chapter or title 

repeatedly.

• To play a track or disc 

repeatedly.

RETURN

• To return to the previ-

ous operation in menu.

• To return to the previ-

ous operation menu.

SEARCH

MODE

• To search chapter, title 

or time.

• To set or search the 

markers.

• To search tracks.
• To search time.
• To set or search the 

markers.

SETUP

• To call up the DVD 

setup menu.

• To call up the DVD 

setup menu.

SKIP

• To skip chapters or 

titles.

• To skip tracks.

STOP

• To stop playback.

• To stop playback.

SUBTITLE

• To select subtitles on 

a disc.

------

TOP MENU

• To call up the Top Menu 

on a disc.

------

ZOOM

• To magnify part of a 

picture. (x2/x4)

------

POWER

AUDIO

SUBTITLE

ANGLE

REPEAT

CLEAR

A-B

PAUSE

SETUP

TOP MENU

MENU

ENTER

MODE

ZOOM

RETURN

SLOW

SKIP

OPEN/CLOSE

DISPLAY

SEARCH

MODE

1

2

3

4

5

6

7

8

9

0

+10

PLAY

REV

FWD

STOP

DVL245G_E6AC0UD.indd   8

2006/01/10   11:00:14

Содержание DVL245G

Страница 1: ...not have AUDIO VIDEO input jack Owner s Manual Please read before using this unit If you need additional operating assistance after reading this owner s manual please call TOLL FREE 1 800 968 3429 or...

Страница 2: ...locate the receiving antenna 2 Increase the separation between the equipment and receiver Connect the equipment into an outlet on a circuit different from that to which the receiver is connected 4 Con...

Страница 3: ...ed plug 13 Power Cord Protection Power supply cords should be routed so that they are not likely to be walked on or pinched by items placed upon or against them paying particular attention to cords at...

Страница 4: ...ervice and adjustment inside the cabinet call a qualified dealer or an Authorized Service Center Be sure to remove disc and unplug the AC power cord from the output before carrying this unit Moisture...

Страница 5: ...video format and finalized can be played back Unfinalized discs cannot be played back Depending on the recording status of a disc the disc may not be played back at all The picture or sound may not be...

Страница 6: ...pictures may be distorted due to the copy protection system Admiral AUX Curtis Mathis LINE1 LINE2 00 90 91 92 9 GE INPUT TV VCR 00 90 91 92 9 Hitachi INPUT AUX JVC VIDEO VIDEO1 VIDEO2 VIDEO Kenwood A...

Страница 7: ...int Playing a DVD using incorrect settings may generate noise distortion and may also damage the speakers Connection to an Audio System Rear Terminals AUDIO OUT L R DIGITAL AUDIO OUT COAXIAL VIDEO OUT...

Страница 8: ...incorrectly To cancel the point for A B repeat DISPLAY To display the current disc mode To display the current disc mode REV FWD To search forward back ward through a disc To begin slow forward rever...

Страница 9: ...Some DVDs may start playback from title 2 or 3 due to specific programs During the playback of a two layered disc pictures may stop for a moment This happens while the 1st layer is being switched to...

Страница 10: ...y when the repeat setting is active C Chapter repeat T Title repeat A B A B repeat 11 16 0 00 00 0 03 30 1 3 0 00 00 1 23 45 T L1 BIT RATE The amount of audio and video data currently being read Layer...

Страница 11: ...y if the total time of the title or track is less than 10 minutes Press CLEAR to erase the incorrect input at step 2 1 2 3 4 5 6 7 8 9 0 This feature allows you to assign a specific point on a disc to...

Страница 12: ...e discs or during repeat A B playback Hint To repeat the current track in the random selections press REPEAT repeatedly until TRACK appears during playback To repeat the entire random selections press...

Страница 13: ...u Refer to the manual accompanying the discs for details Hint For CD playback only The setting will be kept even if the unit is turned off On Audio CD s Virtual Surround will not be effective if the s...

Страница 14: ...AL ON ON BITSTREAM SETUP DISPLAY TV ASPECT STILL MODE 4 3 LETTER BOX AUTO SETUP LANGUAGE AUDIO SUBTITLE DISC MENU PLAYER MENU ORIGINAL OFF ENGLISH ENGLISH 1 Press SETUP in the stop mode SETUP QUICK CU...

Страница 15: ...3 PAN SCAN 16 9 WIDE ANGLE ICON ON AUTO POWER OFF ON TV ASPECT 4 3 LETTER BOX STILL MODE AUTO ANGLE ICON ON AUTO POWER OFF ON ON OFF OFF ON TV ASPECT 4 3 LETTER BOX STILL MODE AUTO STILL MODE AUTO FIE...

Страница 16: ...t to ON to show the angle icon when multiple camera angles are available during DVD playback AUTO POWER OFF Default ON Set to ON to turn this unit off automatically after 30 minutes of no use TV ASPEC...

Страница 17: ...lfunction Picture freezes momentarily during playback Check the disc for finger prints scratches and clean with a soft cloth wiping from center to edge Disc can t be played Clean the disc Ensure the d...

Страница 18: ...UCT WITHOUT PRIOR NOTICE To locate your nearest Authorized Service Center or for gen eral service inquiries please contact us at FUNAI CORPORATION Customer Service Tel 1 800 968 3429 http www Sylvania...

Страница 19: ...borrar el punto para la repetici n A B Para borrar los marcadores Para eliminar el N de estado en la entrada de programa Para borrar los n meros mal entrados Para borrar el punto para la repetici n A...

Страница 20: ...rsor and determine its position A B To repeat between your chosen point of A and B To repeat between your chosen point A and B ANGLE To select camera angles on a disc AUDIO To select audio lan guage o...

Отзывы: