background image

– 21 –

EN

1A29

1   

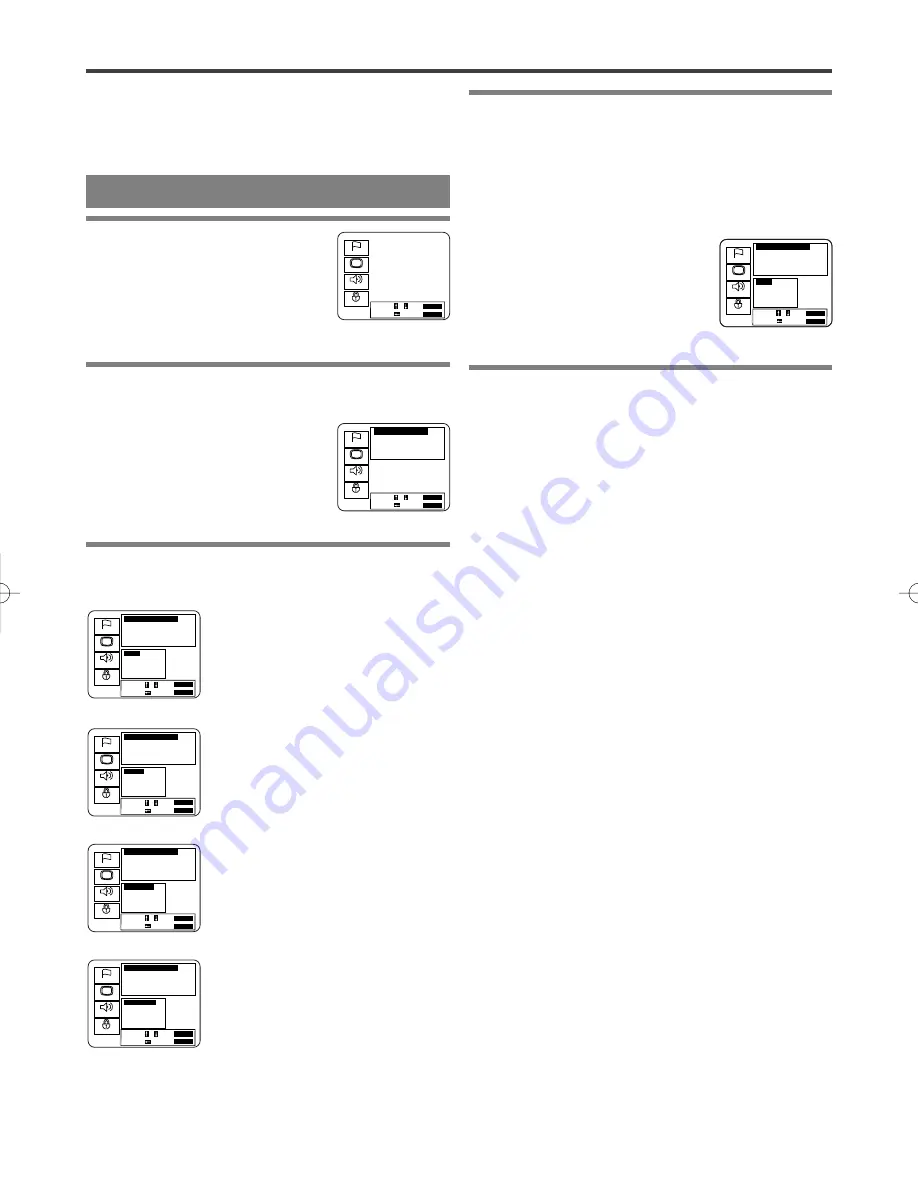
Press the SETUP button.

¡

The setup screen appears.

2   

Press the 

K

/

L

buttons to select Language,

and then press the ENTER button.

3   

Press the 

K

/

L

buttons to select an item, and

then press the ENTER button.

(Voice is played back in selected
language.)

(Subtitles are shown in selected
language.)

(The disc menu appears in select-
ed language.)

(The on-screen display appears in
selected language.)

4   

Press the 

K

/

L

buttons to select a desired

item, and then press the ENTER button.

¡

If Other is selected on the Audio, Subtitle or Disc
Menu setting screen, the Language Code setting
screen will appear. Press the numeric buttons to
enter the desired language code while referring to
the list on page 25.

5   

Press the SETUP button.

¡

The setup mode will be canceled and the ordinary
screen will appear.

Note

¡

Language Setting for Audio and Subtitle is not avail-
able with some discs. Then use the Audio and
Subtitle button. Details are on pages 18 and 19.

Note

¡

When you change the setup items, press the STOP
button if you are in playback mode.

CHANGING THE SETUP ITEMS

LANGUAGE SETTINGS

Language

Display

Audio

Parental

Select  :      /      Set  :

 ENTER

Cancel :             Exit : 

SETUP

Language Controls

Audio

English

Subtitle

English

Disc Menu

English

Player Menu

English 

Select  :      /      Set  :

 ENTER

Cancel :             Exit : 

SETUP

Language

Display

Audio

Parental

Audio

Irish
Portuguese
Dutch

Other       _.......

o

Language Controls

Audio

English

Subtitle

English

Disc Menu

English

Player Menu

English 

Language

Display

Audio

Parental

Select  :      /      Set  :

 ENTER

Cancel :             Exit : 

SETUP

Language Controls

Audio

English

Subtitle

English

Disc Menu

English

Player Menu

English 

Audio

Original

English
French
Spanish

p

o

Language

Display

Audio

Parental

Select  :      /      Set  :

 ENTER

Cancel :             Exit : 

SETUP

Language Controls

Audio

English

Subtitle

English

Disc Menu

English

Player Menu

English 

Subtitle

Off

English

Spanish
French

p

o

Select  :      /      Set  :

 ENTER

Cancel :             Exit : 

SETUP

Language

Display

Audio

Parental

Language Controls

Audio

English

Subtitle

English

Disc Menu

English

Player Menu

English 

Disc Menus

Original

English
French
Spanish

p

o

Select  :      /      Set  :

 ENTER

Cancel :             Exit : 

SETUP

Language

Display

Audio

Parental

Language Controls

Audio

English

Subtitle

English

Disc Menu

English

Player Menu

English


Player Menu

English

Français
Español

Select  :      /      Set  :

 ENTER

Cancel :             Exit : 

SETUP

Language

Display

Audio

Parental

E5502CD  01.3.30  1:11 PM  Page 21

Содержание DVL100CB

Страница 1: ...ional assistance for set up or operating after reading owner s manual please call TOLL FREE 1 800 287 4871 Please read before using this equipment DVD PLAYER DVL100CB OPEN CLOSE PAUSE SEARCH POWER SKI...

Страница 2: ...ect the interference by one or more of the following measures 1 Reorient or relocate the receiving antenna 2 Increase the separation between the equipment and receiver 3 Connect the equipment into an...

Страница 3: ...ly cords should be routed so that they are not likely to be walked on or pinched by items placed upon or against them paying par ticular attention to cords at plugs convenience receptacles and the poi...

Страница 4: ...rial No ABOUT COPYRIGHT Unauthorized copying broadcasting public performance and lending of discs are prohibited This product incorporates copyright protection technology that is protected by method c...

Страница 5: ...13 USING THE DVD MENUS 13 USING THE TITLE MENU 14 PAUSING PLAYBACK OR DISPLAYING A STILL PICTURE 14 RESUMING PLAYBACK FROM THE POINT WHERE PLAYBACK STOPPED 14 STEPPING THROUGH FRAMES 14 FAST FORWARD R...

Страница 6: ...on of discs This player automatically detects if a loaded disc is DVD or audio CD On screen display Information about the current operation can be displayed on a TV screen allowing you to confirm the...

Страница 7: ...unction may result Video CD Never play back otherwise malfunction may result Any other discs without compatibility indications PLAYABLE DISCS DVD Video 12 cm 12 cm Approx 4 h single sided Approx 8 h d...

Страница 8: ...of the current chapter or track 11 OPEN CLOSE Button page 13 Press to insert discs into or remove them from the tray 12 Disc loading tray 13 DISPLAY Button page 20 Displays the current status on the T...

Страница 9: ...current title or track has been played back When a chapter or track has switched the number of a new title chapter or track is displayed in the search mode or when the skip up down button is pressed S...

Страница 10: ...sure to turn off the power to all components in the system before connecting another component Refer to the Owner s Manuals for your TV stereo system and any other components to be connected to the DV...

Страница 11: ...INPUT jack To COMPONENT VIDEO OUT jack To Right red and Left white AUDIO OUT jacks To ANALOG AUDIO INPUT jacks Fig 5 Notes The audio source on a disc in a 5 1 channel Dolby Digital surround format ca...

Страница 12: ...ecting another component Refer to the Owner s Manuals for the components to be connected to the DVD player If connected to a Dolby Digital decoder set Dolby Digital to on for audio output in the setup...

Страница 13: ...is case refer to USING THE TITLE MENU 5 Press the STOP button to stop play CD DVD Notes A prohibited icon may appear at the top right on the TV screen during operation warning that a prohibited operat...

Страница 14: ...button during playback Playback will pause with sound muted 2 Press the PLAY button to resume playback CD DVD Pause F Play B STEPPING THROUGH FRAMES 1 Press the PAUSE STILL button while play back is p...

Страница 15: ...not available with audio CDs The reverse of slow playback is not available DVD 1 16 1 8 1 2 D Button FWD STARTING FROM A DESIRED TRACK CD TRICKS WITH THE SKIP BUTTONS H G If the SKIP button G is pres...

Страница 16: ...the REPEAT button For DVDs A single title or chapter is played back repeatedly Pressing the REPEAT button cycles the display on the screen as follows For audio CDs The whole disc or a single track is...

Страница 17: ...in the programmed order While the program is being played back the STOP button works as follows Press the STOP button once and then the PLAY button again playback will restart from the point where the...

Страница 18: ...uages e g DVDs which allow audio language setting on the disc menu Operation varies between discs so refer to the manual accompanying the disc If a desired language is not shown after pressing the Aud...

Страница 19: ...in the setup mode every time the power is turned on or discs are replaced If that language is not available on a disc a language defined by the disc is selected It may take time to display the subtit...

Страница 20: ...ck and press the ENTER button Clear the marker Using K L button position the cursor on to the marker number to be cleared and press the CLEAR button To clear all markers place the cursor on All Clear...

Страница 21: ...SETUP ITEMS LANGUAGE SETTINGS Language Display Audio Parental Select Set ENTER Cancel Exit SETUP Language Controls Audio English Subtitle English Disc Menu English Player Menu English Select Set ENTE...

Страница 22: ...o Parental Select Set ENTER Cancel Exit SETUP Display Controls TV Aspect 4 3 Pan Scan On Screen Info On Panel Display Bright Angle Icon On p Language Display Audio Parental Select Set ENTER Cancel Exi...

Страница 23: ...r the DVD recorded in PCM 96kHz 96kHz or 48kHz AUDIO SETTINGS Language Display Audio Parental Select Set ENTER Cancel Exit SETUP Audio Controls Digital Audio Out Dynamic Range On Downmix Mode Dolby Su...

Страница 24: ...s the ENTER button 3 Press the numeric buttons to enter the 4 digit password and then press the ENTER button When doing this for the first time enter any 4 digits That number will be used as the passw...

Страница 25: ...5 7 4 7 5 7 5 7 5 7 5 8 5 7 5 9 5 7 6 0 5 7 6 1 5 7 6 5 5 7 6 7 5 7 7 1 5 8 4 7 5 8 6 0 5 8 6 1 5 8 6 6 69 70 71 72 73 74 75 76 77 78 79 80 81 82 83 84 85 86 87 88 89 90 91 92 93 94 95 96 97 98 99 100...

Страница 26: ...cted audio component is off Wrong audio output settings Wrong input settings on the connected audio component Connect the audio cables firmly Turn the power of the audio component on Correct the audio...

Страница 27: ...TICAL PICKUP UNIT IS DIRTY If the player still does not perform properly when it is operated while referring to the relevant sections and to TROUBLESHOOTING GUIDE in this Owner s Manual the laser opti...

Страница 28: ...t limitation 0 001 W PEAK EIAJ Connections S Video output Mini DIN 4 pin jack 75 ohm Video output One RCA connector 1 Vpp 75 ohm Coaxial digital audio output One pin jack 500mVpp 75 ohm Analog audio o...

Страница 29: ...ies connecting cables cassette tapes compact discs This warranty shall in addition not apply to damages due to handling transportation unpacking set up installation customer adjustments that are cover...

Страница 30: ......

Страница 31: ...i apr s lecture de ce guide d utilisation vous avez besoin d une aide suppl mentaire pour la configuration ou le remplacement veuillez composer le num ro d APPEL GRATUIT 1 800 287 4871 LECTEUR DE DVD...

Страница 32: ...es mesures suivantes 1 R orienter ou changer l emplacement de l antenne de r ception 2 Augmenter la distance s parant l appareil du r cepteur 3 Brancher l appareil une prise faisant partie d un circui...

Страница 33: ...laris 13 PROTECTION DES CBLES D ALIMENTATION Les c bles d alimentation devront tre dispos s de mani re ce que l on ne risque pas de marcher dessus ni qu ils soient cras s ou coinc s en pla ant des obj...

Страница 34: ...orisation la diffusion la pr sentation publique et le pr t de disques sont interdits Une technologie de protection du copyright est int gr e ce produit qui est prot g par une m thode de r clamation de...

Страница 35: ...N DU MENU DES TITRES 14 PAUSE DE LECTURE OU AFFICHAGE D UNE IMAGE FIXE 14 REPRISE DE LA LECTURE DEPUIS LE POINT O LA LECTURE S EST ARR T E 14 PASSAGE D UNE VUE L AUTRE 14 AVANCE RAPIDE ARRI RE FAST FO...

Страница 36: ...nts D tection automatique des disques Ce lecteur d tecte automatiquement si le disque charg est un DVD ou un CD audio Affichage sur l cran Les informations concernant l op ration en cours peuvent tre...

Страница 37: ...ourrait se produire CD Photo Ne jamais en effectuer la lecture un mauvais fonctionnement pourrait se produire CD Vid o Ne jamais en effectuer la lecture un mauvais fonctionnement pourrait se produire...

Страница 38: ...s le d but du chapitre ou de la piste 10 Touche SAUTER VERS LE BAS SKIP DOWN t l commande Effectue la lecture depuis le d but du chapitre en cours ou de la piste en cours 11 Touche OUVRIR FERMER OPEN...

Страница 39: ...NEMENT MISE EN PLACE DES PILES Reste allum lorsque la fonction R p tition A B est activ e Reste allum lorsque la lecture du disque ins r est effectu e Affiche la dur e pendant laquelle la lecture du t...

Страница 40: ...ors tension avant de connecter un autre composant Se r f rer au Guide d utilisation du t l viseur du syst me st r o et de tout autre composant devant tre con nect au lecteur de DVD R L AUDIO OUT VIDEO...

Страница 41: ...acks d entr e num rique platine MD platine DAT etc Vers le jack COMPONENT VIDEO INPUT Vers le jack COMPONENT VIDEO OUT Vers les jacks Droite rouge et Gauche blanc AUDIO OUT Vers les jacks ANALOG AUDIO...

Страница 42: ...emarques Veiller mettre tous les composants du syst me hors tension avant de connecter un autre composant Se r f rer au Guide d utilisation pour les com posants devant tre connect s au lecteur de DVD...

Страница 43: ...para t sur l cran Dans ce cas se r f rer UTILISATION DU MENU DES TITRES CD DVD 5 Appuyer sur la touche ARR T STOP pour arr ter la lecture Remarques Une ic ne Interdit peut appa ra tre en haut et droit...

Страница 44: ...IMAGE FIXE 1 Appuyer sur la touche PAUSE pendant la lecture La lecture s arr te momentan ment avec le son mis en sourdine 2 Appuyer sur la touche LECTURE PLAY pour reprendre la lecture CD DVD PASSAGE...

Страница 45: ...lecture normale Remarques La lecture au ralenti n est pas disponible sur les CD audio La lecture au ralenti arri re n est pas disponible DVD 1 16 1 8 1 2 D Button FWD ASTUCES POUR L UTILISATION DES BO...

Страница 46: ...hapitre simple est r p t e Lorsque la touche R P TITION est press e l af fichage passe par un cycle sur l cran comme suit Pour les CD audio La lecture du disque entier ou d une piste simple est r p t...

Страница 47: ...ture du programme est effectu e la touche ARR T STOP fonctionne comme suit Appuyer une fois sur la touche ARR T STOP puis de nouveau sur la touche LECTURE PLAY La lecture recommence partir du point o...

Страница 48: ...ettent le r glage de la langue audio sur le menu du disque Le fonctionnement variant entre les disques se r f rer au manuel qui accompagne le disque Si la langue d sir e ne s affiche pas apr s avoir a...

Страница 49: ...celle qui a t s lectionn e dans le mode Configuration chaque fois que l alimentation est mise sous tension ou chaque fois que le disque est remplac Si cette langue n est pas disponible sur le disque u...

Страница 50: ...ENTER pour activer la fonction Marqueur R gler le marqueur l aide de la touche K L positionner le curseur sur le num ro du marqueur indiqu comme Non r gl Appuyer sur la touche ENTRER ENTER lorsque l...

Страница 51: ...sur la touche ARR T STOP si le mode Lecture est engag CHANGEMENT DES ARTICLES DE CONFIGURATION R GLAGE DES LANGUES Select Set ENTER Cancel Exit SETUP Langue Affichage Son Parent Contr le de la Langue...

Страница 52: ...n a t press e pen dant 30 minutes AFFICHAGE DES R GLAGES Select Set ENTER Cancel Exit SETUP Langue Affichage Son Parent Contr le d Affichage Aspect TV 4 3 Pan Scan Affichage Info EF Affichage du VFD...

Страница 53: ...compress m me lorsque cette fonction est r gl e sur Off Sous chantillon D faut 48KHz R gler la sortie pour le DVD enregistr en PCM 96KHz 96KHz ou 48KHz R GLAGES AUDIO Select Set ENTER Cancel Exit SET...

Страница 54: ...a touche ENTRER ENTER 3 Appuyer sur les touches num riques pour entrer le mot de passe de quatre chiffres puis appuyer sur la touche ENTRER ENTER Lorsque ceci est effectu pour la premi re fois entrer...

Страница 55: ...7 4 7 5 7 5 7 5 7 5 8 5 7 5 9 5 7 6 0 5 7 6 1 5 7 6 5 5 7 6 7 5 7 7 1 5 8 4 7 5 8 6 0 5 8 6 1 5 8 6 6 69 70 71 72 73 74 75 76 77 78 79 80 81 82 83 84 85 86 87 88 89 90 91 92 93 94 95 96 97 98 99 100 1...

Страница 56: ...auvais r glages d entr e sur le composant audio connect Bien connecter les c bles audio Mettre l alimentation du composant audio sous tension Corriger les r glages de la sortie audio Corriger les r gl...

Страница 57: ...i le lecteur ne fonctionne toujours pas correctement tapr s s tre r f r aux chapitres correspondants et au GUIDE DE D PANNAGE de ce Guide d utilisation l unit de pick up du laser optique peut tre sale...

Страница 58: ...nnexions Sortie S Vid o Jack 4 broches mini DIN 75 ohm Sortie vid o Un connecteur RCA 1 Vpp 75 ohm Sortie audio num rique coaxiale Jack une broche 500m Vpp 75 ohm Sortie audio analogique Deux connecte...

Страница 59: ...service non authoris un entretien incorrect des r parations ou modifications effectu es par le client les mauvais traitements ou un fonctionnement non appropri la n gligence un accident un incendie un...

Отзывы: