Sylvania DVC800CC Скачать руководство пользователя страница 29

1   

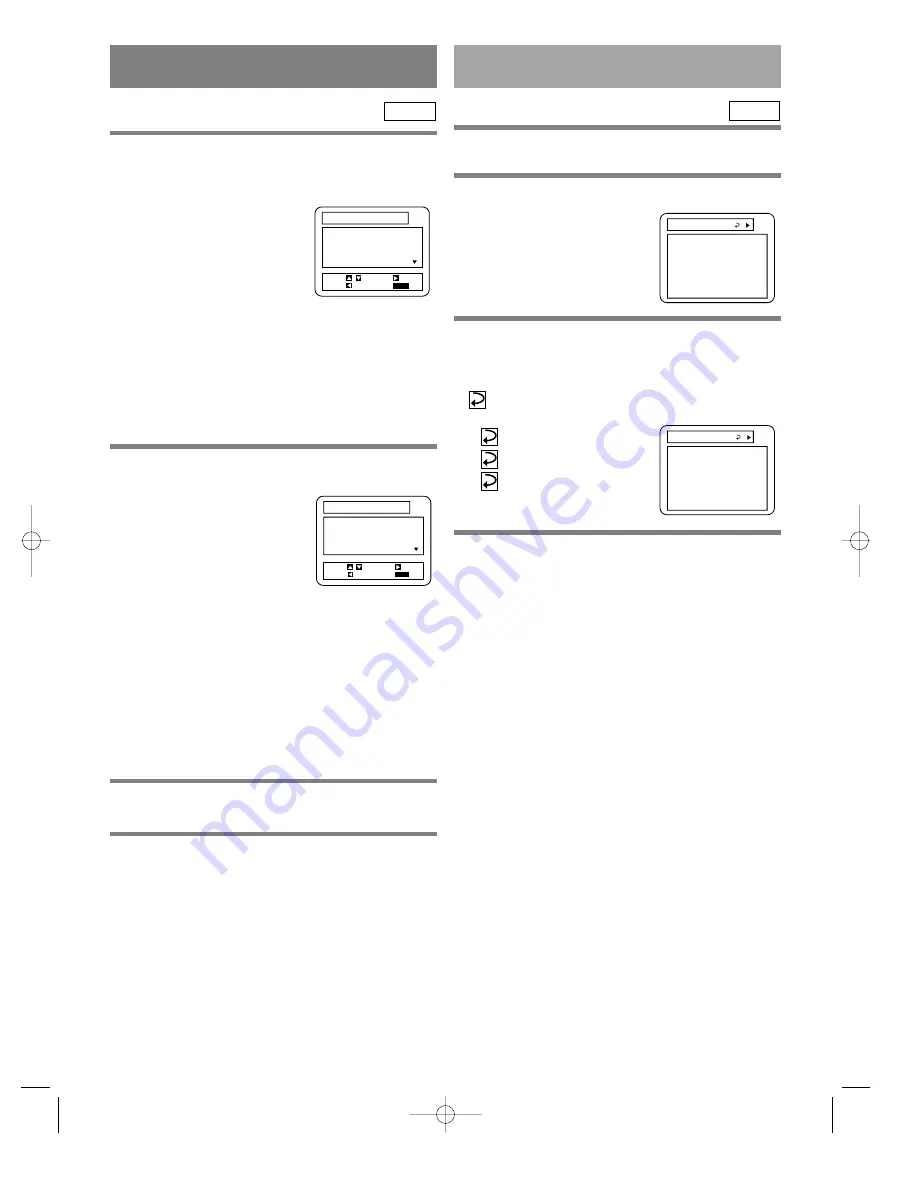
Insert an MP3 file recorded on disc.

¡

The MP3 menu screen is displayed.

¡

Folders are referred to as
“Albums” and files are
referred to as “Tracks”.

¡

“+” appears at the beginning
of the album name.

MP3

– 29 –

EN

1L25

PLAYING AN MP3 DISC

¡

If all the tracks cannot be displayed at once on the
screen, “

L

” appears to go to the next page. If there

is a previous page, “

K

” appears on screen. To the

left of “

L

”, the current page and the total number of

pages are displayed.

¡

The player can recognize 255 albums and tracks
altogether. 

2   

Using the 

K

/

L

buttons, select a album or a

track to be played.

[When a TRACK is selected]

Starting from the selected track, 

the rest of the tracks will be 

played in order.

[When an ALBUM is selected]

Press the 

B

button. The track selection screen shows

up. Using the 

K

/

L

buttons, select the tracks to be

played. 

¡

Choose “FIRST PLAY”, and the albums and tracks
will be played from the beginning of the disc.

¡

Press the TITLE button, and the top hierarchy will
be called back.

¡

Albums can be played up to the 8th hierarchy.

3   

Press the PLAY button.

¡

Playback will start.

4   

To stop playing, press the STOP button.

FIRST PLAY

+ALBUM01
+ALBUM02
+ALBUM03
+ALBUM04

1/15

VOLUME LABEL

START: 

PLAY

SELECT:       /

ENTER:

RETURN:

+ALBUM11
+ALBUM12
+ALBUM13
+ALBUM14
+ALBUM15

ALBUM01

START: 

PLAY

SELECT:      /

ENTER:

RETURN:

CHANGING THE ON-SCREEN 

DISPLAY DURING MP3 DISC PLAY

The information on an MP3 disc in play can be
checked.

1   

Press the DISPLAY button during playback.

¡

The track currently being 
played will be highlighted.

2   

Press the DISPLAY button again.

¡

The album name being displayed will be replaced by
the elapsed time of the track.

¡

will be displayed when repeat play has been

selected.

T: Track repeat

A: Album (folder) repeat

D: Disc repeat

MP3

TRACK11

TRACK12
TRACK13
TRACK14
TRACK15

ALBUM NAME

A

3   

Press the DISPLAY button again, and the dis-
play screen disappears.

TRACK11

TRACK12
TRACK13
TRACK14
TRACK15

0:02:31               

A

Содержание DVC800CC

Страница 1: ...If you need additional assistance for set up or operating after reading owner s manual please call TOLL FREE 1 800 287 4871 Please read before using this equipment DVD PLAYER with VIDEO CASSETTE RECO...

Страница 2: ...oduct s enclosure that may be of sufficient magnitude to constitute a risk of electric shock to persons The exclamation point within an equilateral triangle is intended to alert the user to the pres e...

Страница 3: ...3 Outdoor Antenna Grounding If an outside antenna or cable system is connected to the video product be sure the antenna or cable system is grounded so as to provide some protection against voltage sur...

Страница 4: ...pying broadcasting public performance and lending of discs are prohibited This product incorporates copyright protection technology that is protected by claims of certain U S patents and other intelle...

Страница 5: ...VIDEO TAPE 22 MTS Multi Channel Television Sound SYSTEM 22 AUTO REWIND 23 REAL TIME TAPE COUNTER 23 PLAYING A DISC 23 PLAYING A DVD VIDEO OR AN AUDIO CD 23 USING THE DVD MENUS 23 USING THE TITLE MENU...

Страница 6: ...op mode DVD On screen display Information about the current operation can be displayed on the TV screen allowing you to confirm the currently active functions such as program playback on the TV screen...

Страница 7: ...not block the ventilation holes on the sides of the DVD VCR Avoid locations subject to strong vibration or strong magnetic fields Playback S VHS Quasi Playback SQPB Allows you to view a tape recorded...

Страница 8: ...Any other discs without compatibility indications PLAYABLE DISCS DVD Video 12 cm Approx 4 h single sided Approx 80 min single sided 8 cm Logo Maximum Playback Time Contents Disc Type Sound and Picture...

Страница 9: ...on on the front panel 4 CASSETTE COMPARTMENT 5 REC OTR Light page 20 Lights up during recording 6 TIMER SET Light page 21 This light glows when the DVD VCR is in standby mode or off for a timer record...

Страница 10: ...the beginning of the current chapter or track Hold down to fast reverse playback 24 STOP Button DVD page 23 Stops operation of the disc 25 OPEN CLOSE Button page 23 Press to insert discs into or remo...

Страница 11: ...ing clock or timer program Press to select the setting modes from the on screen menu 51 VCR Button page 13 Press to select VCR mode for the remote control You can switch the OUTPUT mode either by pres...

Страница 12: ...s Connect audio cables coming from the audio out jacks of a camcorder another VCR or an audio source here 59 DVD VCR AUDIO OUT Jacks Connect the supplied audio cables here and to the Audio In jacks of...

Страница 13: ...SLOW VCR TV 100 DISPLAY PAUSE PLAY STOP RECORD ENTER RETURN TITLE MENU SETUP CLEAR C RESET ZOOM MODE A B ANGLE SEARCH MODE REPEAT SUBTITLE DVD VCR DVD button VCR button OUTPUT button DVD OUTPUT Light...

Страница 14: ...ect the DVD VCR directly to a TV If the A V cables are connected to a VCR pictures may be distorted due to the copy protection system DVD VCR TO TV CONNECTION 1 Disconnect the AC power cord of the TV...

Страница 15: ...CR TO TV CONNEC TION on page 14 CONNECTING TO AN AMPLIFIER EQUIPPED WITH DIGITAL INPUT JACKS SUCH AS MD DECK OR DAT DECK Use an audio coaxial digital cables not included for the audio connections Conn...

Страница 16: ...olby Laboratories Notes Be sure to turn off the power to all components in the system before connecting another component Refer to the Owner s Manuals for the components to be connected to the DVD VCR...

Страница 17: ...t follow the steps below before attempting to play or record a video tape 1 You need to connect the antenna or cable to the DVD VCR first Then connect the DVD VCR power plug to a standard AC outlet 2...

Страница 18: ...dly Then press the F FWD button 6 Set AM or PM Press the PLAY button or the STOP button repeatedly TO CHANGE THE ON SCREEN LANGUAGE 1 Press the MENU button twice to call up the main menu If you have a...

Страница 19: ...l selected on the TV 3 Begin playback by pressing the PLAY button Tracking adjustment will be done automatically Digital Tracking function when you start playback To adjust the tracking manually press...

Страница 20: ...n Change the recording length by pressing the REC OTR button repeatedly VCR REC OTR 0 30 OTR 1 00 Normal recording OTR 8 00 OTR 7 30 TIMER RECORDING You may set the DVD VCR to start recording while yo...

Страница 21: ...tails of the selected program appears on the TV screen Go to the digit you want to change by pressing the F FWD or the REW button Then enter correct num bers by pressing the PLAY or the STOP button Yo...

Страница 22: ...ou play a VHS tape or receive a broadcast on the DVD VCR tuner channel you are watching the current status will appear when you press the DISPLAY button on the remote control When you record a MTS bro...

Страница 23: ...the pictures may appear distorted and the playback operation may stop In such cases clean the disc and unplug the power cord and then plug it again before resuming playback With DVDs that use titles f...

Страница 24: ...SING PLAYBACK OR DISPLAYING A STILL PICTURE 1 Press the PAUSE button during playback Playback will pause with sound muted 2 Press the PLAY button to resume playback CD DVD F B STEPPING THROUGH FRAMES...

Страница 25: ...n FWD STARTING FROM A DESIRED TRACK 1 Press the Number buttons to enter the desired track number The selected track will be located and playback will start CD TR 5 PLAYING FROM A DESIRED TITLE OR A CH...

Страница 26: ...ODE button in stop mode The program setting menu screen will appear 2 Press the MODE button again CD You can define the part to be called back 1 Press the SEARCH MODE button three times during playbac...

Страница 27: ...program random playback will be per formed repeatedly Notes Repeat playback is not available with some discs The REPEAT setting will be cleared when moving to an other title chapter or track Repeat pl...

Страница 28: ...k and random playback are not available during program playback Program settings will be cleared when the power is turned off or the disc loading tray is opened Press the MODE button to check the prog...

Страница 29: ...albums and tracks will be played from the beginning of the disc Press the TITLE button and the top hierarchy will be called back Albums can be played up to the 8th hierarchy 3 Press the PLAY button Pl...

Страница 30: ...3 DISC IN A PROGRAM 2 Use the ARROW buttons L K to select a track Then press the ENTER button to save it in a program When an album name is highlighted press the L button and the next hierarchy is dis...

Страница 31: ...yed when you first press the AUDIO button If the desired language is not shown after pressing the Audio button several times the disc does not have an audio source in that language The audio language...

Страница 32: ...the DVD being played The subtitle language cannot be changed if the subtitles are recorded in a single language on the DVD being played Pressing the SUBTITLE button cycles the subtitle language from...

Страница 33: ...s TIME Elapsed time of the current track and remaining time of the current track 2 Press the DISPLAY button again ALL 4 12 0 13 45 0 45 40 B ALL Current track number the total number of tracks TIME El...

Страница 34: ...ils are on pages 31 and 32 You can also select an item by entering the number besides it using the Number buttons When you change the setup items press the STOP button if you are in playback mode Whil...

Страница 35: ...DISPLAY SETTINGS 1 LANGUAGE 2 DISPLAY 3 AUDIO 4 PARENTAL SET UP EXIT SETUP CANCEL RETURN SELECT SET ENTER 1 LANGUAGE 2 DISPLAY 3 AUDIO 4 PARENTAL SET UP EXIT SETUP CANCEL RETURN SELECT SET ENTER 1 TV...

Страница 36: ...and then press the ENTER button When playing a disc with copyright protection If you select 96 kHz copyright protection will be activated and no sound will come out If you select AUTO sound will be d...

Страница 37: ...the above Steps 3 5 again 1 Press the SETUP button in STOP mode The setup screen will appear 2 Press the K L buttons to select PARENTAL and then press the ENTER button 3 Press the Number buttons to e...

Страница 38: ...79 80 81 82 83 84 85 86 87 88 89 90 91 92 93 94 95 96 97 98 99 100 101 102 103 104 105 106 107 108 109 110 111 112 113 114 115 116 117 118 119 120 121 122 123 124 125 126 127 128 129 130 131 132 133 1...

Страница 39: ...mode Check if the green VCR OUTPUT light is lit Then set it to the TV position by pressing the VCR TV button The VCR TV light goes off Video or color fades in and out You cannot copy a copyrighted vid...

Страница 40: ...ed to be cleaned 1 Please visit your local Audio Video store and pur chase a good quality VHS Video Head Cleaner 2 If a Video Head Cleaner does not solve the prob lem please call our help line at 1 80...

Страница 41: ...VHF Channel 3 or 4 Power source 120 V AC 10 60 Hz 0 5 Power consumption 25 W standby 7 2 W Operating temperature 5 C to 40 C Dimensions W 17 1 8 435 mm H 4 99 mm D 10 1 2 266 mm Weight 8 8 lbs 4 kg De...

Страница 42: ...apes compact discs This warranty shall in addition not apply to cleaning video audio heads pinch rollers tape transport system damages due to handling transportation unpacking set up installation cust...

Отзывы: