


PREPARATION FOR USE
OPERATIONS
WATCHING A TV PROGRAM
1) Press the POWER button to turn on the TV.
2) Select the desired channel with the CH(annel)
▲
or
▼
button.
3) Adjust the volume to the desired listening level using the VOL(ume)
▲
or
▼
button.
4) Adjust picture controls for a natural looking image. (See "PICTURE ADJUSTMENT".)
SETTING THE SLEEP TIMER
The sleep timer function enables you to shut off the power without pressing
the POWER button after a desired time period.
1) Press the POWER button to turn on the TV and press the SLEEP button
on the remote control .
2) You may change the sleep time by pressing the SLEEP
button on the remote control repeatedly. The timer can be
set up to 90 minutes, 10 minutes each time the SLEEP
button is pushed. (The timer display counts up and sleep
timer will be displayed on the screen when you press the
SLEEP button on remote control.)
Note: When you disconnect the unit from the AC outlet, or if you have a power failure, the
sleep time will be lost.
CLOSED CAPTION SELECTION
SLEEP 10
To cancel the sleep timer:
Press the SLEEP button repeated-
ly until "SLEEP 0" is displayed.
You may view specially labeled (cc) TV pro-
grams, movies, news, prerecorded tapes, etc.
with either a dialogue caption or text display
added to the program.
1) Press the MENU button so that the menu
display appears on the TV screen.
2) Press the CH(annel)
▲
or
▼
button to point
to "CAPTION".
3) Press the VOL(ume)
▲
or
▼
button to select
the mode you wish.
4) When done, press the MENU button to exit
the menu.
PICTURE
CHANNEL SET
[ENGLISH]ESPAÑOL
V-CHIP SET UP
CAPTION
[OFF]
PICTURE
CHANNEL SET
[ENGLISH]ESPAÑOL
V-CHIP SET UP
CAPTION [ C1]
PICTURE
CHANNEL SET
[ENGLISH]ESPAÑOL
V-CHIP SET UP
CAPTION [ C2]
PICTURE
CHANNEL SET
[ENGLISH]ESPAÑOL
V-CHIP SET UP
CAPTION [ T1]
PICTURE
CHANNEL SET
[ENGLISH]ESPAÑOL
V-CHIP SET UP
CAPTION [ T2]
: Press the VOL(ume)
▲
or
▼
button.
GAME MODE
Set to the most suitable position for TV
GAME.
[+] : ON
[ - ] : OFF
BRIGHT
Adjust until the whitest parts of the picture are
as bright as you prefer.
[+] : increase brightness
[ - ] : decrease brightness
CONTRAST
Adjust to increase or decrease contrast.
[+] : increase contrast
[ - ] : decrease contrast
COLOR
Adjust to be brilliant or pale color.
[+] : be brilliant color
[ - ] : be pale color
TINT
Adjust to obtain natural skin tones.
[+] : greenish tone
[ - ] : reddish tone
Notes:
●
In the above steps, the picture adjustment
display will disappear from the TV screen
automatically after about 10 seconds if you
do not press any buttons. Press the MENU
and VOL(ume)
▲
button so that "PIC-
TURE" is selected. Then, press the
CH(annel)
▲
or
▼
button repeatedly until
the display returns to the screen.
●
If you adjust the other Picture control after
you set the Game mode to [ON], the Game
mode is set to [OFF] automatically.
[USING THE GAME BUTTON]
You may also set the Game mode and external
input mode at the same time by pressing the
GAME button on the remote control. "GAME"
appears on the TV screen. In this case, connect
the external source to the AUDIO/VIDEO
jacks on the front panel.
●
To exit the Game mode and external input
mode, press the INPUT SELECT button on
the remote control.
●
To cancel the Game mode only, adjust the pic-
ture control. In this case, "VIDEO2" instead
of "GAME" appears on the TV screen.
●
If you press the GAME button when the TV
is off, the TV turns on and will be in the
Game mode and external input mode auto-
matically.
PICTURE ADJUSTMENT
1) Press the MENU button so that the menu display appears on the TV screen.
2) Press the VOL(ume)
▲
button so that "PICTURE" is selected.
3) Select the feature you wish to adjust with the CH(annel)
▲
or
▼
button and adjust it with the
VOL(ume)
▲
or
▼
button.
[-]
GAME MODE
[+]
OFF
ON
[-]
BRIGHT
[+]
[-]
CONTRAST
[+]
[-]
COLOR
[+]
[-]
TINT
[+]
: Press the CH(annel)
▲
or
▼
button.
LANGUAGE SELECTION
If you want to change the language of the on-screen menu, follow the proce-
dure below.
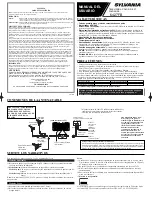
1) Connect the power cord to a standard AC outlet.
Note: If some digits appear in the corner of the screen,
press the POWER button without unplugging the power cord.
2) Press the POWER button to turn on the TV.
3) Press the MENU button so that the menu display appears
on the TV screen.
4) Press the CH(annel)
▲
or
▼
button to point to "[ENGLISH]".
5) Select "ENGLISH" or "ESPAÑOL" = Spanish by using
the VOL(ume)
▲
or
▼
button.
6) Press the MENU button to exit the menu.
CHANNEL PRESETTING
NOTE:You MUST PRESET channels BEFORE using CHANNEL
▲
or
▼
button.
To preset a channel or to change a preset channel, follow the procedure below.
1) Press the POWER button to turn on the TV.
2) Press the MENU button so that the menu display appears
on the TV screen.
3) Press the CH(annel)
▲
or
▼
button to point to "CHANNEL SET".
Then, press the VOL(ume)
▲
button.
4) Press the CH(annel)
▲
or
▼
button to point to "AUTO MEMO".
Then, press the VOL(ume)
▲
button.
The tuner scans and memorizes all active channels in your area.
●
The TV distinguishes between standard TV channels and cable (CATV)
channels.
●
When AUTO MEMO action is completed, the lowest memorized channel
reappears on the screen.
●
When you press the CH(annel)
▲
or
▼
button after selecting AUTO MEMO,
the tuner will stop at the memorized channels only.
●
The TV may memorize TV channels as CATV channels if the reception conditions are poor. If
this happens, try the AUTO MEMO action again when reception conditions are better.
[ADD/DELETE FUNCTION]
1) Press the MENU button so that the menu display appears on the TV
screen.
2) Press the CH(annel)
▲
or
▼
button to point to "CHANNEL SET".
Then, press the VOL(ume)
▲
button.
3) Press the VOL(ume)
▲
button so that "ADD/DELETE" is selected.
4) Use the CH(annel)
▲
or
▼
button to select the channel you wish to put
into memory or to erase from memory.
Note: The display will return to the normal screen automatically in about
10 seconds.
Perform "ADD/DELETE" function while this display appears on the screen.
●
Press the VOL(ume)
▲
or
▼
button to light up the channel number
in LIGHT BLUE if you wish to add the channel into memory.
●
Press the VOL(ume)
▲
or
▼
button to light up the channel number
in LIGHT RED if you wish to erase the channel from memory.
5) Press the MENU button to exit the menu.
MTS (Multi-Channel Television Sound) System
You can listen to a program in MTS stereo by following the steps below.
RESUME FUNCTION
If the power fails or is disconnected while the TV is powered on, the TV will turn on automatical-
ly when the power resumes.
PICTURE
CHANNEL SET
[ENGLISH]ESPAÑOL
V-CHIP SET UP
CAPTION [OFF]
ADD/DELETE
AUTO MEMO
STEREO
[ON]
MAIN/SAP [MAIN]
ADD/DELETE
AUTO MEMO
STEREO
[ON]
MAIN/SAP [MAIN]
PICTURE
CHANNEL SET
[ENGLISH]ESPAÑOL
V-CHIP SET UP
CAPTION [OFF]
PICTURE
CHANNEL SET
[ENGLISH]ESPAÑOL
V-CHIP SET UP
CAPTION [OFF]
PICTURE
CHANNEL SET
[ENGLISH]ESPAÑOL
V-CHIP SET UP
CAPTION [OFF]
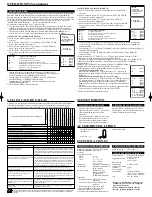
Type of broadcast
Regular
(monaural audio)
Stereo broadcast
SAP
Display on
the TV screen
–None–
STEREO
MONO
MAIN
SAP
MENU
SELECTION
–Invalid–
STEREO [ON]
STEREO [OFF]
MAIN/SAP [MAIN]
MAIN/SAP [SAP]
[To Select STEREO or MONO in Stereo broadcast]
1) Press the MENU button so that the menu
display appears on the TV screen.
2) Press the CH(annel)
▲
or
▼
button to point
to "CHANNEL SET".
Then, press the VOL(ume)
▲
button.
3) Press the CH(annel)
▲
or
▼
button so that
"STEREO" is selected.
4) Press the VOL(ume)
▲
or
▼
button to select the
stereo mode on or off.
Stereo sound is effective
when the "STEREO" is on.
[To Select MAIN or SAP in Bilingual broadcast]
1) Press the MENU button so that the menu
display appears on the TV screen.
2) Press the CH(annel)
▲
or
▼
button to point
to "CHANNEL SET".
Then, press the VOL(ume)
▲
button.
3) Press the CH(annel)
▲
or
▼
button so that
"MAIN/SAP" is selected.
4) Press the VOL(ume)
▲
or
▼
button to select the
"MAIN” or “SAP".
Bilingual sound is effective
when the "SAP" is selected.
ADD/DELETE
AUTO MEMO
STEREO [ON]
MAIN/SAP [MAIN]
To show the status, press the
DISPLAY button on the remote
control.
ADD/DELETE
AUTO MEMO
STEREO [ON]
MAIN/SAP [SAP]
SAP: Second Audio Program,
which means your program, can
also be received in a second lan-
guage or sometimes a radio station.
L1521.QX33 01.6.18 2:28 PM Page 3