SY VWP24-18G Скачать руководство пользователя страница 8


sy.uk 

V1.0 


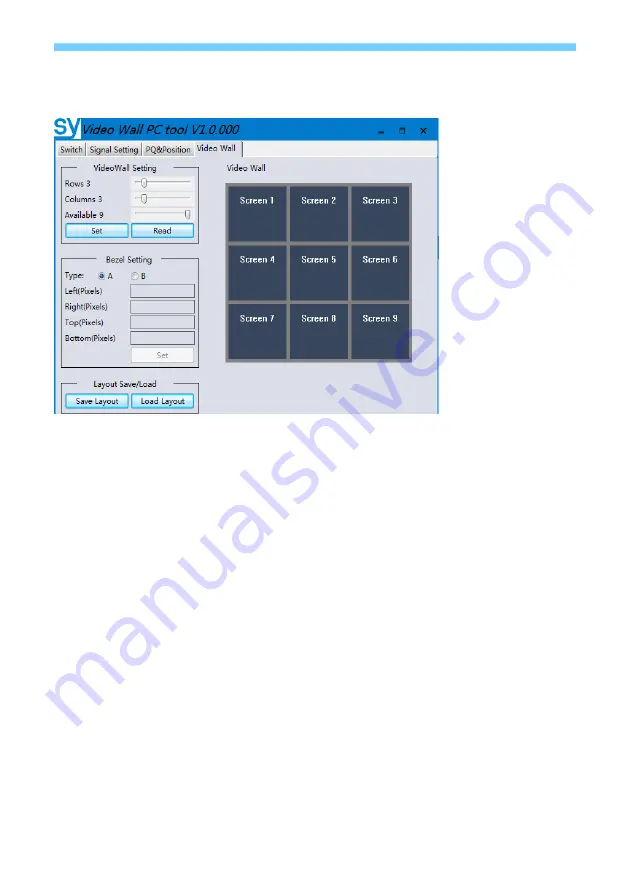
Video Wall tab on the PC tool 

The Video Wall tab is used to configure a group of outputs to function as a video wall. 


1.


Use  the  Video  Wall  Setting  controls  to  change  how  the  displays  are  arranged  on  the 
Video Wall tab: 
a.


Adjust the Rows and Columns sliders to change the displayed screen arrangement to 
permit proper Drag-and-Select of the desired screens for the video wall. 

b.


Change the Available slider to set how many outputs will be used for the Video Wall. 

c.


Click the Set button to change the Screen configuration on the Video Wall tab. 


2.


Use the left mouse button to drag-select the screens that will be set for video wall mode.  
The selected screens will be shown as bright blue. 


3.


Use the right mouse button to open a menu. 


4.


Select Screen Stitching from the menu to program the video wall mode.  The selected 
screens will now be shown as bright green. 


5.


To change the displayed image:  right-click on the respective Screen window to open the 
pop-up menu and select the desired input from the Input Select menu option. 

Repeating steps 2 to 5 above with a different set of outputs allows the creation of a second video 
wall.  However, changing the RowsColumns and Available sliders will automatically delete the 
current video wall set up when the Set button is clicked.  

The following example shows a more unusual video wall set-up of two video walls with 1x3 and 
2x2 configurations: 

Содержание VWP24-18G

Страница 1: ...SY Electronics Ltd 7 Worrall Street Salford Greater Manchester M5 4TH UK Tel 44 0 161 868 3450 Web sy uk User Manual VWP24 18G VWP29 18G Dual input HDMI 2 0 18G VIDEO WALL PROCESSORS...

Страница 2: ...the PC tool 7 Video Wall tab on the PC tool 8 Bezel Setting 9 Bezel Compensation 9 Video Wall Context Menu 10 Layout Save Load 10 DAISY CHAIN AND CASCADE MODE 11 LAN AND RS232 CONTROL COMMANDS 12 Vide...

Страница 3: ...sy co uk Installation precautions This product has special circuitry to protect it against moderate surges and static discharges However to ensure reliable operation and long service life it is import...

Страница 4: ...4 4 and HDCP2 2 2x HDMI 2 0 inputs and 2x HDMI loop outs Full scaler per output Scale Up Down to any resolutions up to 4K60 4 4 4 18G Daisy chain or Cascade connections for large Video Walls up to 8x...

Страница 5: ...C power input VWP 29 18G 110 240V Mains input 2A Fuse Using the VWP24 and VWP29 Connect the desired video sources to VWP24 or VWP29 input HD A or HD B connectors and the desired output video wall disp...

Страница 6: ...om a pre defined EDID setting and set the HDMI A and B input ports to that setting The Manual EDID option is normally used only after an EDID binary image has been written to that location The Predefi...

Страница 7: ...1024 60Hz 5 1920x1200 60Hz 13 1280x768 60Hz 6 1920x1080p 60Hz 14 1280x720p 60Hz 7 1920x1080p 50Hz 15 1280x720p 50Hz 8 1600x1200 60Hz 16 1024x768 60Hz Please Note 3840x2160 25 30Hz can only be used for...

Страница 8: ...t the screens that will be set for video wall mode The selected screens will be shown as bright blue 3 Use the right mouse button to open a menu 4 Select Screen Stitching from the menu to program the...

Страница 9: ...usted to allow for the number of pixels entered in each of the entry boxes Click the Set button view the effect of the new values Type B Bezel Settings The image size will be adjusted to allow for the...

Страница 10: ...mage shown in the above example Output Select This option is only available for any screen that is not assigned to a video wall mode Output Type Use the submenu to set the HDCP options for that output...

Страница 11: ...be set to 1 The second unit device ID should be set 2 and its first output index should be set 10 if the first unit is VWP29 or 5 if the first unit is VWP24 The third unit device ID should be set 3 an...

Страница 12: ...ity None Stop Bits 1 All the ASCII RS232 commands given in this section can also be sent to the LAN port using the following settings Default IP Address 192 168 0 247 Default Network Mask 255 255 255...

Страница 13: ...tion to preset memory z Where z is in the range 1 to 10 for presets 1 to 10 GET SYS ROUTE MODE z Set the Video Wall to pre set z Where z is in the range 1 to 10 Examples SET SYS ROUTE MODE 3 SYS ROUTE...

Страница 14: ...sy uk 14 V1 0...

Страница 15: ...440x900 60Hz 1280x720p 50 60Hz Output Scaled Resolutions 3840x2160p 60Hz 1440x1050 60Hz 3840x2160p 50Hz 1366x768 60Hz 3840x2160p 30Hz 1360x768 60Hz 3840x2160p 25Hz 1280x1024 60Hz 1920x1200 60Hz 1280x7...

Страница 16: ...y use this product in a dry environment Do not allow any liquids or harmful chemicals to come into contact with this product After Sales Service 1 Should you experience any problems while using this p...

Отзывы: