SWIT S-1071H(EFP) Скачать руководство пользователя страница 7


3. Menu Operation


  Press “MENU” and it will display menu system


⑵ 

Revolve “OK” to select an item. The selected item will be highlighted display. 

⑶ 

Press “OK” to enter the selected item. 

⑷ 

Under menu system, press “MENU” to back to previous menu. 

*The menu will automatically save and quit if it remains idle. 


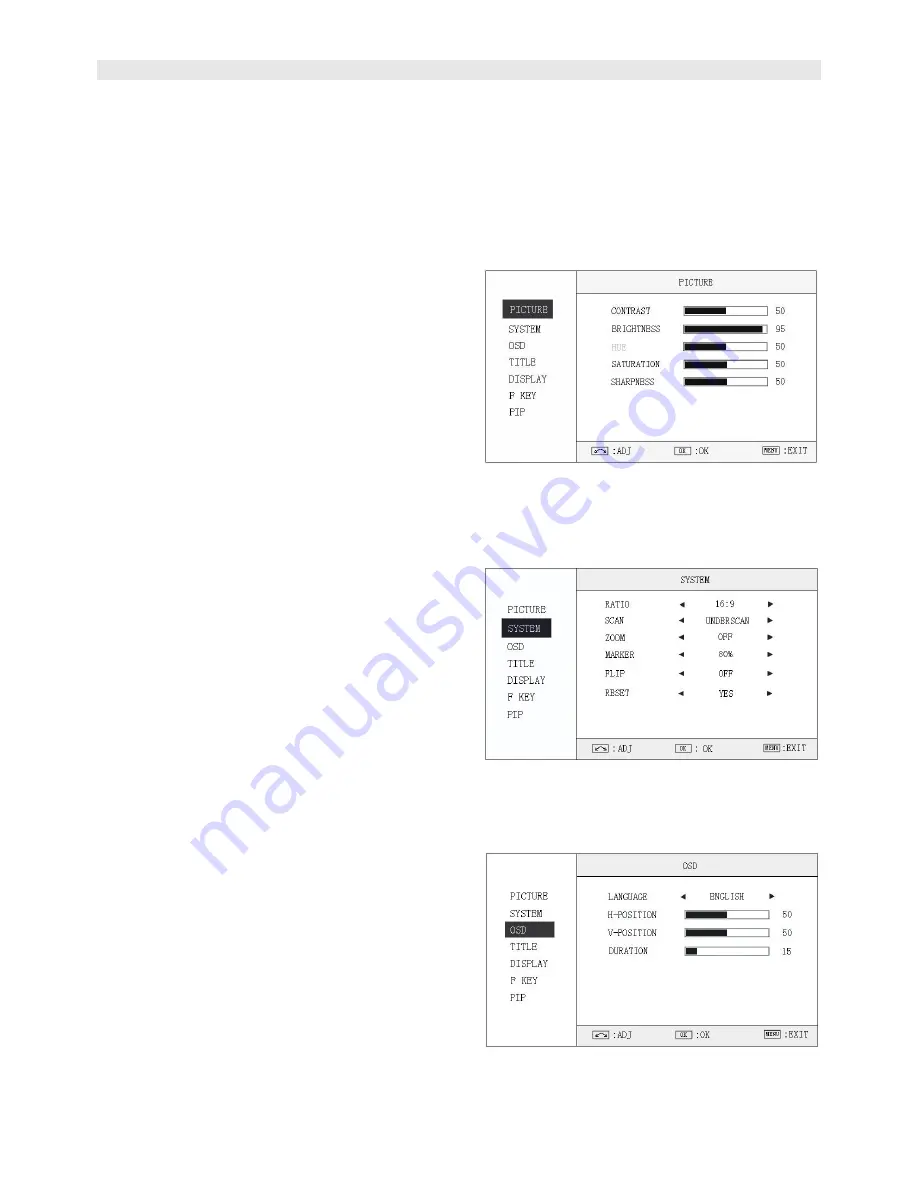
3.1 PICTURE submenu 
 

The PICTURE submenu includes: 


CONTRAST:

 0-100 value adjustment 

⑵ 

BRIGHTNESS:

 0-100 value adjustment


HUE:

 0-100 value adjustment   

(Only available under CVBS NTSC input) 

  SATURATION:

 0-100 value adjustment 


SHARPNESS:

 0-100 value adjustment 


3.2 SYSTEM submenu


The SYSTEM submenu includes:   


RATIO:

 Aspect ratio “16:9” / “4:3” selection 


SCAN:

 “UNDERSCAN” / “OVERSCAN” selection 


ZOOM:

 “OFF”, “ZOOM1” and “ZOOM2” selection 

ZOOM1: Canon DSLR scale zoom-in   
ZOOM2: Pixel to Pixel zoom-in 

  MARKER:

  Select  and  set  the  safe  area  scale  from 

80%, 85%, 90% and 95%. 


FLIP: 

Select “ON” to flip the picture by 180°. 


RESET:

 Select “YES” to recover all to factory setting. 


3.3 OSD submenu 
 

The OSD submenu includes: 

⑴ 

LANGUAGE: 

Menu language selection 

⑵ 

H-POSITION:

 Menu horizontal position (0-100) 

adjustment, real-time preview and default value: 50. 

⑶ 

V-POSITION:

 Menu vertical position (0-100) 

adjustment, real-time preview and default value: 50. 


DURATION: 

Menu timeout setting (5-60) 

Set a time (in seconds) in which the menu will 
automatically quit if remains idle. Default: 15.


Содержание S-1071H(EFP)

Страница 1: ...Model S 1071H EFP 7 EFP Field On camera LCD Monitor User Manual Please read this User Manual throughout before using...

Страница 2: ...without prior notice 4 The warranty period of this product is 2 years and does not cover the following 1 Physical damage to the surface of the products including scratches cracks or other damage to t...

Страница 3: ...rd party power adapter please make sure the voltage range supplied power and polarity of power lead are fit Please disconnect the power cable under the following situations 1 If you do not operate thi...

Страница 4: ...audio output Convert SDI embedded audio to analog and output via 3 5mm earphone jack HDMI embedded audio output Convert HDMI embedded audio to analog and output via 3 5mm earphone jack Underscan and...

Страница 5: ...SDI Press to switch the input signal to SDI OVERSCAN Overscan Underscan switch MENU Press to enter Menu F1 User definable function key 1 F2 User definable function key 2 RATIO 16 9 and 4 3 switch ZOO...

Страница 6: ...l DB 9 port See details in Chapter 4 DB 9 Terminal Description AUDIO L Stereo audio left channel input RCA connector AUDIO R Stereo audio right channel input RCA connector CVBS LOOP Composite video lo...

Страница 7: ...submenu The SYSTEM submenu includes RATIO Aspect ratio 16 9 4 3 selection SCAN UNDERSCAN OVERSCAN selection ZOOM OFF ZOOM1 and ZOOM2 selection ZOOM1 Canon DSLR scale zoom in ZOOM2 Pixel to Pixel zoom...

Страница 8: ...er edited title MARKER4 3 The 4 3 scale mark on 16 9 image Only available under HD input 3 6 F KEY submenu The F KEY Settings Submenu is to define Function Key F1 and F2 The available function items a...

Страница 9: ...pport 6 5V 17V wide range voltage Lower voltage will generate high current and please use the high quality of DB 9 connector Terminal 7 Ground port for DC power and controlling signal Terminal 8 Compo...

Страница 10: ...6I 480P 576P 1080i 60 59 94 50 720p 60 59 94 50 HDMI 1080p 60 59 94 50 30 29 97 25 24 23 98 General Input voltage DC 6 5V 17V Power consumption 8W Working temperature 0 40 Working humidity 10 90 Stora...

Страница 11: ......

Страница 12: ......

Отзывы: