background image

1.

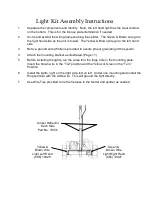
Separate the components and identify.  Note, the left hand light has the clear window 
on the bottom.  This is for the license plate illumination if needed

2.

Un-tie and extend the wiring harness along the splitter.  The Green & Brown wire go to 
the right hand side as the unit is towed.  The Yellow & Brown wire go to the left hand 
side.

3.

Note: a ground wire (White) is provided to assure proper grounding of the system.

4.

Attach the mounting bracket as illustrated. (Page 11)

5.

Before installing the lights, run the wires thru the large hole in the mounting plate.  
Insert the brown wire in the “Tail” position and the Yellow or Green in the “Turn” 
Position

6.

Install the lights, right on the right side, left on left.  Under one mounting stud install the 
Ring terminal with the white wire.  This will ground the light directly.

7.

Use Wire Ties provided to tie the harness to the fender and splitter as needed

Light Kit Assembly Instructions

Green & 

Brown Wire

Light Right Hand

(485) 10027

Yellow &

Brown Wire

Light Left Hand

(486) 10028

Amber Reflector

Each Side

Part No. 10031

Содержание LS67528S

Страница 1: ...LITTER OWNER S MANUAL 1602 CORPORATE DRIVE WARRENSBURG MISSOURI 64093 PHONE 660 747 8183 FAX 660 747 8650 MODEL NO LS67528S Manufacturing quality lawn care equipment since 1945 Safety Assembly Operation Service and Adjustment Repair Parts Made In The USA Rev 05 019 IMPORTANT 10013 swisherinc com ...

Страница 2: ...ar of the product 4 Exclusions Excluded from this warranty are normal wear normal adjustments and normal maintenance The pump valve and cylinder each carry separate manufacture s warranties The valve and cylinder both carry a one 1 year limited warranty The pump carries a two 2 year limited warranty In the event you have a claim under this warranty you must return the product to an authorized serv...

Страница 3: ...itter is a precision piece of power equipment not a toy Therefore exercise extreme caution at all times Only a single operator is to load and operate the log splitter Keep all others including pets and children a minimum of 20 feet away from your work area More accidents occur when more than one person operates the log splitter than any other time Always disconnect the spark plug wire and place th...

Страница 4: ...is in motion When loading log splitter place hands on the sides of the log not the ends Only use your hands to operate the control lever Never use foot knee rope or any extension device Always keep fingers clear of splits that open in log during splitter operation When splitter is in the return mode keep hands off the machine Only operate splitter on level ground not on the side of a hill It could...

Страница 5: ...UPLER ADJUST COUPLER LOCKING PRESSURE ON BALL BEFORE USE PLACE HANDLE IN LOCKED POSITION WITH BALL IN COUPLER TIGHTEN LOCKNUT AGAINST TENSION SPRING SO THAT COUPLER IS NOT LOOSE ON BALL CORRECT ADJUSTMENT WILL ALLOW HANDLE TO BE RELEASED WITH MODERATE PRESSURE APPLIED TO HANDLE TO OPEN PULL UP ON COUPLER HANDLE AND ROTATE FORWARD PLACE COUPLER ON BALL WHEN BALL IS COMPLETELY NESTED IN BALL SOCKET ...

Страница 6: ...ponent to assure proper assembly Stand beam pre assembly vertical and secure in position Roll tank engine assembly into place aligning pivot holes Bolt with provided hardware Note Do not over tighten this is the vertical horizontal pivot point 6 Pivot beam assembly into the horizontal position and lock with pin provided 7 Hose Assembly Locate the Pressure Hose noted by the pipe fittings and attach...

Страница 7: ...ighways See also TOWING SAFETY Be sure you are using the correct ball hitch size for the hitch coupler on the log splitter 2 ball Be sure safety chains are properly connected Leave enough slack in chains for turning See TOWING SAFETY to read warnings about coupling Make sure beam attachment is locked in the horizontal position NEVER tow splitter in the vertical position Turn the fuel shut off valv...

Страница 8: ...pressure by shutting off the engine and moving the control handle back and forth several times NEVER remove the cap from the hydraulic tank or reservoir while your unit is running Hot oil under pressure will cause injury Always store gasoline in an approved tightly sealed container Store container in a dry cool place Keep fuel away from gas appliances where fumes could contact open flame pilot lig...

Страница 9: ...mounting bracket as illustrated Page 11 5 Before installing the lights run the wires thru the large hole in the mounting plate Insert the brown wire in the Tail position and the Yellow or Green in the Turn Position 6 Install the lights right on the right side left on left Under one mounting stud install the Ring terminal with the white wire This will ground the light directly 7 Use Wire Ties provi...

Страница 10: ...N LINE FITTING 7329 10 1 2 13 JAM 2 WAY LOCK NUT NB121 11 2 WAY PIPE NIPPLE 7292 12 MASTER CHAIN LINK 7424 13 COTTER PIN NB597 14 VALVE INLET FITTING 7387 15 VALVE CONTROL W LEVER 7287 16 BEAM WELDMENT 7624 17 1 4 X 1 CLEVIS PIN NB522 18 1 2 13 NUT NB213Z 19 VALVE LEVER GRIP 7423 7425 20 THIN GIB PLATE 7388 21 THICK GIB PLATE 7237 22 BOTTOM GIB PLATE 7333 23 LOCK WASHER NB508 24 WASHER NB555 25 ST...

Страница 11: ...3B 57 3 8 16 X 3 1 2 GR5 BOLT NB649 13 FILTER HEAD LS1112 35 BEARING SEAL 2203S 58 Nut Locking NB170 14 FILTER ELEMENT LS1113 36 BELT 644 59 Light Mounting Bracket 10008 15 1 2 13 X 1 1 4 GR5 BOLT NB646 37 IDLER ARM 6681TK 60 5 16 18 X 3 4 Locking Bolt NB596 16 3 8 16 2 WAY LOCK NUT NB280 38 CLUTCH LEVER 7358 61 Wiring Harness Not Shown 10030 17 TANK BRACE 7352 39 SPRING 682S 62 Light Right Hand 4...

Страница 12: ...wisher Mower Machine Co Inc your nearest Swisher dealer or from our website All engine parts may be ordered from the nearest dealer of the engine supplied with your mower Parts subject to change without notice WHEN ORDERING PARTS PLEASE HAVE THE FOLLOWING INFORMATION AVAILABLE PRODUCT SWISHER LOG SPLITTER SERIAL NUMBER _______________ MODEL NUMBER _______________ ENGINE MODEL NUMBER ______________...

Отзывы: