Swisher FC-10 DUMP CART Скачать руководство пользователя страница 7

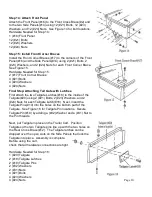
Step 6:  Attaching Wheel Axle and Tires

Set Hitch Tongue(#10) in place as shown below before inserting 
Wheel Axle(#5) through Wheel Axle Support(#4). Next, insert the 
Wheel Axle (#5) into the Wheel Axle Support(#4), and through the
holes in the Tongue(#10) as shown in Figure 6. Be sure equal 
amounts of axle extend from each side of Wheel Support.

TIGHTEN BOLTS ON WHEEL AXLE 
SUPPORT.

Next, install each Tire Assembly (#6) onto 
Wheel Axle, followed by a Washer(#26) 
and a Cotter Pin(#27)
Hardware Needed for Step 6:
1 (#10) Hitch Tongue
1 (#5) Wheel Axle
2 (#6) Wheel Assemblies (Tires)
2 (#26) Washers
2 (#27) Cotter Pins

Step 7:  Assembling Tongue Latch

Insert the Tongue Latch(#9) up through the opening in
the Hitch Tongue(#10).  Place one Latch Spacer(#8)
on each side of the Tongue Latch(#9), the insert
Bolt(#29) to connect Hitch Tongue(#10) and Latch
Spacers(#8) and Tongue Latch(#9).  Only Hand
Tighten (#29) Bolt to (#30) Nut. See Figure 7.

Next, attach one end of Latch Spring(#7) to Hitch
Tongue(#10) and one end of Latch Spring(#7) to top
hole in Tongue Latch(#9). Note hole locations from
Figure 7. Now completely tighten (#29) Bolt and (#30)
Nut.
Hardware Needed for Step 7:
1 (#9) Tongue Latch
2 (#8) Latch Spacers
1 (#7) Latch Spring
1 (#29) Bolt
1 (#30) Nut

Page 7

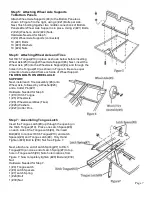
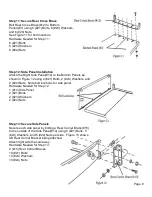
Step 5:  Attaching Wheel Axle Supports 
To Bottom Panels

Attach Wheel Axle Supports (#4) to the Bottom Panels as
shown in Figure 5 to the right, using 4 (#21) Bolts per side.
Next, finish bolting together two middle connections of Bottom
Panels after Wheel Axle Support is in place. Using 2 (#21) Bolts,
2 (#23) Washers, and 2 (#24) Nuts.
Hardware Needed for Step 5:
2 (#4) Wheel Axle Supports (connected)
10 (#21) Bolts
10 (#23) Washers
10 (#24) Nuts

Содержание FC-10 DUMP CART

Страница 1: ...ons and Instructions Before Operating this Equipment Made In CHINA 1602 CORPORATE DRIVE PO BOX 67 WARRENSBURG MISSOURI 64093 PH 660 747 8183 FAX 660 747 8650 swisherinc com MANUFACTURING QUALITY LAWN...

Страница 2: ...rranty claim can be processed THIS WARRANTY DOES NOT APPLY TO ANY INCIDENTAL OR CONSEQUENTIAL DAMAGES AND ANY IMPLIED WARRANTIES ARE LIMITED TO THE SAME TIME PERIODS STATED HEREIN FOR ALL EXPRESSED WA...

Страница 3: ...Qty 1 12166 Bottom Panel 2 2 12167 Front Cross Brace 1 3 12168 Tongue Support 1 4 12169 Wheel Axle Support 2 5 12170 Axle 1 6 12171 Wheel Tire Assembly 2 7 12172 Latch Spring 1 8 12173 Latch Spacer 2...

Страница 4: ...Complete Parts Illustration for Trailer Cart Page 4...

Страница 5: ...Hardware Needed for Step 1 1 2 Cross Brace 4 21 Bolts 4 23 Washers 4 24 Nuts 2 1 Bottom Panels Step 2 Connecting Bottom Panels Attach Bottom Panels 1 as shown in Figure 2 using 2 21 Bolts 2 23 Washer...

Страница 6: ...2 22 Bolts 2 24 Nuts 2 23 Washers 2 23 Washers Step 4 Assemble Wheel Axle Supports As shown in Figure 4 below connect together the 2 Wheel Axle Supports 4 using 8 25 Bolts 8 23 Washers and 8 24 Nuts...

Страница 7: ...tch Spacer 8 on each side of the Tongue Latch 9 the insert Bolt 29 to connect Hitch Tongue 10 and Latch Spacers 8 and Tongue Latch 9 Only Hand Tighten 29 Bolt to 30 Nut See Figure 7 Next attach one en...

Страница 8: ...Rear Cross Brace Turn the Trailer Cart over onto its wheels Attach the Rear Corner Brackets 13 and the Rear Cross Brace 12 to the back of the Bottom Panels as shown in Figure 9 Use 2 21 Bolts 2 23 Was...

Страница 9: ...12 using 2 21 Bolts 2 23 Washers and 2 24 Nuts Note bolt locations for side panel Hardware Needed for Step 12 1 14 Side Panel 2 21 Bolts 2 23 Washers 2 24 Nuts Step 13 Secure Side Panels Secure each...

Страница 10: ...ate into place Assembly is complete Before using the cart check that all hardware connections are tight Hardware Needed for Step 16 1 20 Tailgate 2 18 Tailgate Latches 2 19 Tailgate Pins 2 32 Washers...

Страница 11: ...r or ATV Cart is not to for highway use Do not exceed 10mph when towing Maintenance notes On a regular basis check that tires are inflated properly Pressure should be approx 14psi NEVER over inflate t...

Страница 12: ...TYPE _______________ PART NUMBER WITH PAINT CODE PART DESCRIPTION TELEPHONE 1 800 222 8183 FAX 1 660 747 8650 SWISHER MOWER MACHINE CO INC SWISHER MOWER MACHINE CO INC SWISHER MOWER MACHINE CO INC SWI...

Отзывы: