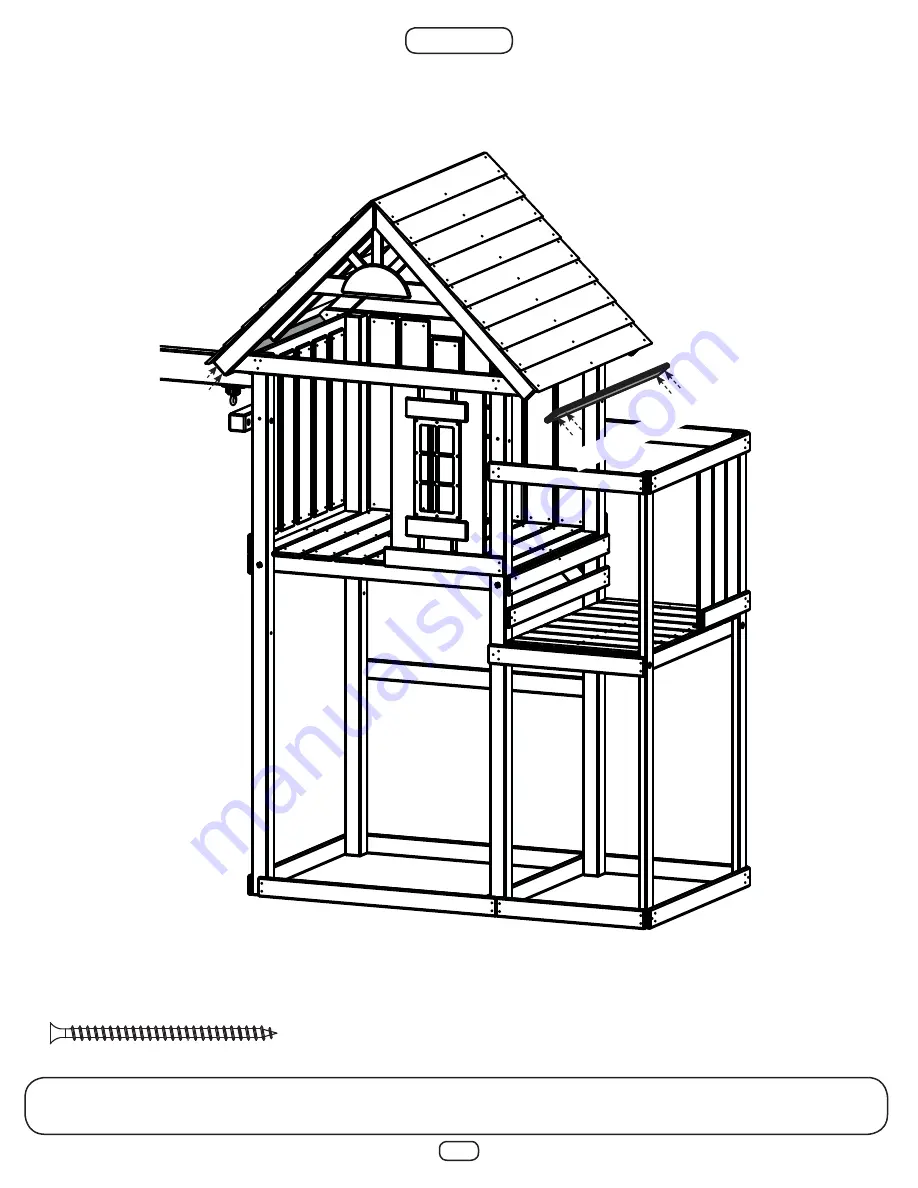
48
STEP 35
1. Attach Roof Side Support Boards as shown.
PF 6050 3/4’
’ x 3-3/8’
’ x 43-1/2’
’
2” Deck Screw (x8)
(4)
2’’ Screws
Страница 1: ...SZLQJ N SOLGH IQF 3ULQWHG LQ USA LA WS 8344 IMPORTANT PLEASE READ BEFORE BEGINNING ASSEMBLY Please make sure all lumber hardware and accessory parts are accounted for If you are missing anything plea...
Страница 2: ...RRTQRTKCVG KVGOU UWEJ CU DWV PQV NKOKVGF VQ NQQUG HKVVKPI ENQVJKPI JQQF CPF PGEM FTCYUVTKPIU UECTXGU EQTF EQPPGEVGF KVGOU ECRGU CPF RQPEJQU 6JGUG KVGOU ECP ECWUG FGCVJ D UVTCPIWNCVKQP PUVTWEV EJKNFTGP...
Страница 3: ...T UJCNN DG TGURQPUKDNG HQT OCKPVCKPI VJG NGIKDKNKV QH YCTPKPI NCDGNU 9JGP QW CTG TGCF VQ FKURQUG QH QWT RNC UGV OCMG UWTG VJCV CNN OGVCN RNCUVKE CPF YQQF EQORQPGPVU CTG FKURQUGF QH KP CEEQTFCPEG YKVJ...
Страница 4: ...KCN 6Q OCKPVCKP VJG TKIJV COQWPV QH NQQUG HKNN OCVGTKCNU OCTM VJG EQTTGEV NGXGN QP RNC GSWKROGPV UWRRQTV RQUVU 6JCV YC QW ECP GCUKN UGG YJGP VQ TGRNGPKUJ CPF QT TGFKUVTKDWVG VJG UWTHCEKPI Q PQV KPUVCN...
Страница 5: ...0 6 0 6 0 6 0 6 0 11 8 21 33 PLAYSET SAFETY ZONE MINIMUM USE ZONE FOR PLAY EQUIPMENT SHALL EXTEND NO LESS THAN 72 FROM ALL SIDES OF THE PLAY STRUCTURE SWING USE ZONE EXTENDS NO LESS THAN 168 SWINGS MU...
Страница 6: ...sed Contact our Customer Service Department at 1 800 888 1232 or email us at service swing n slide com For ease in inventorying your wooden playset parts all have been marked with a part number Look f...
Страница 7: ...1 2 2 PF 6004 3 4 x 3 3 8 x 42 2 PF 6003 3 4 x 3 3 8 x 35 7 8 2 PF 6002 3 4 x 3 3 8 x 22 1 2 2 PF 6058 5 8 x 3 3 8 x 30 4 PF 6172 5 8 x 3 3 8 x 11 1 2 2 PF 6056 5 8 x 2 x 10 4 PF 6059 5 8 x 2 x 7 2 PF...
Страница 8: ...hor It Strap x4 Safety Handle x2 Climbing Rock x6 Quick Link x6 Anchor It x4 Square Bit x1 HD Ring Trap x1 HD Swing Hanger x6 5 16 Clamp Beam x12 HD Swing Seat x2 3 8 x 5 Drill Bit x1 3 8 x 6 Drill Bi...
Страница 9: ...x 1 Truss Screw x3 5 16 x 1 1 2 Lag Screw x4 5 16 Washer x36 5 16 Loc Nut x21 Flat Washer x8 30mm Deck Screw x32 5 16 Loc Washer x12 5 16 18 T Nut x28 Small 5 16 Wood Loc Washer x3 1 3 4 Deck Screw x...
Страница 10: ...22 1 2 1 PF 6022 3 4 x 3 3 8 x 19 1 2 10 PF 6021 5 8 x 5 3 8 x 30 3 4 6 PF 6135 3 4 x 5 3 8 x 26 1 4 4 PF 6025 3 4 x 3 3 8 x 29 1 4 2 1 2 Deck Screw x55 1 3 4 Deck Screw x50 2 Deck Screw x25 1 1 4 De...
Страница 11: ...26 7 8 PICNIC TABLE LEG 2 PF 6037 3 4 x 3 3 8 x 15 3 4 BENCH SUPPORT 2 PF 6039 3 4 x 3 3 8 x 9 3 4 TABLE SUPPORT TABLE HARDWARE LADDER MODULE SA6032 BOARD LIST 1 PF 6030 1 3 8 x 3 3 8 x 52 3 4 LADDER...
Страница 12: ...12 WOOD ROOF SA6035 BOARD LIST 18 PF 6055 1 2 x 5 x 47 1 2 SHINGLE 2 PF 6061 1 1 2 x 1 1 2 x 40 1 5 8 Deck Screw x96 HARDWARE Coolwave Slide x2 SLIDES...
Страница 13: ...13 PAGE INTENTIONALLY LEFT BLANK...
Страница 14: ...6 1 1 2 BOTH SIDES PF 6063 3 4 x 3 3 8 x 59 5 8 A FRAME BASE PF 6010 1 x 3 3 8 x 47 1 2 PF 6006 3 4 x 3 3 8 x 44 1 2 PF 6164 3 x 3 x 94 PF 6164 3 x 3 x 94 2 1 2 Deck Screw x14 3 2 1 2 Screws 3 2 1 2...
Страница 15: ...4 x 3 3 8 x 59 5 8 A FRAME BASE PF 6010 1 x 3 3 8 x 47 1 2 PF 6006 3 4 x 3 3 8 x 44 1 2 PF 6006 3 4 x 3 3 8 x 44 1 2 31 1 1 2 ALL JOINTS 3 2 1 2 Screws 3 2 1 2 Screws 2 2 1 2 Screws 2 2 1 2 Screws 2 2...
Страница 16: ...E A Check to make sure struc ture is square PF 6005 3 4 x 3 3 8 x 42 PF 6005 3 4 x 3 3 8 x 42 PF 6005 3 4 x 3 3 8 x 42 PF 6004 3 4 x 3 3 8 x 42 Flush Flush 59 1 4 3 2 1 2 Screws 3 2 1 2 Screws 2 2 1 2...
Страница 17: ...17 STEP 4 1 Attach Frame A to Frame B as shown Check to make sure struc ture is square FRAME A FRAME B 2 1 2 Deck Screw x11 3 2 1 2 Screws 3 2 1 2 Screws 3 2 1 2 Screws 2 2 1 2 Screws...
Страница 18: ...03 3 4 x 3 3 8 x 35 7 8 PF 6003 3 4 x 3 3 8 x 35 7 8 PF 6011 1 x 3 3 8 x 47 1 2 PF 6003 3 4 x 3 3 8 x 35 7 8 PF 6003 3 4 x 3 3 8 x 35 7 8 PF 6011 1 x 3 3 8 x 47 1 2 TOP VIEW 2 1 2 Deck Screw x2 2 2 1...
Страница 19: ...19 STEP 6 1 Install Deck Boards as shown NOTE Standard gap between deck boards is 3 8 7 PF 6008 3 4 x 5 3 8 x 42 6 1 3 4 Screws per board 1 3 4 Deck Screw x42...
Страница 20: ...Boards as shown Flush Flush PF 6007 3 4 x 3 3 8 x 47 1 2 PF 6002 3 4 x 3 3 8 x 22 1 2 Flush 2 1 2 Deck Screw x14 3 2 1 2 Screws 3 2 1 2 Screws 3 2 1 2 Screws 3 2 1 2 Screws 2 2 1 2 Screws 62 5 8 PF 60...
Страница 21: ...6149 1 3 8 x 3 3 8 x 15 1 2 DECK SUPPORT Flush NOTE Insert Hardware From Outside 1 Install Deck Supports as shown 1 3 4 Deck Screw x6 3 Deck Screw x4 3 1 3 4 Screw per joint 4 3 Screw Flush NOTE Pre...
Страница 22: ...uc ture is square 1 Install Deck Support Board as shown PF 6026 1 x 3 3 8 x 42 FRAME A 2 1 2 Deck Screw x4 Hint Use parts from your Terrace Box 5 16 18 X 4 Hex Head Bolt 5 16 Loc Washer 5 16 Washer T...
Страница 23: ...eck to make sure struc ture is square PF 6005 3 4 x 3 3 8 x 42 PF 6005 3 4 x 3 3 8 x 42 PF 6028 1 3 8 x 3 x 79 PF 6028 1 3 8 x 3 x 79 Flush Flush FRAME C 2 Deck Screw x12 3 2 Screws 3 2 Screws 3 2 Scr...
Страница 24: ...P 11 1 Install Deck Support Board as shown Check to make sure struc ture is square 2 Deck Screw x4 PF 6026 1 x 3 3 8 x 42 47 1 4 5 16 18 X 2 Hex Head Bolt 5 16 Loc Washer 5 16 Washer T Nut Small 2 2 S...
Страница 25: ...re struc ture is square PF 6024 3 4 x 3 3 8 x 27 3 4 FRAME C Flush Flush Flush Flush PF 6024 3 4 x 3 3 8 x 27 3 4 PF 6025 3 4 x 3 3 8 x 29 1 4 PF 6025 3 4 x 3 3 8 x 29 1 4 2 1 2 Deck Screw x8 2 2 1 2...
Страница 26: ...26 STEP 13 1 Attach Frame C to Tower as shown Check to make sure struc ture is square FRAME C 2 1 2 Deck Screw x10 2 2 1 2 Screws 2 2 1 2 Screws 3 2 1 2 Screws 3 2 1 2 Screws 79...
Страница 27: ...3 4 PF 6061 1 1 2 x 1 1 2 x 40 PF 6150 3 4 x 3 3 8 x 24 3 4 10 5 8 TOP VIEW PF 6061 1 1 2 x 1 1 2 x 40 PF 6150 3 4 x 3 3 8 x 24 3 4 PF 6150 3 4 x 3 3 8 x 24 3 4 1 3 4 Deck Screw x10 2 1 3 4 Screws 2...
Страница 28: ...28 STEP 15 1 Install Deck Boards as shown NOTE Standard gap between deck boards is 7 16 6 PF 6135 3 4 x 5 3 8 x 26 1 4 1 3 4 Deck Screw x36 6 1 3 4 Screws per board NOTE Hole Locations...
Страница 29: ...29 STEP 16 1 Install Barrier Support Boards as shown 50 5 8 2 Deck Screw x8 3 2 Screws PF 6022 3 4 x 3 3 8 x 19 1 2 PF 6025 3 4 x 3 3 8 x 29 1 4 3 2 Screws 2 2 Screws Flush...
Страница 30: ...30 STEP 17 1 Attach Gap Filler Boards as shown PF 6004 3 4 x 3 3 8 x 42 PF 6005 3 4 x 3 3 8 x 42 53 7 8 5 3 8 2 1 2 Deck Screw x12 6 2 1 2 Screws 6 2 1 2 Screws...
Страница 31: ...P 18 1 Install Barrier Boards as shown INSIDE VIEW 3 PF 6021 5 8 x 5 3 8 x 30 3 4 1 1 4 Deck Screw x12 12 x 3 4 Pan Screw x4 4 1 1 4 Screws per board 4 3 4 Pan Screws Panel Bracket ALL BARRIER BOARDS...
Страница 32: ...shown 10 3 4 Screws per Window Frame Hint Use parts from your Tower Box PF 6000 5 8 x 5 3 8 x 33 3 4 PF 6172 5 8 x 3 3 8 x 11 1 2 3 4 7 8 PF 6001 5 8 x 5 3 8 x 9 1 4 4 30mm Screws per board PF 6172 5...
Страница 33: ...33 STEP 20 1 Install Window Panel 12 x 3 4 Pan Screw x4 4 3 4 Pan Screws 1 1 4 Deck Screw x12 2 1 1 4 Screws per board 2 1 1 4 Screws per board Panel Bracket 1 1...
Страница 34: ...shown 2 Install Barrier Support Board as shown 1 1 4 Deck Screw x22 18 4 1 1 4 Screws per board 1 GAP BETWEEN BOARDS 4 PF 6000 5 8 x 5 3 8 x 33 3 4 PF 6005 3 4 x 3 3 8 x 42 Flush Flush 2 3 1 1 4 Screw...
Страница 35: ...4 Screws per board 15 1 4 1 1 4 Deck Screw x12 Hint Use parts from your Tower Box INSIDE VIEW PF 6021 5 8 x 5 3 8 x 30 3 4 PF 6021 5 8 x 5 3 8 x 30 3 4 2 PF 6001 5 8 x 5 3 8 x 9 1 4 1 GAP BETWEEN BOAR...
Страница 36: ...Frame in opening and ush to the underside of PF 6005 as shown 2 To avoid splitting pre drill holes in all PF6172 Board as shown 3 Install PF 6172 under Window Fram as shown STEP 23 30mm Deck Screw x4...
Страница 37: ...37 STEP 24 1 Install Swing beam support as shown PF 6020 3 x 3 x 47 1 2 SWING BEAM SUPPORT 5 16 18 X 6 Carriage Bolt Wood Loc Washer 5 16 Washer Loc Nut...
Страница 38: ...to attach swing hangers on the same side that you drilled from This will ensure proper alignment 4 Attach Heavy Duty Swing Hangers as shown A FRAME THIS SIDE BOTTOM VIEW DRILL HERE 6 PLACES CENTER 5 1...
Страница 39: ...t 5 16 Washer 5 16 Washer 5 16 Loc Nut 5 16 18 T Nut Small 5 16 18 T Nut Small 5 16 Washer 5 16 18 x 2 1 2 Hex Head Bolt 5 16 18 x 4 Hex Head Bolt 5 16 Washer 5 16 18 T Nut Small 5 16 Washer 5 16 18 x...
Страница 40: ...tach Swing Beam Bracket to A Frame Swing Beam as shown 5 16 Washer 5 16 Washer 5 16 18 x 3 1 2 Hex Head Bolt 5 16 Washer 2 Swing Beam Bracket 5 16 Washer 5 16 18 x 3 1 2 Hex Head Bolt 5 16 Loc Nut 5 1...
Страница 41: ...41 STEP 28 5 16 18 x 3 1 4 Hex Head Bolt 5 16 18 T Nut Small 5 16 Washer Beam Brace 5 16 Loc Washer 1 Install Swing Beam Brace as shown...
Страница 42: ...42 STEP 29 1 Install Swing Beam as shown 5 16 Loc Washer 5 16 Washer 5 16 18 x 8 1 2 Hex Head Bolt 5 16 18 x 6 Carriage Bolt 5 16 Loc Nut 5 16 Washer 5 16 18 T Nut Small 5 16 Wood Loc Washer...
Страница 43: ...43 STEP 30 4 PF 6000 5 8 x 5 3 8 x 33 3 4 1 Install Barrier Boards as shown NOTE Standard gap between barrier boards is 2 7 8 4 1 1 4 Screws per board 1 1 4 Deck Screw x16 2 7 8 GAP BETWEEN BOARDS...
Страница 44: ...is square 1 5 8 1 5 8 PF 6058 5 8 x 3 3 8 x 30 PF 6060 5 8 x 5 3 8 x 13 SUN 3 4 13 1 2 CENTERED PF 6062 1 x 3 3 8 x 42 1 2 ROOFA FRAME PF 6062 1 x 3 3 8 x 42 1 2 ROOFA FRAME 4 1 1 4 Deck Screws 1 1 4...
Страница 45: ...ame as shown x2 1 PF 6056 5 8 x 2 x 10 2 PF 6059 5 8 x 2 x 7 PF 6053 1 3 8 x 3 3 8 x 43 1 2 CENTERED 43 1 2 43 1 2 30mm Deck Screw x8 6 1 1 4 Screws 2 1 2 Deck Screw x4 2 2 1 2 Screws 2 2 1 2 Screws 1...
Страница 46: ...6061 1 1 2 x 1 1 2 x 40 2 PF 6061 1 1 2 x 1 1 2 x 40 UNDERSIDE VIEW 5 PF 6055 1 2 x 5 x 47 1 2 SHINGLE Per Side 1 OVERHANG BOTH SIDES 1 1 5 8 Deck Screw per board 5 1 5 8 Deck Screws per board 4 PF 60...
Страница 47: ...34 1 Attach Roof Frame to Tower as shown NOTE Secure roof from inside the tower 3 1 5 8 Screws 3 1 5 8 Screws 3 1 5 8 Screws 3 1 5 8 Screws Flush At Ends 1 5 8 Deck Screw x12 NOTE Secure Roof from the...
Страница 48: ...48 STEP 35 1 Attach Roof Side Support Boards as shown PF 6050 3 4 x 3 3 8 x 43 1 2 PF 6050 3 4 x 3 3 8 x 43 1 2 2 Deck Screw x8 4 2 Screws 4 2 Screws...
Страница 49: ...A D D E R S U P P O R T R 4 PF 6032 1 x 3 3 8 x 18 1 2 PF 6029 5 8 x 3 3 8 x 20 1 2 2 1 2 Deck Screw x20 2 2 1 2 Screws per Rung 4 2 1 2 Screws Hint Use parts from your Ladder Box P F 6 0 3 1 1 3 8 x...
Страница 50: ...50 STEP 37 1 Attach Ladder to Tower as shown 12 x 3 4 Pan Screw x8 Panel Bracket 4 3 4 Pan Screw Panel Bracket 4 3 4 Pan Screw...
Страница 51: ...x 60 ROCKWALL SUPPORT PF 6388 1 3 8 x 3 3 8 x 60 ROCKWALL SUPPORT PF 6388 1 3 8 x 3 3 8 x 60 ROCKWALL SUPPORT 4 2 Deck Screws per board 1 PF 6013 5 8 x 5 3 8 x 22 3 4 ROCKWALL BOARD 1 PF 6013 5 8 x 5...
Страница 52: ...52 STEP 39 1 Attach Rock Wall as shown Under Deck View 2 1 2 Deck Screw x3 3 2 1 2 Screws 12 x 3 4 Pan Screw x4 4 3 4 Pan Screw Panel Bracket...
Страница 53: ...53 1 Attach Climbing Rocks as shown STEP 40 2 1 4 T Nuts 2 1 1 4 Hex Head Bolts 2 1 4 Flat Washer Per Rock 2 1 4 Loc Washer Per Rock...
Страница 54: ...ake sure structure is square 2 PF 6039 3 4 x 3 3 8 x 9 3 4 TABLE SUPPORT 2 PF 6037 3 4 x 3 3 8 x 15 3 4 BENCH SUPPORT Flush 4 1 1 4 Screws 4 1 1 4 Screws 3 3 6 7 8 2 2 Screws 13 3 4 25 3 BOTH SIDES Hi...
Страница 55: ...r Support and Barrier Boards as shown Flush PF 6024 3 4 x 3 3 8 x 27 3 4 4 PF 6021 5 8 x 5 3 8 x 30 3 4 5 8 GAP BETWEEN ALL BOARDS 2 1 2 Deck Screw x4 1 1 4 Deck Screw x16 2 2 1 2 Screws per side 4 1...
Страница 56: ...e 2 1 1 4 Deck Screw x6 3 1 1 4 Screws per board UNDERSIDE VIEW 2 PF 6180 5 8 x 3 3 8 x 10 1 2 2 30mm Deck Screws PF 6009 1 3 8 x3 3 8 x17 1 4 Slide Stake 2 30mm Deck Screws PF 6009 1 3 8 x3 3 8 x17 1...
Страница 57: ...57 STEP 44 1 Attach Safety Handle and I D Tag as shown 1 3 4 Pan Screw x2 1 2 Pan Screw x2 1 4 x 1 3 4 Pan Screw 1 4 Washer 11 x2 ID Tag x1...
Страница 58: ...1 Attach Chain to Swing Hanger as shown in Fig A 2 Tighten Quick Link to secure chains to Swing Hangers as shown in Fig A NOTE Once installed there must be a minimum 8 clearance between the bottom of...
Страница 59: ...59 STEP 46 HD Ring Trap Combo Assembly 1 Attach Ring Trap Chain to Swing Hanger as shown in Fig A 2 Tighten Quick Link to secure chains to Swing Hangers as shown in Fig A FIG A...
Страница 60: ...1 Position Mounting Bracket in desired location 2 Attach Mounting Bracket to the unit using the Mounting Screw provided 3 Insert the Telescope into the Mounting Bracket as shown Telscope Assembly Mou...
Страница 61: ...5 16 diameter hole through the lumber NOTE If lumber is greater than 2 in depth you will need to counterbore the hole appropriately 2 Mount Steering Wheel to climbing unit as indicated 3 Snap Steering...
Страница 62: ...u loop fold the ends together and attach to the unit as shown Note Keep as little play as possible using any of the holes in the strap that work best TIP When installing Anchor Its in rocky or hard so...
Страница 63: ...the defect upon delivery of the defective part to Swing N Slide at 1212 Barberry Drive Janesville Wisconsin 53545 Any part s returned to Swing NSlide must have prior approved Return Authorization Numb...
Страница 64: ...s Call our Customer Support Representatives 1 800 888 1232 Available Monday Friday 7am 5pm CST Weekend support available April through July Technical support from experienced Swing N Slide customer se...