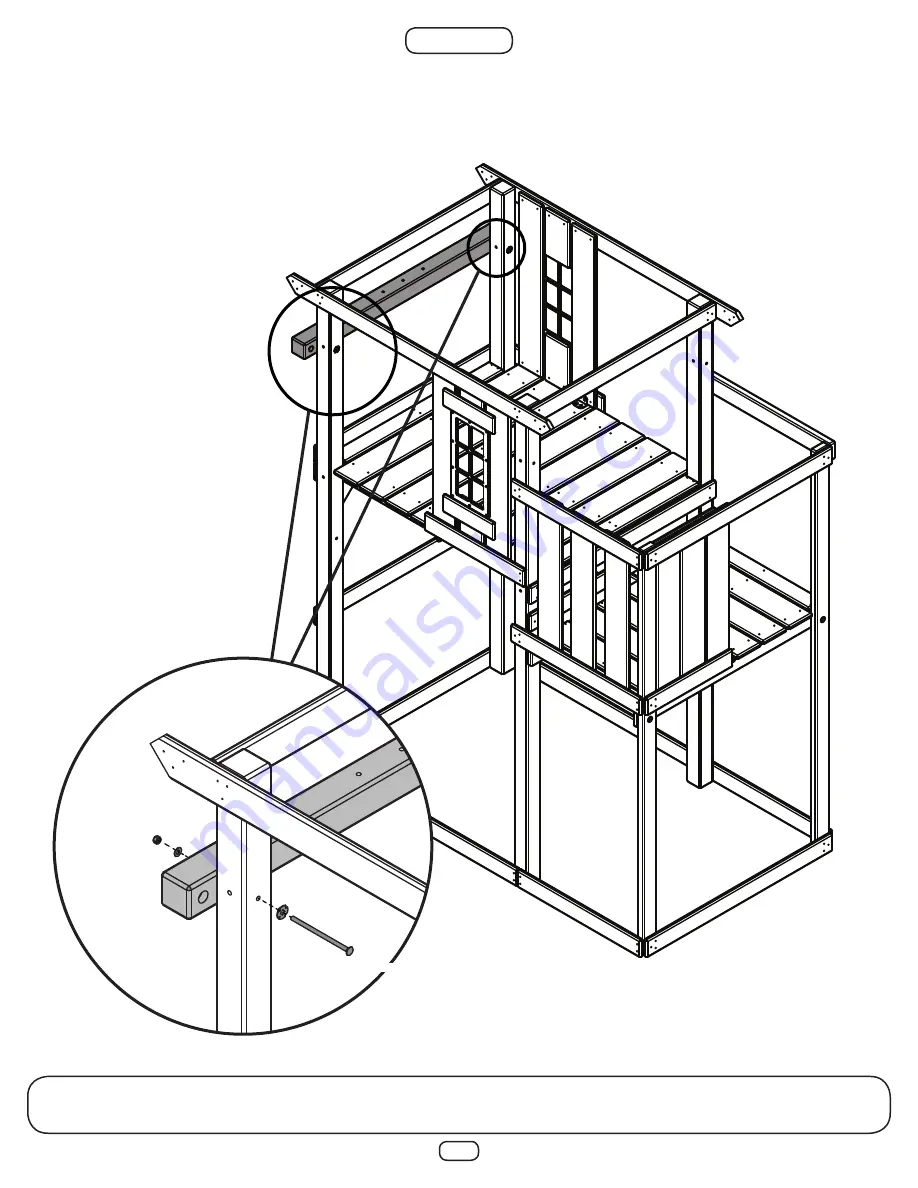
35
STEP 22
1. Install Swing beam support as shown.
PF 6020 3’’ x 3’’ x 47-1/2’’
SWING BEAM SUPPORT
5/16-18 X 6’’ Carriage Bolt
Wood Loc-Washer
5/16’’ Washer
Loc Nut
TOP OF BEAM SUPPORT
84’’ FROM BOTTOM OF
POST
Страница 1: ...rt backyardproducts com or call us at 1 800 882 0272 PB 8272 IMPORTANT PLEASE READ BEFORE BEGINNING ASSEMBLY Please make sure all lumber hardware and accessory parts are accounted for If you are missi...
Страница 2: ...clothing hood and neck drawstrings scarves cord connected items capes and ponchos These items can cause death by strangulation Instruct children not to climb when the equipment is wet Slippery surface...
Страница 3: ...sible for maintaing the legibility of warning labels When you are ready to dispose of your playset make sure that all metal plastic and wood components are disposed of in accordance with local waste o...
Страница 4: ...rfacing material To maintain the right amount of loose fill materials mark the correct level on play equipment support posts That way you can easily see when to replenish and or redistribute the surfa...
Страница 5: ...LL EXTEND NO LESS THAN 72 FROM ALL SIDES OF THE PLAY STRUCTURE SWING USE ZONE EXTENDS NO LESS THAN 168 SWINGS MUST HAVE A MINIMUM CLEARANCE OF 8 ABOVE THE PROTECTIVE SURFACING 10 3 83 to Swing Hanger...
Страница 6: ...If you are missing anything please DO NOT RETURN to the store where purchased Contact our Customer Service Department at 1 800 882 0272 or email us at playsupport backyardproducts com For ease in inve...
Страница 7: ...002 3 4 x 3 3 8 x 22 1 2 1 PF 6022 3 4 x 3 3 8 x 19 1 2 2 PF 6037 3 4 x 3 3 8 x 15 3 4 BENCH SUPPORT 2 PF 6039 3 4 x 3 3 8 x 9 3 4 TABLE SUPPORT 2 PF 6058 5 8 x 3 3 8 x 30 1 PF 6029 5 8 x 3 3 8 x 20 1...
Страница 8: ...PONENTS SA 6052 Glider End x2 Glider Seat x1 60 GliderChain x4 ASSEMBLY INSTRUCTIONS Swing N Slide 1212 Barberry Drive Janesville Wisconsin 53545 Visit our web site at www swing n slide com or call us...
Страница 9: ...w x75 3 Deck Screw x8 1 5 8 Deck Screw x24 3 4 Flat Head Screw x20 FS2828 1 3 4 FS2826 1 1 4 FS2827 1 5 8 FS2829 2 FS2830 2 1 2 FS2831 3 FS2826 3 4 FS2828 1 3 4 FS2826 1 1 4 FS2827 1 5 8 FS2829 2 FS28...
Страница 10: ...3 3 8 x 22 1 2 1 PF 6022 3 4 x 3 3 8 x 19 1 2 2 PF 6037 3 4 x 3 3 8 x 15 3 4 BENCH SUPPORT 2 PF 6039 3 4 x 3 3 8 x 9 3 4 TABLE SUPPORT 3 3 8 x 30 1 PF 6029 5 8 x 3 3 8 x 20 1 2 3 3 8 x 11 1 2 10 PF 6...
Страница 11: ...1 2 1 PF 6040 1 x 5 3 8 x 41 1 2 BENCH 2 PF 6133 3 4 x 3 3 8 x 41 1 2 TABLE 2 PF 6003 3 4 x 3 3 8 x 35 7 8 2 PF 6038 3 4 x 3 3 8 x 26 7 8 PICNIC TABLE LEG 2 PF 6002 3 4 x 3 3 8 x 22 1 2 2 PF 6037 3 4...
Страница 12: ...8 x 3 3 8 x 32 2 PF 6043 1 3 8 x 3 3 8 x 60 2 PF 6045 1 3 8 x 3 3 8 x 79 7 8 1 PF 6044 1 x 3 3 8 x 58 1 PF 6041 1 3 8 x 3 3 8 x 29 1 4 MONKEY BARS MODULE SA6006 SA6022 2 PF 6042 1 3 8 x 3 3 8 x 32 2 P...
Страница 13: ...FS2828 1 3 4 FS2826 1 1 4 FS2827 1 5 8 FS2829 2 FS2830 2 1 2 FS2831 3 FS2826 3 4 HARDWARE SA 6014 SIDEWINDER SA 6030 BOARD LIST 2 PF 6148 1 1 2 x 3 1 2 x 36 2 PF 6147 1 1 2 x 3 1 2 x 15 5 16 Washer x1...
Страница 14: ...6 1 1 2 BOTH SIDES PF 6063 3 4 x 3 3 8 x 59 5 8 A FRAME BASE PF 6010 1 x 3 3 8 x 47 1 2 PF 6006 3 4 x 3 3 8 x 44 1 2 PF 6164 3 x 3 x 94 PF 6164 3 x 3 x 94 2 1 2 Deck Screw x14 3 2 1 2 Screws 3 2 1 2...
Страница 15: ...4 x 3 3 8 x 59 5 8 A FRAME BASE PF 6010 1 x 3 3 8 x 47 1 2 PF 6006 3 4 x 3 3 8 x 44 1 2 PF 6006 3 4 x 3 3 8 x 44 1 2 31 3 2 1 2 Screws 3 2 1 2 Screws 2 2 1 2 Screws 2 2 1 2 Screws 2 1 2 Deck Screw x18...
Страница 16: ...E A Check to make sure structure is square PF 6005 3 4 x 3 3 8 x 42 PF 6005 3 4 x 3 3 8 x 42 PF 6005 3 4 x 3 3 8 x 42 PF 6004 3 4 x 3 3 8 x 42 Flush Flush 59 1 4 3 2 1 2 Screws 3 2 1 2 Screws 2 2 1 2...
Страница 17: ...17 STEP 4 1 Attach Frame A to Frame B as shown Check to make sure structure is square FRAME A FRAME B 2 1 2 Deck Screw x11 3 2 1 2 Screws 3 2 1 2 Screws 3 2 1 2 Screws 2 2 1 2 Screws...
Страница 18: ...Install Deck Supports as shown 2 PF 6149 1 3 8 x 3 3 8 x 15 1 2 DECK SUPPORT Flush 3 1 3 4 Screw per joint 1 3 4 Deck Screw x6 8 6 7 9 0 1 3 Deck Screw x4 9 0 1 4 3 Screw Flush NOTE Insert Hardware F...
Страница 19: ...011 1 x 3 3 8 x 47 1 2 PF 6003 3 4 x 3 3 8 x 35 7 8 PF 6003 3 4 x 3 3 8 x 35 7 8 PF 6011 1 x 3 3 8 x 47 1 2 TOP VIEW 2 1 2 Deck Screw x2 2 2 1 2 Screws 6 1 3 4 Screws 6 1 3 4 Screws 1 3 4 Deck Screw x...
Страница 20: ...20 STEP 7 1 Install Deck Boards as shown NOTE Standard gap between deck boards is 3 8 7 PF 6008 3 4 x 5 3 8 x 42 6 1 3 4 Screws per board 1 3 4 Deck Screw x42 8 6 7 9 0 1...
Страница 21: ...3 4 x 3 3 8 x 42 PF 6005 3 4 x 3 3 8 x 42 PF 6002 3 4 x 3 3 8 x 22 1 2 PF 6002 3 4 x 3 3 8 x 22 1 2 Flush 2 1 2 Deck Screw x16 3 2 1 2 Screws per joint 3 2 1 2 Screws 3 2 1 2 Screws 2 2 1 2 Screws 2...
Страница 22: ...is square STEP 9 1 Install Deck Support Board as shown PF 6026 1 x 3 3 8 x 42 FRAME A 2 1 2 Deck Screw x4 Hint Use parts from your Terrace Box 5 16 18 X 4 Hex Head Bolt 5 16 Loc Washer 5 16 Washer T...
Страница 23: ...e structure is square PF 6005 3 4 x 3 3 8 x 42 PF 6005 3 4 x 3 3 8 x 42 PF 6028 1 3 8 x 3 x 79 PF 6028 1 3 8 x 3 x 79 Flush Flush FRAME C 2 Deck Screw x12 FS2828 1 3 4 FS2827 1 5 8 FS2829 2 FS2830 2 1...
Страница 24: ...1 Install Deck Support Board as shown Check to make sure struc ture is square 2 Deck Screw x4 8 7 9 0 1 PF 6026 1 x 3 3 8 x 42 47 1 4 5 16 18 X 2 Hex Head Bolt 5 16 Loc Washer 5 16 Washer T Nut Small...
Страница 25: ...3 8 x 27 3 4 FRAME C Flush Flush Flush Flush PF 6024 3 4 x 3 3 8 x 27 3 4 PF 6041 1 3 8 x 3 3 8 x 29 1 4 PF 6025 3 4 x 3 3 8 x 29 1 4 50 5 8 2 1 2 Deck Screw x10 2 2 1 2 Screws 2 2 1 2 Screws 2 2 1 2...
Страница 26: ...26 STEP 13 1 Attach Frame C to Tower as shown Check to make sure structure is square FRAME C 2 1 2 Deck Screw x13 2 2 1 2 Screws 2 2 1 2 Screws 3 2 1 2 Screws 3 2 1 2 Screws 3 2 1 2 Screws...
Страница 27: ...6150 3 4 x 3 3 8 x 24 3 4 10 5 8 TOP VIEW PF 6061 1 1 2 x 1 1 2 x 40 PF 6150 3 4 x 3 3 8 x 24 3 4 PF 6150 3 4 x 3 3 8 x 24 3 4 1 3 4 Deck Screw x10 FS2828 1 3 4 FS2826 1 1 4 FS2827 1 5 8 FS2829 2 FS28...
Страница 28: ...28 STEP 15 1 Install Deck Boards as shown NOTE Standard gap between deck boards is 7 16 6 PF 6135 3 4 x 5 3 8 x 26 1 4 1 3 4 Deck Screw x36 8 6 7 9 0 1 6 1 3 4 Screws per board...
Страница 29: ...29 STEP 16 1 Install Barrier Support Boards as shown 50 5 8 2 Deck Screw x6 8 7 9 0 1 3 2 Screws PF 6022 3 4 x 3 3 8 x 19 1 2...
Страница 30: ...30 STEP 17 1 Attach Gap Filler Boards as shown PF 6004 3 4 x 3 3 8 x 42 PF 6005 3 4 x 3 3 8 x 42 53 7 8 5 3 8 2 1 2 Deck Screw x12 6 2 1 2 Screws 6 2 1 2 Screws...
Страница 31: ...1 Install Barrier Boards as shown INSIDE VIEW 3 PF 6021 5 8 x 5 3 8 x 30 3 4 1 1 4 Deck Screw x16 8 6 7 9 0 1 12 x 3 4 Pan Screw x4 4 1 1 4 Screws per board 4 3 4 Pan Screws Panel Bracket 1 8 GAP BETW...
Страница 32: ...32 STEP 19 1 Attach Barrier Boards as shown 2 1 8 3 PF 6021 5 8 x 5 3 8 x 30 3 4 1 1 4 Deck Screw x12 8 6 7 9 0 1 4 1 1 4 Screws per board...
Страница 33: ...Screw x16 3 4 Flat Head Screw x20 FS2828 1 3 4 FS2826 1 1 4 FS2827 1 5 8 FS2829 2 FS2830 2 1 2 FS2831 3 FS2826 3 4 10 3 4 Screws per Window Frame 4 1 3 16 30 mm Screws per board FROM BACK SIDE PF 6172...
Страница 34: ...ndow Panels 12 x 3 4 Pan Screw x8 4 3 4 Pan Screws Panel Bracket 1 1 3 16 30 mm Deck Screw x24 2 1 3 16 30 mm Screws per board 2 1 3 16 30 mm Screws per board 2 1 3 16 30 mm Screws per board 2 1 3 16...
Страница 35: ...35 STEP 22 1 Install Swing beam support as shown PF 6020 3 x 3 x 47 1 2 SWING BEAM SUPPORT 5 16 18 X 6 Carriage Bolt Wood Loc Washer 5 16 Washer Loc Nut TOP OF BEAM SUPPORT 84 FROM BOTTOM OF POST...
Страница 36: ...position of Swing Hanger while tightening Lock Nut Final position of each Spring Clip is perpendicular to swing beam Swing Beam IMPORTANT x1 2 11 16 x 5 3 8 x 93 You may need to tap with hammer to get...
Страница 37: ...Bolt 5 16 Washer 5 16 Washer 5 16 Loc Nut 5 16 18 T Nut Small 5 16 18 T Nut Small 5 16 Washer 5 16 18 x 2 1 2 Hex Head Bolt 5 16 18 x 4 Hex Head Bolt 5 16 Washer 5 16 18 T Nut Small 5 16 Washer 5 16...
Страница 38: ...tach Swing Beam Bracket to A Frame Swing Beam as shown 5 16 Washer 5 16 Washer 5 16 18 x 3 1 2 Hex Head Bolt 5 16 Washer 2 Swing Beam Bracket 5 16 Washer 5 16 18 x 3 1 2 Hex Head Bolt 5 16 Loc Nut 5 1...
Страница 39: ...39 STEP 26 5 16 18 x 3 1 4 Hex Head Bolt 5 16 18 T Nut Small 5 16 Washer Beam Brace 5 16 Loc Washer 1 Install Swing Beam Brace as shown...
Страница 40: ...40 STEP 27 1 Install Swing Beam as shown 5 16 Loc Washer 5 16 Washer 5 16 18 x 8 1 2 Hex Head Bolt 5 16 18 x 6 Carriage Bolt 5 16 Loc Nut 5 16 Washer 5 16 18 T Nut Small 5 16 Wood Loc Washer...
Страница 41: ...41 STEP 28 6 PF 6000 5 8 x 5 3 8 x 33 3 4 1 Install Barrier Boards as shown NOTE Standard gap between deck boards is 1 2 1 3 16 30 mm Deck Screw x24 4 1 3 16 30 mm Screws per board...
Страница 42: ...quare 1 5 8 1 5 8 PF 6058 5 8 x 3 3 8 x 30 PF 6060 5 8 x 5 3 8 x 13 SUN 3 4 13 1 2 CENTERED PF 6062 1 x 3 3 8 x 42 1 2 ROOFA FRAME PF 6062 1 x 3 3 8 x 42 1 2 ROOFA FRAME 1 3 16 30 mm Deck Screw x12 3...
Страница 43: ...wn x2 1 PF 6056 5 8 x 2 x 10 2 PF 6059 5 8 x 2 x 7 PF 6053 1 3 8 x 3 3 8 x 43 1 2 CENTERED 43 1 2 43 1 2 1 3 16 30 mm Deck Screw x20 2 2 1 2 Screws 2 2 1 2 Screws 10 1 3 16 30 mm Screws 2 1 2 Deck Scr...
Страница 44: ...x 1 1 2 x 40 2 PF 6061 1 1 2 x 1 1 2 x 40 UNDERSIDE VIEW 5 PF 6055 1 2 x 5 x 47 1 2 SHINGLE Per Side 1 OVERHANG BOTH SIDES 1 1 5 8 Deck Screw per board 5 1 5 8 Deck Screws per board 4 PF 6055 1 2 x 5...
Страница 45: ...32 1 Attach Roof Frame to Tower as shown NOTE Secure roof from inside the tower 3 1 5 8 Screws 3 1 5 8 Screws 3 1 5 8 Screws 3 1 5 8 Screws Flush At Ends 1 5 8 Deck Screw x12 NOTE Secure Roof from the...
Страница 46: ...46 STEP 33 1 Attach Roof Side Support Boards as shown PF 6050 3 4 x 3 3 8 x 43 1 2 PF 6050 3 4 x 3 3 8 x 43 1 2 2 Deck Screw x8 8 7 9 0 31 4 2 Screws 4 2 Screws...
Страница 47: ...D E R S U P P O R T L P F 6 0 3 5 1 3 8 x 3 3 8 x 6 6 1 4 L A D D E R S U P P O R T R 5 PF 6032 1 x 3 3 8 x 18 1 2 PF 6029 5 8 x 3 3 8 x 20 1 2 2 2 1 2 Deck Screw x24 2 2 1 2 Screws per Rung 2 2 1 2...
Страница 48: ...48 STEP 35 1 Attach Ladder to Tower as shown Underdeck View 2 1 2 Deck Screw x3 12 x 3 4 Pan Screw x4 4 3 4 Pan Screw 3 2 1 2 Screws Panel Bracket...
Страница 49: ...3 3 8 x 60 ROCKWALL SUPPORT PF 6388 1 3 8 x 3 3 8 x 60 ROCKWALL SUPPORT 1 PF 6013 5 8 x 5 3 8 x 22 3 4 ROCKWALL BOARD 1 PF 6013 5 8 x 5 3 8 x 22 3 4 ROCKWALL BOARD 6 PF 6389 5 8 x 5 3 8 x 22 3 4 ROCK...
Страница 50: ...50 STEP 37 1 Attach Rock Wall as shown Under Deck View 2 1 2 Deck Screw x3 3 2 1 2 Screws 4 3 4 Pan Screw Panel Bracket 12 x 3 4 Pan Screw x4...
Страница 51: ...g Rocks on the Climbing Wall in a pattern that will easily allow your child to climb to the deck Make sure the bolt hole locations are clear of wall supports before drilling 2 Drill holes through the...
Страница 52: ...upport and Barrier Boards as shown Flush PF 6024 3 4 x 3 3 8 x 27 3 4 4 PF 6021 5 8 x 5 3 8 x 30 3 4 5 8 GAP BETWEEN ALL BOARDS Flush 2 1 2 Deck Screw x4 1 1 1 4 Deck Screw x18 1 2 2 1 2 Screws per si...
Страница 53: ...3 4 x 3 3 8 x 26 7 8 PICNIC TABLE LEG 11 3 8 6 7 8 Check to make sure structure is square 2 PF 6039 3 4 x 3 3 8 x 9 3 4 TABLE SUPPORT 2 PF 6037 3 4 x 3 3 8 x 15 3 4 BENCH SUPPORT Flush 4 1 1 4 Screws...
Страница 54: ...tached to the platform attach the slide support to the bottom half of the slide using 1 1 3 16 30 mm deck screw per side as shown Square the support to the ground and bury the ends of the brace NOTE T...
Страница 55: ...2 2 1 2 Pan Head Screws per rung 5 Short Monkey Bar Rungs 3 1 1 4 Pan Head Screws per L Bracket 2 L Brackets 2 Triangle Brackets 5 16 18 X 1 1 2 Hex Head Bolt 5 16 Loc Washer 5 16 Washer T Nut Small P...
Страница 56: ...Rungs 12 3 4 24 1 2 36 1 4 22 PF 6044 1 x 3 3 8 x 58 Flush 2 PF 6042 1 3 8 x 3 3 8 x 32 5 16 18 X 3 1 2 Hex Head Bolt 5 16 Loc Washer 5 16 Washer T Nut Small 4 2 1 2 Screws T Nut Small 5 16 Loc Washer...
Страница 57: ...Monkey Bar Assembly as shown T Nut Small 5 16 Loc Washer 5 16 Washer 5 16 18 X 1 1 2 Hex Head Bolt T Nut Small 5 16 18 X 3 Hex Head Bolt 5 16 Loc Washer 5 16 Washer 3 1 1 4 Pan Head Screws per L Brack...
Страница 58: ...ate and I D Tag as shown STEP 45 1 4 x 1 1 4 Pan Screw 1 4 Washer 11 1 4 Flat Washer x8 NOTE Hardware packaged with accessory 1 2 Pan Screw x2 ID Tag SA 1699 Safety Warning Plate SA 4294 3 4 Pan Screw...
Страница 59: ...exposed 90 o Eye bolts should be oriented perpendicular with Glider seat TOP VIEW It is helpful to use a screwdriver to hold eye bolt in place when tightening lock nut Eye Bolt Eye Bolt Tighten Lock N...
Страница 60: ...Link x4 Chain End Link Tighten clips securely with a wrench 8 minimum between Glider and ground Adjust Chains at Top 8 minimum between Glider and ground Adjust Chains at Top Glider Chain IMPORTANT Att...
Страница 61: ...ds together and attach to the unit as shown Note Keep as little play as possible using any of the holes in the strap that work best TIP When installing Anchor Its in rocky or hard soil create a starte...
Страница 62: ...to Swing N Slide at 166 Etowah Industrial Ct Canton GA 30114 Any part s returned to Swing NSlide must have prior approved Return Authorization Number and proof of purchase including the date of purcha...
Страница 63: ...rs Call our Customer Support Representatives 1 800 882 0272 Available Monday Friday 8am 5pm Technical support from experienced Swing N Slide customer service representatives who have actually built a...