background image

INSTALLATION GUIDE  

ThermShield MF(1 & 2) Installation Method 

Applies to...

•  Actionair ThermShield FD
•  Actionair ThermShield FD-C

Health and safety

•  This process must be undertaken by competent 

persons. More than one person may be required to 
ensure the safe handling of large dampers and other 
materials. Use must be made of access equipment to 
ensure unsafe practices are not used to approach walls 

or difficult access areas.

•  Standard site PPE should be used (minimum steel toe 

cap boots, hard hat); together with any protective 
eyewear, gloves and masks, when drilling or cutting is 
being undertaken. The latter should also be used when 

handing the wall construction materials, as defined by 

the material suppliers. If loud equipment is being used, 
hearing protection should be used.

•  All waste materials should be collected and disposed of 

as defined by the relevant supplier.

•  Actuators: All wiring should be carried out in 

accordance with the wiring details provided by the IEE 
and BS regulations and by a competent person. Care 
must be taken when installing and inspecting dampers, 
as they are likely to close without warning due to 
loss of electrical power or a temperature rise in the 
ductwork. This is their prime function. Do not insert 

any items, fingers or limbs between the blades. Larger 

dampers must be handled in accordance with current 
regulations and good practice due to weight.

Contents

Applies to... .......................................... 1
Health and safety .................................. 1

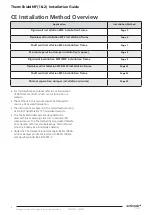
CE Installation Method Overview ..................... 2
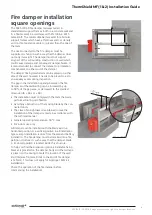
Fire damper installation square openings ........ 3
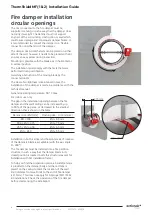
Fire damper installation circular openings ....... 4
Rigid wall installation MF2 installation frame .. 5
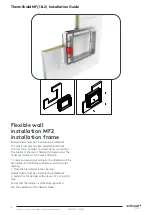
Flexible wall installation MF2 installation 
frame .................................................................... 6
Shaft wall installation MF2 installation frame . 7
Minimal Seperation Dampers (square) ............. 8
Rigid wall installation MF1/MF2 installation 
frame (circular) .................................................... 9
Flexible wall installation MF1/MF2 installation 
frame .................................................................. 10
Shaft wall installation MF2 installation frame 11
Minimal Seperation Dampers (circular) ........... 12

Periodic maintenance .............................14 

Actuators ............................................15
Wiring Diagrams ...................................18
Dimensional Data ................................. 20
Inspection and handover check sheet ........ 23

Содержание Actionair ThermShield MF

Страница 1: ...the wiring details provided by the IEE and BS regulations and by a competent person Care must be taken when installing and inspecting dampers as they are likely to close without warning due to loss of electrical power or a temperature rise in the ductwork This is their prime function Do not insert any items fingers or limbs between the blades Larger dampers must be handled in accordance with curre...

Страница 2: ...ation damper installation circular Page 13 For full classifications please refer to our Declaration of Performance DoP which can be found on our website The methods in this manual should be followed to ensure a CE marked installation The instructions are based on the tested method using Actionair ThermShield PTC fire smoke dampers Our ThermShield dampers are designed to be used with fire separatin...

Страница 3: ...ng between the fire damper and the wall ceiling can be increased by up to 50 of the gap area or decreased to the smallest dimension B 60 x H 60 The installation must comply with the tests that were performed during certification Avoid any obstruction of the moving blade by the con nected ducts The class of air tightness is maintained in case the installation of the damper is made in accordance wit...

Страница 4: ...ion of the damper is made in accordance with the technical manual General operating temperature 50 C max For indoor use only The gap in the installation opening between the fire damper and the wall ceiling can be increased by up to 50 of the gap area or decreased to the smallest dimension that is shown in the table Damper size Ød mm Opening size A minimum Ød 160 Ød 85 mm 180 Ød 315 Ød 75 mm 355 Ød...

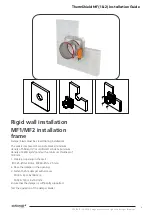
Страница 5: ...is composed of concrete blocks minimum density of 550 kg m or reinforced concrete minimum density of 2200 kg m and with a minimum thickness of 100 mm 1 Prepare opening in the wall according to B H 80 mm Damper blade must be closed during installation 2 Insert fire damper into wall and fasten with screws 12 pcs 6x160 mm Ensure that the damper is sufficiently supported Test the operation of the damp...

Страница 6: ...led on a steel frame construction The interior of the wall is filled with mineral wool The minimum thickness of the wall is 100 mm Create an opening according to the dimension of the fire damper and build the subframe according to the drawing 1 Place the fire damper in the opening Damper blade must be closed during installation 2 Fasten the fire damper with screws 12 pcs 6x160 mm Ensure that the d...

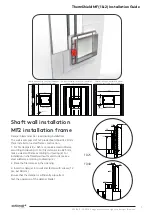
Страница 7: ... metal studs make a steel subframe according to drawing 3 2 Place the fire damper in the opening 3 Insert fire damper into wall and fasten with screws 12 pcs 6x160 mm Ensure that the damper is sufficiently supported Test the operation of the damper blade FD MF2 Fire damper B 625 mm installation in 90 mm shaft wall with metal studs opening H 80 opening B 80 FD MF2 Fire damper B 625 mm installation ...

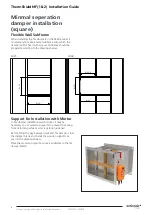
Страница 8: ... be fixed with screws Subframe should be prepared according to the drawings below Support for Installation with Mortar In fire damper installations with mortar it may be necessary to use wooden supports to prevent the casing from deforming while mortar is getting hardened Before filling the gap between wall and fire damper close the damper blade and install the wooden supports as seen in the drawi...

Страница 9: ...s composed of concrete blocks minimum density of 550 kg m or reinforced concrete minimum density of 2200 kg m and with a minimum thickness of 100 mm 1 Create an opening in the wall FDC25 Ød 10 mm FDC40 Ød 25 mm 2 Place the damper in the opening 3 Fasten the fire damper with screws FDC25 4pcs 6x160 mm FDC40 12pcs 6x160 mm Ensure that the damper is sufficiently supported Test the operation of the da...

Страница 10: ...ck installed on a steel frame construction The interior of the wall is filled with mineral wool 100 kg m The minimum thickness of the wall is 100 mm 1 Create an opening in the wall FDC25 Ød 10 mm FDC40 Ød 25 mm and build the subframe according to the drawing 2 Place the fire damper in the opening 3 Fasten the fire damper with screws FDC25 4pcs 6x160 mm FDC40 12pcs 6x160 mm Ensure that the damper i...

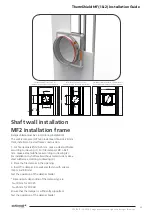
Страница 11: ...ke a steel subframe according to drawing 3 2 Place the fire damper in the opening 3 Insert fire damper into wall and fasten with screws 12pcs 6x160 mm Test the operation of the damper blade Dimension G depending of the damper type is G 10 mm for FDC25 G 25 mm for FDC40 Ensure that the damper is sufficiently supported Test the operation of the damper blade FDC MF2 Fire damper Ød 625 mm installation...

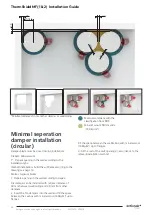
Страница 12: ...ning in the wall according to page 4 Fire damper can be installed with minimal distance of 30 mm between wall ceiling and 30 mm from other dampers 2 Insert the fire dampers into the wall and fill the space between the casings with mineral wool 140kg m up to flanges 30 3 0 30 30 Ød 2 3 0 1 Fill the space between the wall ceiling with mineral wool 140kg m up to flanges 3 Fill the rest of the wall op...

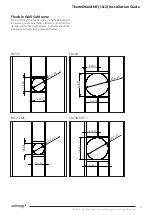
Страница 13: ...bframe When installing the fire dampers in the flexible walls it is necessary to make a metal subframe onto which the damper will be fixed with screws Subframe should be prepared according to the drawings below FDC25 FDC40 FDC25 MF1 FDC40 MF2 d 80 Ø d 80 d 80 d 80 d 80 d 80 2 Ø d 80 d 10 d 10 Ø d 10 d 25 d 25 Ø d 25 d 25 2 ...

Страница 14: ...ehensive example of the maintenance procedure is given in Annex D of the standard Some automatic systems may allow more frequent testing 48hr or less and this may be required by a national standard Approved Document B Volume 2 Clause 10 12 states adequate means of access must be provided to allow inspection testing and maintenance of both fire damper and its actuating mechanism BS 9999 2017 Code o...

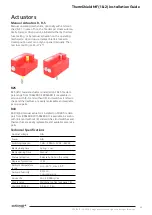
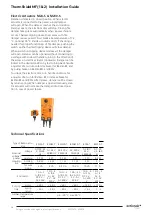
Страница 15: ...s available in version with R S and without R end switches End swit ches and thermal fuse are easily replaceable and available as service parts R40 R40 right manual actuator is installed on FD40 fire dam pers from 800x600 till 1500x800 It is available in version with R S and without R end switches End switches and thermal fuse are easily replaceable and available as service parts Technical Specifi...

Страница 16: ...st turning back handle a quarter of a turn counter clockwise for Belimo BF and by puling brake on Belimo BFL and BFN To unlock the electro motor turn handle clockwise for a quarter of a turn for Belimo BF or release brake for Belimo BFL and BFN After release damper will be closed by return spring When damper is opened manually elec tric actuator will not move the damper into closed posi tion in ca...

Страница 17: ...y turning in the direction of the arrow on electric actuator clockwise After release of Allen key damper will go to closed position Type Examination Certificate Number EXA 14 ATEX0064X Equipment complies with the essential health and safety requirements relating to the design and construction of equipment intended to use in potentially explosive atmospheres given in annex II of the directive 94 9 ...

Страница 18: ...6 1 negative direct current or neutral alternating current 2 positive direct current or faze alternating current S1 common micro switch closed damper S2 normally closed micro switch closed damper S3 normally open micro switch closed damper S4 common micro switch open damper S5 normally closed micro switch open damper S6 normally open micro switch open damper Tf temperature sensor on the outer side...

Страница 19: ...nstallation Guide H 300 Thermal fuse is located on the underside of the fire damper 300 H 450 Thermal fuse is located on the same side as Belimo actuator H 450 Thermal fuse is located on the same side as Belimo actuator below Bottom View Side view Side view Electric Actuator Schischek ExMax ...

Страница 20: ...ensional Data Square 350 123 5 103 5 H B 196 B 60 H 196 H 60 R 4 0 FD25 MF2 R H 350 123 5 103 5 H 350 123 5 103 5 H 196 B 60 H 196 H 60 B 196 B 60 H 196 H 60 R 4 0 FD25 MF2 M H 350 123 5 103 5 H 350 123 5 103 5 350 123 5 103 5 H H 196 B 60 H 196 H 60 B 196 H 196 H 60 B 60 B 196 B 60 H 196 H 60 R 4 0 FD40 MF2 M ...

Страница 21: ...ensional Data Circular 62 82 Dn 380 Dn 118 36 62 82 380 Dn 118 Dn 118 36 36 Ød 380 82 62 Ød 118 36 36 Ød 118 R 4 0 FDC25 MF1 R 62 82 Dn 380 Dn 118 Dn 118 36 36 Ød 82 62 36 380 Ød 118 62 82 D n 380 Dn 118 D n 1 1 8 3 6 36 Ød 118 36 Ød 118 R 4 0 FDC25 MF1 M Ød 380 103 5 65 Ød 118 36 36 Ød 118 11 R 4 0 FDC25 MF2 R ...

Страница 22: ...ld MF 1 2 Installation Guide 22 Swegon reserves the right to alter specifications 20210615 L00014 Ød 118 36 36 Ød 118 11 Ød 380 103 5 65 R 4 0 FDC25 MF2 M Ød 65 Ød 120 30 30 Ød 120 25 380 103 5 R 4 0 FDC40 MF2 M ...

Страница 23: ...ically 6 Is access through the ductwork to the damper unobstructed Unobstructed space should be provided for safe access to the damper This must include access through ceiling voids and adjacent services Damper installer to advise the system designer if problems are foreseen 7 Has the space around the damper and within the opening been left clear and not been used for other services Other services...

Отзывы:

Похожие инструкции для Actionair ThermShield MF