


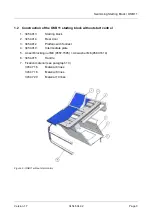


Swimming Starting Block / OSB 11
Version 1.7
3454.504.02
Page 13
5 PREVENTION AND MAINTENANCE
Equipment installed in aquatic complex, often sealed with a high moisture level, require special attention in
regards to their maintenance. In fact, the stainless steel parts found on ladders, fences or swimming starting
blocks can have corrosion if they are not frequently cleaned.
Stainless steel is an excellent product that needs to be very clean to keep its stainless quality.
MAINTE
NANC
E
When you receive your new equipment, it is important to establish a maintenance program to
avoid the stainless steel parts to deteriorate. Indeed, lack of maintenance can make the
chromium oxide film inefficient, which could cause corrosion on your equipment. A dirty
surface is the biggest ally of corrosion and your biggest enemy.
Dirt, grease and deposit left by users or by contaminated water deposit must be removed by cleaning the
surface with
fresh water
(do not use the pool’s water) and wiped, if possible, with a clean dry cloth.
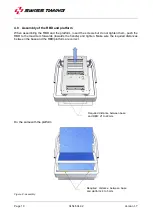
A
basic cleaning
of the starting blocks’ inner and outer surfaces (without disassembling) must be done
regularly,
preferably every week
.
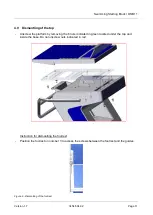
A
thorough cleaning
with removal of the top (see manual) must be done
regularly
, several times a
year, depending on the degree of contamination of the stainless steel. You must pay extra attention to
the RBD (Relay Break Detection) and the handles (backstroke ledge).
Concerning dismantling, it is imperative to use tools that are specially designed for stainless steel.
Applying a hydrophobic (insoluble in water) silicone type B 431 also increases the protection of the
sensitive areas of the OSB14 against corrosion.
A tube of this silicone is provided with each mounting set and must be used in case it is dispersed and
after each thorough cleaning or rehabilitation.
RE
M
E
DIAT
IO
N
If your equipment is already showing significant dirt deposits, you need to get rid of them in
order that the oxygen from the air gets in contact with the chromium in the stainless steel to
form the protective chromium oxide film.
A thorough cleaning with fresh water
should be sufficient. If some dirt remains, rub with a nylon pad
or a cotton cloth. Make sure the pad you use is not rough to prevent it damaging the protective film or the
aesthetic finish of the product.
After a
thorough cleaning
, clean the stainless steel with fresh water
twice a week
during a few months
and then decrease the frequency.
Never use a metal brush, steel wool, emery paper or any abrasive material to clean. Indeed, stainless
steel would be contaminated by a large quantity of undesirable particles which inevitably would cause
rust stains.
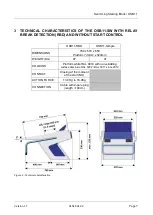
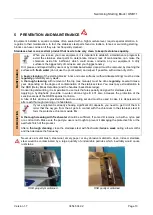
OSB properly maintained
OSB poorly maintained
Содержание SWISS TIMING 3454.013
Страница 1: ...3454 504 02 Version 1 7 Edition March 2020 OSB 11 Swimming Starting Block User s Manual...
Страница 4: ......
Страница 20: ...Page 16 3454 504 02 Version 1 7 NOTES...


