Swann DVR4-Alert Plus Скачать руководство пользователя страница 16


User Manual

1. 

Hard Drive Usage (Displayed as a percentage) 

2. 

Recording symbol (channel is currently recording) 

3. 

Camera Number 

4. 

Record Mode (QUAD or EACH) 

5. 

Status (REC, Play, FF1, FF2, FF3, REW, PAUSE) 

6. 

HDD Info. ([M] Master Hard disk) 

7. 

Record Schedule: (T) Time or Manual Record (M) Motion Detection (-) No 

Recording 

8. 

The date and time on the DVR


6.2 Stop Recording


 Press [

Stop

] button to stop recording. If you have already activated the 

password protection, you will be prompted to input the password. 


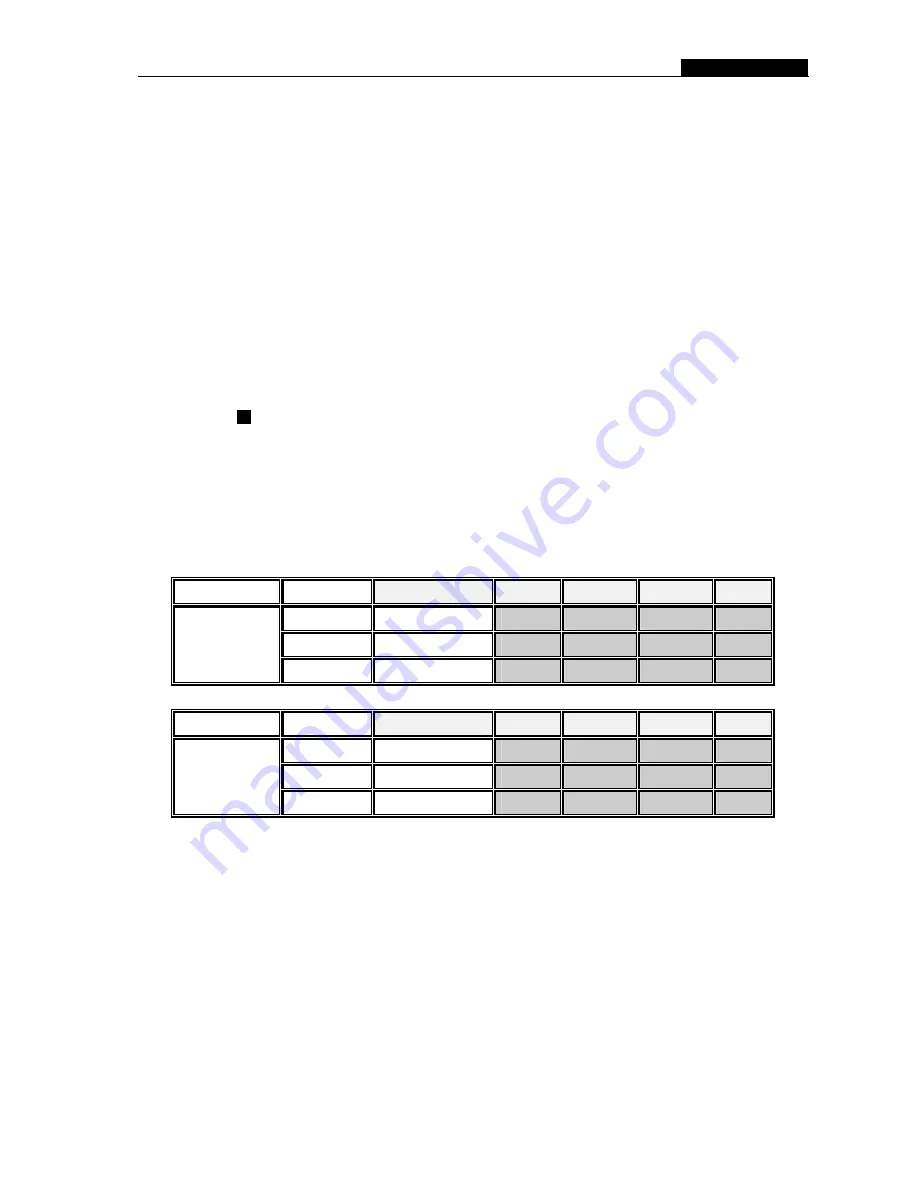
6.3 Recording Time on Hard Drive


System


Quality 

Frame Rate 

30 

15 

HIGH 

20 K Bytes 

58 

117 

251 

1748 

NORMAL 

15 K Bytes 

78 

155 

332 

2330 

NTSC 

LOW 

12 K Bytes 

97 

194 

416 

2913 

System


Quality 

Frame Rate 

25 

12 

HIGH 

20 K Bytes 

70 

146 

291 

1748 

NORMAL 

15 K Bytes 

93 

194 

388 

2330 

PAL 

LOW 

12 K Bytes 

117 

243 

485 

2913 

Estimated record time based on a 120GB Hard Drive (Quad Mode) in hours: 

You can calculate and estimate record hours by below formula: 

120 (G Byte) × 1024 (M Byte) × 1024 (K Byte) 

Divided by: 

15 (Kbyte/frame) × 7 (frame/sec.) × 60 (sec.) x 60 (min.) 

 
Estimated time would be 332 Hours. 


- 13 - 

Содержание DVR4-Alert Plus

Страница 1: ...DVR4 Alert Plus 4CH Digital Video Recorder SW242 DAL SW244 DAO U Us se er r M Ma an nu ua al l...

Страница 2: ...ng Lost Data 4 4 3 Restore Recording Feature 4 4 4 Main Screen 5 5 DVR Setup 5 1 Setup Menu 5 5 2 Camera Select 6 5 3 Record Select 6 5 4 Resolution 7 5 5 Record Frame 7 5 6 Record Quality 8 5 7 Sched...

Страница 3: ...cording 13 6 3 Recording Time on Hard Drive 13 7 Playback 14 8 USB Programming 15 8 1 PC Viewer Program 15 8 2 Program Buttons 15 8 3 PC Backup 16 9 Specifications 17 10 Appendix 10 1 System Connectio...

Страница 4: ...Control Removable Hard Drive Tray 2 1 Front Panel CH1 Channel 1 Stop Stop Playing Recording CH2 Channel 2 REC Record CH3 Channel 3 Menu Esc Enter exit setup menu CH4 Channel 4 SEL Edit Confirm Selecti...

Страница 5: ...Channel 3 CH4 Select or enlarge Channel 4 Quad Quad View 4 Camera View Rewind Playback Recording Forward Record Pause Stop recording playback Menu Enter or exit setup menu Move up left cursor SEL Sele...

Страница 6: ...ive IDE type connection 4 Firmly insert the HDD tray into DVR body 5 Lock the HDD tray Lock the caddy by turning the key clockwise If you need to unlock the tray turn the key counter clockwise CAUTION...

Страница 7: ...creen it will show the hard drive information If no hard drive is detected check that the HDD is set to master and the tray is locked After connecting the power the system will boot up and detect the...

Страница 8: ...er CH1 through CH4 Bottom right Date and Time Bottom left System recording status Refer to 6 1 Start Recording 5 1 Setup Menu MenuDirectory CAMERA SELECT RECORD SELECT RESOLUTION RECORD FRAME VIDEO QU...

Страница 9: ...2 Camera Select 6 The DVR system can display 4 cameras at once or you can limit the number of cameras displayed to save HDD space Press SEL to modify setting or press CH1 CH2 CH3 and CH4 to set each c...

Страница 10: ...ra will appear in full screen for three 3 seconds including Quad view The switch will lasts until any button is pushed NOTE Pushing the Stop button will stop the switch feature but also may stop the r...

Страница 11: ...e recording methods need to be triggered by pressing the REC button After pressing REC button if the schedule is set to T at that time the DVR will start to record immediately if the schedule is set t...

Страница 12: ...on When this option is set to ON you will be required to enter a password if you want to stop recording or enter the menu System default password Press CH1 button six 6 times 5 10 Miscellaneous Menu P...

Страница 13: ...and save If you choose NO the recording process will stop when the hard drive is full OVERWRITE ENABLED If you choose YES recording continues and overwrites oldest recordings when the hard drive is f...

Страница 14: ...E OFF MOTION SET PRESS UP DOWN ENTER SELECT PRESS MENU TO EXIT MOTION DETECTION SET CHANNEL 1 SENSITIVITY 4 CHANNEL 2 SENSITIVITY 4 CHANNEL 3 SENSITIVITY 4 CHANNEL 4 SENSITIVITY 4 CHANNEL 1 AREA SET C...

Страница 15: ...button If you have forgotten your password and would like to reset press Pause button 10 times to reset DVR to factory default Then the default password is now CH1 button 6 times If you are unable to...

Страница 16: ...d protection you will be prompted to input the password 6 3 Recording Time on Hard Drive System Quality Frame Rate 30 15 7 1 HIGH 20 K Bytes 58 117 251 1748 NORMAL 15 K Bytes 78 155 332 2330 NTSC LOW...

Страница 17: ...ing time of the event 2 TIME continuous record 3 MOTION Motion Triggered event 4 FORCE Force Record event 5 marks un played video recording Chapter 7 Playback You can also play recorded video by searc...

Страница 18: ...gram 1 Insert the CD into your CD ROM Drive 2 Open CD directory 3 Double click on the PCViewerInstall exe file to install the PC Viewer software 4 Run the installed PC Viewer program PC Viewer will de...

Страница 19: ...video clip to PC in mys avi file 5 Load video file saved in PC Load mys file saved in PC 6 DVR Mode 7 PC Mode To switch working mode between PC viewer mode and DVR viewer mode 8 Channel selection keys...

Страница 20: ...g Frame Rate Each Mode PAL Each Channel 25 fps Number of Cameras Max 25 frames s Total Record Mode Continuous Time Schedule Motion Triggered Display NTSC 720 480 PAL 720 576 Resolution Record NTSC 320...

Страница 21: ...endix 10 1 System Connection Diagram 10 2 DVR Accessories included Power Cord The shape of the plug might be different from different countries or regions Power Adaptor User s Manual Software CD Remot...

Отзывы: