background image

To prevent breakage or distortion, do not use oil-based
caulking or putty to connect the overflow assembly.  Oil-based
plumber’s putty will have a harmful effect on the overflow
assembly, resulting in a leak.  If a sealant is required between
the overflow assembly and the tail pipe, use silicone sealant.

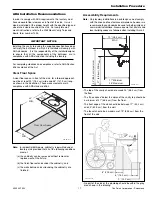
13. Install tail pipe onto the sink ring.

14. Tighten the tail pipe assembly onto the sink

Do not overtighten the nut when installing the tail pipe.  Hand-
tighten the nut and then tighten NO MORE than one-half turn.
Overtightening will break the overflow assembly and void the
warranty.

15. Turn on water and check for leaks.

Undermount Installation

Note:

If undermount installation is required to be ADA
compliant, refer to the wall mount installation and ADA
sections.

Note:

Steps 1 through 3 are working from top of the
countertop.

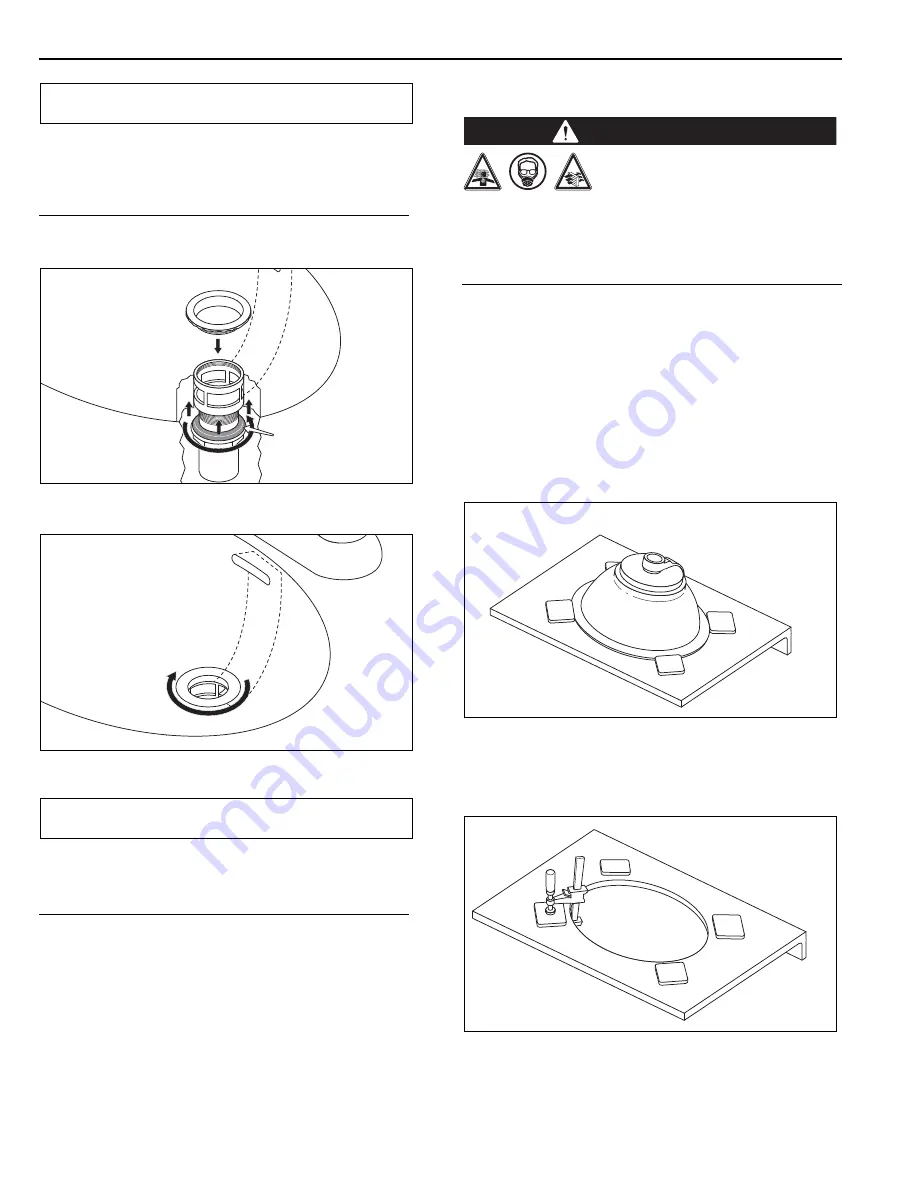
1.

Position template on countertop in desired location.

2.

Cut opening and finish the edge of the hole.

D

Du

us

stt  H

Ha

az

za

arrd

d

When sanding Swanstone product,
use a dust collection method which

prevents dust particles from going into the air. Always work
in a well-ventilated area. To keep the area well ventilated,
open windows and use exhaust fans. Always use an OSHA
approved dust mask when cutting, drilling, or sanding
Swanstone products. 

Note:

Remaining steps are working from underside of the
countertop.

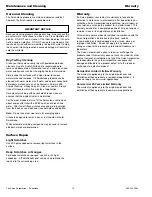
3.

Place bowl into desired position, making sure that
overhang is uniform and aligned with the cutout.

4.

Using 3” wide strips of ¾” thick plywood, trial fit the pieces
around bowl perimeter making sure not to cover faucet
openings.  Make sure there is 1/4” space between
plywood strips and bowl flange.

5.

Using construction adhesive, fasten plywood strips to
countertop surface.  For maximum adhesion of plywood
strip to countertop, use the manufacturer’s recommended
curing time.

6.

Clean bowl and bottom of the countertop surface with
denatured alcohol.  Remove all dust.  Let the surface dry
completely.

VI-036

VI-034

WARNING

IMPORTANT NOTICE

VI-052

VI-051

No Plumber’s
Putty in this
location

IMPORTANT NOTICE

The Swan Corporation – Swanstone

12

800-325-7008

Installation Procedure

Содержание Chesapeake Vanity

Страница 1: ...y Information Register your warranty at www swanstone com R e a d a n d U n d e r s t a n d B e f o r e I n s t a l l i n g Form 255 1 Models Chesapeake Vanity Single Bowl Chesapeake Vanity Double Bowl Contour Vanity Single Bowl Ellipse Vanity Single Bowl Ellipse Vanity Double Bowl Europa Vanity Single Bowl Hilo Vanity Bowl Islandia Vanity Bowl Palladio Above Counter Washbasin ...

Страница 2: ...ips or falls Before installation dry all surfaces including the floor with a cloth or paper towel Clean up all water or spilled fluids immediately Tripping Hazard Personal injury can result from tripping over power cords tools or other items DO NOT leave items laying around the work area CAUTION IMPORTANT NOTICE The Swan Assurance if our product is properly installed and maintained as stated in th...

Страница 3: ...Hazard The fumes from the silicone and solvents used by the installer can be harmful if used in an unventilated room Always work in a well ventilated area To keep the area well ventilated open windows and use exhaust fans If adequate ventilation is not achievable or practical use respiratory protective equipment Dust Hazard When cutting or drilling the Swanstone product use a dust collection metho...

Страница 4: ... W CH2B 2273 22 1 2 D x 73 W Contour Vanity Single Bowl CV 2225 22 D x 25 W CV 2231 22 D x 31 W CV 2237 22 D x 37 W CV 2243 22 D x 43 W CV 2249 22 D x 49 W Ellipse Vanity Single Bowl VT1B 1719 17 D x 19 W VT1B 1925 19 D x 25 W VT1B 1931 19 D x 31 W VT1B 1937 19 D x 37 W VT1B 2225 22 D x 25 W VT1B 2231 22 D x 31 W VT1B 2237 22 D x 37 W VT1B 2243 22 D x 43 W VT1B 2249 22 D x 49 W VT1B 2255 22 D x 55...

Страница 5: ... Side Splash and Front Apron Panels Side Splash Panel for Vanity Tops one per carton Model Part Dimensions VT18 3SS VT01803SS 18 W x 3 H x 3 8 D VT19 SS VT00019SS 19 W x 3 H x 3 4 D VT21 3SS VT02103SS 21 W x 3 H x 3 8 D VT22 SS VT00022SS 22 W x 3 H x 3 4 D Side Splash Panel for Chesapeake one per carton Model Part Dimensions CHVTSS CHVTSS 21 5 8 W x 3 1 2 H x 3 4 D Side Splash Panel for Europa one...

Страница 6: ...enatured alcohol and a clean cloth Be very careful not to disturb caulk joints before they dry Installation Procedure Disclaimer The information contained in this Installation Manual is given free of charge It is based upon technical data which we believe to be reliable and is intended for use by persons having knowledge of this technical area at their own discretion and risk Swanstone assumes no ...

Страница 7: ...a well ventilated area To keep the area well ventilated open windows and use exhaust fans Always use an OSHA approved dust mask when cutting drilling or sanding Swanstone products 2 Drill fixture hole s using the 1 4 pilot hole for a guide with a 1 3 8 hole saw 3 Faucet may be installed at this time per manufacturer s instructions Vanity Top Installation Cabinet Mount 1 Install cabinet per manufac...

Страница 8: ...g agents or solvents 3 Apply a bead of adhesive or silicone onto each corner of cabinet top 4 Place Swanstone vanity top onto the cabinet making sure vanity is seated properly 5 Wipe off any excess adhesive and allow vanity top to set for 24 hours to ensure maximum adhesion 6 If desired use a color match silicone sealant not included Place a bead of sealant along the seam of the back splash panel ...

Страница 9: ...en tighten NO MORE than one half turn Overtightening will break the overflow assembly and void the warranty 10 Connect the faucet supply lines per the manufacturer s instructions 11 Connect the drain lines and p trap per the manufacturer s instructions Note Swanstone recommends using a licensed plumber for the installation of all necessary plumbing 12 Turn on the water and check for leaks Fix any ...

Страница 10: ... these products Ventilate any work area before beginning to apply silicone sealants cleaning agents or solvents 4 Apply a thin bead of adhesive or silicone onto back of side splash panel and attach it to the wall Wipe off excess adhesive with denatured alcohol and allow adhesive to set for 24 hours for maximum adhesion 5 Caulk all seams between wall and side back splash to create a moisture barrie...

Страница 11: ...e Silicone vapors may irritate eyes and nose Personal injury can result from improperly handling or use of products such as denatured alcohol Always follow the manufacturer s recommendations for the safe use of these products Ventilate any work area before beginning to apply silicone sealants cleaning agents or solvents 9 If installing for raised mount apply adhesive around base flange and set bow...

Страница 12: ... ar rd d When sanding Swanstone product use a dust collection method which prevents dust particles from going into the air Always work in a well ventilated area To keep the area well ventilated open windows and use exhaust fans Always use an OSHA approved dust mask when cutting drilling or sanding Swanstone products Note Remaining steps are working from underside of the countertop 3 Place bowl int...

Страница 13: ... countertop 8 Attach the sink with clips and screws Loosely tighten the screws 9 If mounting the bowl with an undermount overlap bowl should be positioned as shown 10 If mounting the bowl with an undermount reveal bowl should be positioned as shown 11 Verify bowl is in correct position and has not shifted then completely tighten screws Do not overtighten 12 Use a soft cloth with mineral spirits to...

Страница 14: ...Tighten the tail pipe assembly onto the sink Do not overtighten the nut when installing the tail pipe Hand tighten the nut and then tighten NO MORE than one half turn Overtightening will break the overflow assembly and void the warranty 19 Turn on water and check for leaks The installation is now complete DO NOT discard these installation instructions PLEASE LEAVE THEM WITH THE HOMEOWNER Palladio ...

Страница 15: ...move all dust Let the surfaces dry completely 9 Apply a bead of silicone around the underside of sink flange and position it over the countertop opening S So ol lv ve en nt ts s H Ha az za ar rd d Follow all manufacturers safety instructions for silicone sealants and denatured alcohol Alcohol vapors are both flammable and hazardous to breathe Silicone vapors may irritate eyes and nose Personal inj...

Страница 16: ...3 Install tail pipe onto the sink ring 14 Tighten the tail pipe assembly onto the sink Do not overtighten the nut when installing the tail pipe Hand tighten the nut and then tighten NO MORE than one half turn Overtightening will break the overflow assembly and void the warranty 15 Connect the faucet supply lines per the manufacturer s instructions 16 Connect the drain lines and p trap per the manu...

Страница 17: ...sink provided that all of the following conditions are met a the cabinetry can be removed without removal or replacement of the fixture b the finish floor extends under the cabinetry and c the walls behind and surrounding the cabinetry are finished Accessibility Requirements Note Only lavatory installations in a public space must comply with the knee and toe clearance dimensions however we recomme...

Страница 18: ...bing compound may be used to remove stubborn marks or discoloration Surface Repair Light Scratches Use 400 grit sandpaper to remove light scratches in the surface Deep Scratches or Gouges For deeper scratches or gouges use 220 or 320 grit sandpaper A Scotchbright pad can be used to blend the repair into the surrounding area Warranty If a Swan product covered by this warranty is found to be defecti...

Страница 19: ......

Страница 20: ...www swanstone com Form 255 1 Save these Installation Instructions for future reference They provide important information on cleaning maintenance and surface repair of the Swanstone Products ...

Отзывы: