background image


22

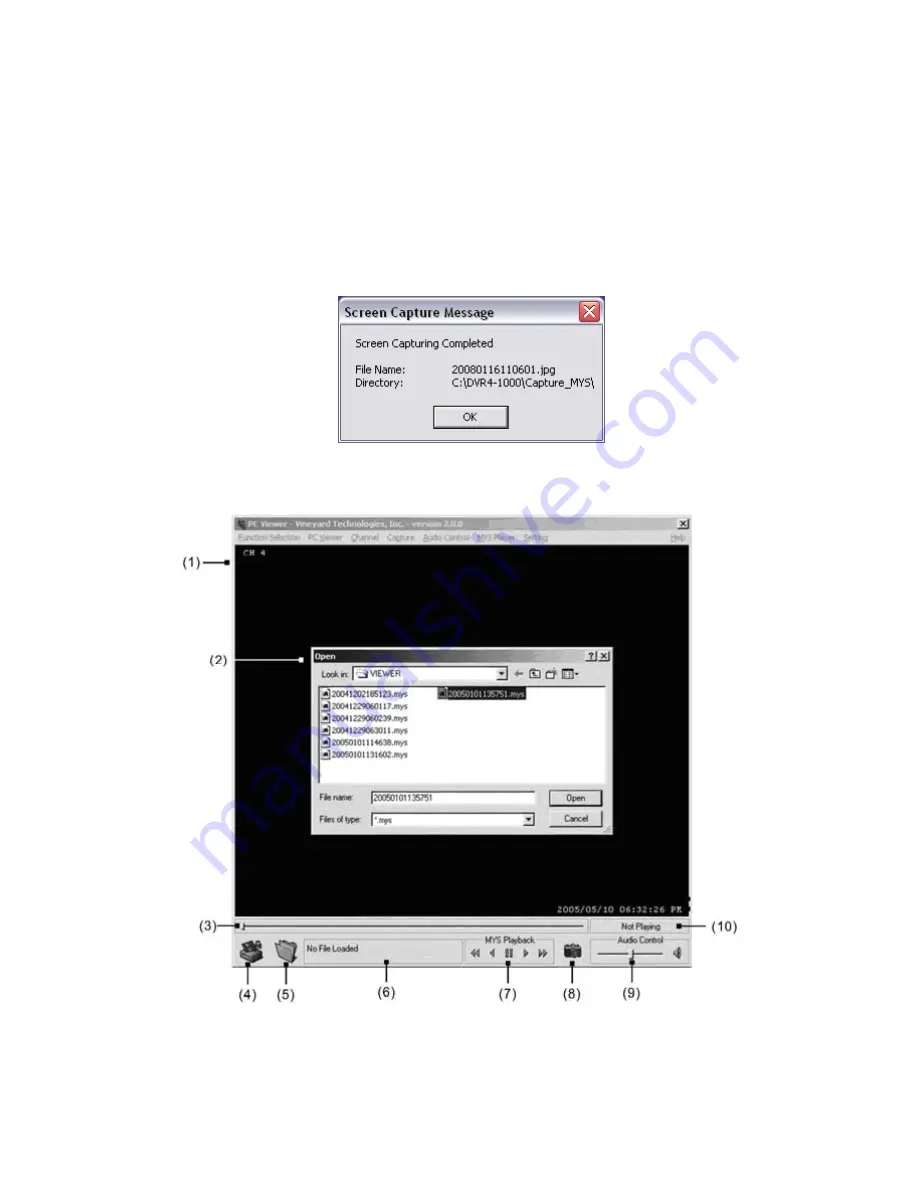
Capturing a JPEG Image 


1.  Navigate the viewer to a position you would like to begin recording and 

click the pause button in player controls 

 
2.  Click the ‘Capture JPEG Image’ button to create an image 


3.  A dialog box will appear showing the location and filename in year-

month-day-time format of when it was recorded 


MYS Player Layout


Содержание Alert DVR Camera Kit

Страница 1: ...DVR4 1000 User Manual SW242 DU2 www swannsecurity com SR242 DU2 10005 EN160109 ...

Страница 2: ...to which the receiver is connected Consult the dealer or an experienced radio TV technician for help IMPORTANT Prohibition against eavesdropping Except for the operations of law enforcement officers conducted under lawful authority no person shall use either directly or indirectly a device operated pursuant to the provisions of this Part for the purpose of overhearing or recording the private conv...

Страница 3: ... Setup Menu 13 Live ON OFF 13 Record ON OFF 13 Brightness Setup 13 Contrast Setup 13 Color Setup 13 Auto Switching 13 Record Setup Menu 14 Record Mode 14 Video Quality 14 Record Frame Rate 14 Record Schedule Menu 14 Programming Record Modes 14 Motion Setup Menu 15 Setting Camera Sensitivity 15 Recording with Motion Detection 15 Hard Drive Setup Menu 16 Overwrite Feature 16 Hard Drive Information 1...

Страница 4: ... Control USB Cable Software CD Security Stickers DVR Power Supply Power Supply Cable Video Cable Using the Remote Control for the First Time The remote control contains a built in battery that must be activated before use Find the clear plastic tab at the bottom of the remove Gently pull to remove The remote will now be ready for use ...

Страница 5: ... mode 6 Menu Button Press to enter main menu returns to previous menu exits main menu 7 Remote Control Sensor Aim the remote control at the sensor 8 Power Indicator Light is on when DVR is powered on 9 Hard Drive Indicator Light is on when hard drive is active recording searching etc 10 Play Pause Button Push to begin last recording playback or pause playback 11 Rewind Button Push to rewind playba...

Страница 6: ...or Europe and Australia 7 Power Input DVR power supply connection Remote Control Layout 1 4 Camera Select Buttons Changes to corresponding camera when pushed 5 Record Stop Button Start or stop recording 6 7 Up Down Buttons Use to move up or down 8 9 Rewind Fast Forward Moves left right in menus 10 Enter Exit Menu Button 11 Enter Button Confirm selection in menus 12 Play Pause Button Start or pause...

Страница 7: ...tension cable connect your camera to the extension 2 Connect the BNC connector to VIDEO IN CH1 on the back of the DVR If required use RCA to BNC adapters for RCA cameras 3 Connect the Power connector on the extension cable to your camera s power supply 4 Finally connect the DVR s power adapter to the DC 12V input on the back of the DVR and plug in your camera power supply ...

Страница 8: ... Video Input This is sometimes listed as Source Input L1 L2 Video A V and Channel 0 Consult your TV manual for more information Powering the DVR On Off To turn on your DVR connect the power adapter to the DC 12V input on the back of the unit If you do not require use of the DVR for long periods of time Swann recommends unplugging the unit To turn the DVR off simply unplug the DVR from the wall out...

Страница 9: ...annel in full screen view 4 Record Mode Each or Quad 5 Recording Indicator 6 Motion Detected Motion indicator 7 Type of Recording Motion M Timer T or No recording Auto Switching Feature Press the Auto Switching button to cycle all 4 cameras in full screen mode See Camera Setup Menu for details on changing the length of time between cycles ...

Страница 10: ...p all record modes before entering playback or the main menu otherwise a Hard Drive Usage message will appear Playback Mode To enter playback mode press the Play Pause button The recordings will begin playing Press the Play Pause button again to pause the recording Press the Fast Forward button to increase the playback speed by 2X 4X or 8X Press the Rewind button to reverse playback To stop playba...

Страница 11: ...op button to move the cursor to the date and time at the top of the screen Cursor Time Date YY MM DD Press the Left and Right buttons to move the cursor to the desired value Press the Up and Down arrows to change the value the cursor is under When you have finished changing the Date and Time you are searching for press the Play Pause button to view the recording Note If the date is outside of the ...

Страница 12: ... select button System Setup Menu From the Main Menu select System Setup Buzzer Alarm Time Number of seconds the alarm sounds Loss Alarm Set the DVR to sound an audible alarm when any video signal is lost or disconnected from the unit Password Setup Select to change password Note Default is 111111 Set with the channel select buttons You will be prompted to enter the current password before entering...

Страница 13: ...rent camera Live ON OFF Turns selected camera on off Record ON OFF Set the selected camera for viewing only will not record Bright Setup Increase or decrease camera brightness 0 low 9 high Contrast Setup Increase or decrease image contrast 0 low 9 high Colors Setup Increase or decrease color hue 0 low 9 high Auto Switching Set the number of seconds the camera will be shown before cycling to the ne...

Страница 14: ...lable on playback Video Quality Set recording quality Low Medium or High Record Frame Rate Set Frame Rate up to maximum 30 fps NTSC 4 Channels x 7 5 fps or 25 fps PAL 4 Channels x 6 25 fps Record Schedule Menu Programmed Record Set the DVR to record Motion Timer or No recording Schedule is based on 24 hour time clock M Motion Detection Recording T Timer or Continuous Recording No Recording ...

Страница 15: ...ot be activated unless specified in Record Schedule Programmed Record as above Setting the sensitivity to 0 will turn off motion detection for the chosen camera Recording with Motion Detection When Motion settings have been set exit all menus and press the Record Stop button to begin recording Square indicates Channel 1 is recording 2nd M indicates Motion has been detected ...

Страница 16: ... Size The total hard drive size Master HDD Used The total memory used in MB and percentage full Master HDD Format When formatting the hard drive you will be prompted to enter your password to prevent unauthorized tampering System Restore Feature System Restore This feature will reset all settings to default Note System Restore resets settings only will not erase hard drive contents ...

Страница 17: ...imate Hard Drive Recording Times The following table is an approximate guide to recording times for an 80GB hard drive This is a general guide only as complexities and changes in an image will vary storage sizes ...

Страница 18: ...ion 1 Ensure the DVR4 1000 is powered on 2 Connect the included USB cable to your computer and DVR4 1000 3 Insert the software CD into your CD ROM drive 4 Open My Computer and navigate to your CD ROM 5 Double click the setup exe program located on the CD 6 Click Install 7 Read the License Agreement and click I agree 8 Click Ok to complete the installation Running the PC Viewer Software First ensur...

Страница 19: ...Channel View Cameras 1 4 2 Position Slider Cycle through all recordings 3 MYS Player Switch to MYS player view 4 Not Used 5 Hard Drive Information 6 Channel Selection Full screen selector 7 Viewer Playback Controls 8 Capture MYS Video Create MYS video file preserving DVR video formatting 9 Capture AVI Video Convert video to AVI 10 Capture JPEG Image Create JPEG screen capture 11 Not Used 12 Curren...

Страница 20: ...orded on the hard drive Capturing Video and Images The PC Viewer software has 3 options for backing up footage from the DVR to your PC 1 Capture MYS Video This option will save selected video in the proprietary MYS format Video files in this format are preserved as they were written to the DVR4 1000 2 Capture AVI Video This option will save selected video in AVI format commonly read by most comput...

Страница 21: ...n you would like to begin recording and click the pause button in player controls 2 Click the Capture AVI Video button to bring up the save dialog box 3 Choose a filename and location to save your video and click save 4 Choose your desired compression type The default is Uncompressed click OK 5 The video will begin playing and recording to your PC When it has finished click the Capture AVI Video b...

Страница 22: ... would like to begin recording and click the pause button in player controls 2 Click the Capture JPEG Image button to create an image 3 A dialog box will appear showing the location and filename in year month day time format of when it was recorded MYS Player Layout ...

Страница 23: ...layer button 2 The Open file box will appear select the file you wish to play and click Open 3 The file will begin playing Use the playback controls to navigate through the video While in MYS Viewer mode you may create a JPEG image as in the PC Viewer software To return to the PC Viewer click PC Viewer button Note If you have already stored MYS files on the computer and wish to view them you do no...

Страница 24: ...TSC 640 x 448 Resolution PAL 640 x 544 Recording NTSC 640x224 PAL 640x272 Advanced Low 12K Bytes Frame Compression Format MJPEG Normal 15K Bytes Frame High 20K Bytes Frame Supported HDD SATA X 1 Backup Device PC via USB or Output to VCR Search Mode Time Date Event MOTION DETECT YES LOSS DETECT YES BUZZER OUTPUT YES Brightness adjust YES Contrast adjust YES USB Output YES System monitor Power recov...

Страница 25: ... Communications will at their discretion repair replace or credit the faulty unit unless otherwise specified by contractual agreement viii Any unit returned as faulty but tested and found OK will incur a handling charge ix DOA Swann considers that any product that fails within 14 days of end user purchase can be considered DOA and will be replaced with a new unit x Swann Communications will fully ...

Страница 26: ...pm US PT USA Exchange Repairs 562 777 2551 M F 9am 5pm US PT AUSTRALIA toll free 1300 138 324 M 9am 5pm AUS ET Tu F 1am 5pm AUS ET Sa 1am 9am AUS ET New Zealand toll free 0800 479 266 International 61 3 8412 4610 See http www worldtimeserver com for information on different time zones and the time in Melbourne Australia compare to your local time Swann Communications 2008 ...

Отзывы: