


Take note of the symbols and what they mean in the
ASSEMBLY section. If the term OEM appears in the
ASSEMBLY section, the vehicle manufacturer's
specifications must be observed and applied.
If you have any questions, please don't hesitate to contact
our Customer Service team or our distributors. You can
find our telephone number and a list of our distributors in
our online shop:
www.sw-motech.com
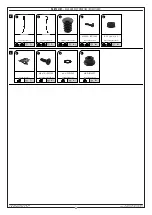
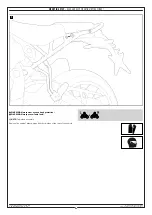
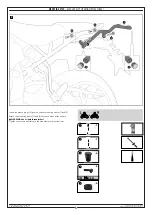
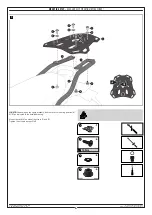
Identical assembly on both sides: Indicates that
installation on the side of the vehicle not shown
must be carried out identically to the side of the
vehicle shown.
Hand protection: Wear suitable hand protection during
assembly and disassembly.
Safety glasses: Wear safety glasses during assembly
and disassembly.
Hex key set: Use this tool during assembly or
disassembly.
Torque wrench: Use this tool during assembly or
disassembly.
Hex bit set: Use this tool during assembly or
disassembly.
Use screw lock: Indicates that a thread must be
coated with liquid screw lock. H (HIGH): high
strength; M (MEDIUM): medium strength; L (LOW):
low strength.
Tighten / note the tightening torque information:
Indicates the tightening torque of a part specified by SW-
MOTECH or the vehicle manufacturer (OEM).
Ratchet with extension: Use this tool during
assembly or disassembly.
Socket set; Allen key: Use this tool during assembly or
disassembly.
Direction arrow: Shows the orientation of the vehicle
in the illustration.
LEGEND OVERVIEW ·
READ AND KEEP MOUNTING INSTRUCTIONS!
The content translation is automated.
© SW-MOTECH GmbH & Co. KG
Errors and omissions excepted
Subject to technical and design changes.
2


