background image

Chapter 2: Installation

2-29

1

1

JI2C2

JI2C1

SLOT4 PCI-E 2.0 X4 ON X8

U3

U4

JS

2

JS

1

J31

JTPM

JP

ME

2

JP

ME

1

J29

JL

1

T-

SGPIO

2

T-

SGPIO

1

JWF1

JPW2

JWO

L

J12

JSPK

JPI2C

JF

1

JPW1

B1

JS6

JS3

JS4

JS5

J24

JLAN2

JLAN

1

CO

M1

SPKR

1

LE3

LE4

LE2

JWD

JLED

JPL2

JPG1

JP

BJ

PL

1

JPUSB1

FA

NA

FAN1

FA

N4

FAN3

FA

N2

U82

DIMM2

DIMM3

DIMM1

DIMM4

LE7

FF

DDR3 1066/1333 UDIMM required

GND

GND

5V

1-2:RST 2-3:NM

I

JWD

USB4/5

USB 12/13

_LAN

IP

MI

1-2:ENABLE 2-3:DISABL

E

JPL2:LAN2

JPL1:LAN1

2-3:DISABL

E

1-2:ENABLE

JPB:BM

C

JSPK

:Buzzer/Speake

r

COM2

VGA

COM1

USB11

JBT1:CMOS CLEAR

SLOT7 PCI-E 2.0 X8

LAN2

LAN1

JPUSB1:B/P USB WAKE UP

1-2:ENABLE

2-3:DISABLE

DIMM2B

DIMM2A

JI2C1/JI2C

2

USB2/3

SLOT6 PCI-E 2.0 X8

2-3:Disable

1-2:Enable

CPU

JLED1:3 pin 

Po

wer LE

D

OFF

:Disable

ON:Enable

2-3:DISABLE

1-2:ENABLE

JF

1

ON

LE

D

LE

D

PWR

HD

D

NIC1

NIC2

OH

/

X

RST

PWR

USB/0/

1

I-SA

TA

3

I-SATA4

I-SA

TA

2

I-SA

TA

1

I-SA

TA

0

I-SATA5

SLOT5 PCI-E 2.0 X4 ON X8

KB/MOUSE

DIMM1B

DIMM1A

JPG1: 

VG

A

JWF1:DOM PW

R

JL

1:

CHASSIS INTRUSION

JBT1

Fan Header

Pin Definitions 

Pin#     Definition     

1

Ground (Black)

2

2.5A/+12V 

(Red)

3

Tachometer

4

PWM_Control

Fan Headers

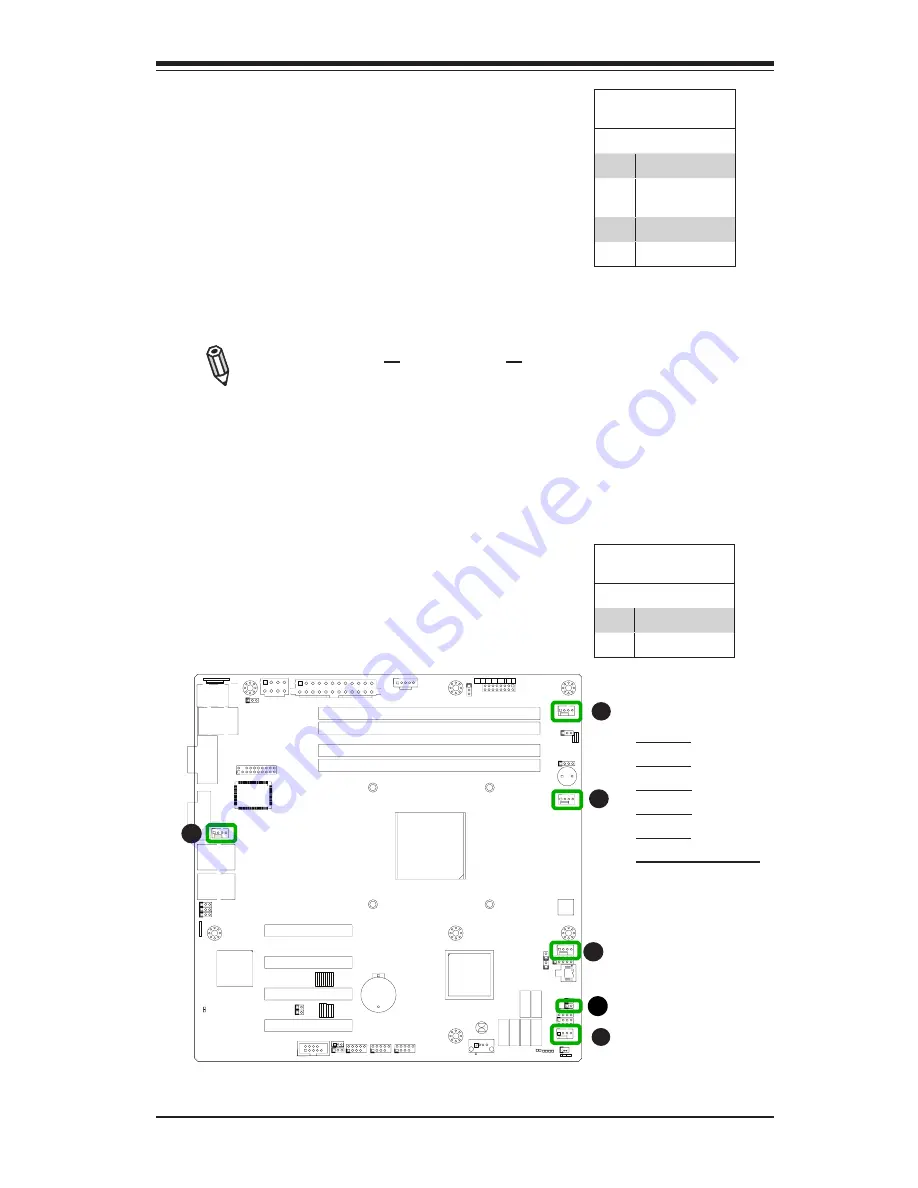
The X9SCM-IIF/X9SCL-IIF has five fan headers 
(Fan 1~Fan 4 and Fan A). These fans are 4-pin 

fan headers. However, Pins 1-3 of the fan head-

ers are backward compatible with the traditional 

3-pin fans. A fan speed control setting in the 

BIOS  Hardware  Monitoring  section  allows  the 

BIOS to automatically set fan speeds based on 
the system temperature. Refer to the table on 

the right for pin definitions.

Note

: Please use all 3-pin fans or all 

4-pin fans on a motherboard. Please 
do not use 3-pin fans and 4-pin fans 
on the same board. 

A

B

A. Fan 1
B. Fan 2
C. Fan 3
D. Fan 4
E. Fan A
F. Chassis Intrusion

C

D

E

F

Chassis Intrusion 

A Chassis Intrusion header is located at JL1 on 

the motherboard. Attach the appropriate cable 
from the chassis to inform you of a chassis intru-
sion when the chassis is opened. 

Chassis Intrusion

Pin Definitions (JL1)

Pin#     Definition     

1

Intrusion Input

2

Ground

Содержание X9SCL-IIF

Страница 1: ...USER S MANUAL Revision 1 0a X9SCM IIF X9SCL IIF...

Страница 2: ...LLING OR RECOVERING SUCH HARDWARE SOFTWARE OR DATA Any disputes arising between manufacturer and customer shall be governed by the laws of Santa Clara County in the State of California USA The State o...

Страница 3: ...ocessor and memory support updates This product is intended to be installed and serviced by professional technicians Manual Organization Chapter 1 describes the features specifications and performance...

Страница 4: ...he system or injury to yourself Danger Caution Instructions to be strictly followed to prevent catastrophic system failure or to avoid bodily injury Warning Important information given to ensure prope...

Страница 5: ...eeld 28 5215 ML s Hertogenbosch The Netherlands Tel 31 0 73 6400390 Fax 31 0 73 6416525 Email sales supermicro nl General Information support supermicro nl Technical Support rma supermicro nl Customer...

Страница 6: ...Fan Status Monitor with Firmware Control 1 11 Environmental Temperature Control 1 11 System Resource Alert 1 11 1 5 ACPI Features 1 12 Slow Blinking LED for Suspend State Indicator 1 12 1 6 Power Sup...

Страница 7: ...16 Installing the Motherboard 2 17 2 6 Connectors IO Ports 2 18 Back I O Panel 2 18 ATX PS 2 Keyboard Mouse Ports 2 19 Universal Serial Bus USB 2 20 Ethernet Ports 2 21 Serial Ports 2 22 Video Connect...

Страница 8: ...38 2 9 Onboard Indicators 2 39 LAN 1 LAN 2 LEDs 2 39 IPMI Dedicated LAN LEDs 2 39 Onboard Power LED 2 40 Unsupported Memory LED 2 40 Power Standby LED 2 40 IPMI Heartbeat LED 2 40 2 10 SATA Connectio...

Страница 9: ...t 4 4 AddOn ROM Display Mode 4 4 Bootup Num Lock 4 4 Wait For F1 If Error 4 4 INT19 Trap Response 4 4 Watch Dog Function 4 5 Power Button Function 4 5 Restore on AC Power Loss 4 5 DeepSx Power Policie...

Страница 10: ...10 Load Onboard LAN1 Option ROM Load Onboard LAN2 Option ROM 4 10 Super IO Device Configuration 4 11 Serial Port 1 Serial Port 2 4 11 Serial Port1 Settings Serial Port2 Settings 4 11 Serial Port Conso...

Страница 11: ...rent IP Address 4 17 Current Subnet Mask 4 17 Current MAC Address 4 17 Current Gateway IP Address 4 17 4 6 Boot Settings 4 18 Setup Prompt Timeout 4 18 Retry Boot Devices 4 18 Boot Option Filter 4 18...

Страница 12: ...A 1 Appendix B Software Installation Instructions B 1 Installing Drivers B 1 B 2 Configuring SuperDoctor III B 2 Appendix C UEFI BIOS Recovery Instructions An Overview to the UEFI BIOS 1 How to Recove...

Страница 13: ...ention to detail to provide you with the highest standards in quality and performance Please check that the following items have all been included with your motherboard If anything listed here is dama...

Страница 14: ...rd Image X9SCM IIF Note All graphics shown in this manual were based upon the latest PCB Revision available at the time of publishing of the manual The motherboard you ve received may or may not look...

Страница 15: ...X9SCL IIF Note All graphics shown in this manual were based upon the latest PCB Revision available at the time of publishing of the manual The motherboard you ve received may or may not look exactly t...

Страница 16: ...JL1 T SGPIO2 T SGPIO1 JWF1 JPW2 JWOL J12 JSPK JPI2C JF1 JPW1 B1 JS6 JS3 JS4 JS5 J24 JLAN2 JLAN1 COM1 SPKR1 LE3 LE4 LE2 JWD JLED JPL2 JPG1 JPB JPL1 JPUSB1 FANA FAN1 FAN4 FAN3 FAN2 U82 DIMM2 DIMM3 DIMM1...

Страница 17: ...F Disable ON Enable 2 3 DISABLE 1 2 ENABLE JF1 ON LED LED PWR HDD NIC1 NIC2 OH X RST PWR USB 0 1 I SATA3 I SATA4 I SATA2 I SATA1 I SATA0 I SATA5 SLOT5 PCI E 2 0 X4 ON X8 KB MOUSE DIMM1B DIMM1A JPG1 VG...

Страница 18: ...nector Required JPI2C PWR supply I2C System Management Bus JLED 3 pin Power LED header JF1 Front Panel Control Header JSPK Speaker header Pins 3 4 Internal 1 4 External SPKR1 Internal speaker buzzer T...

Страница 19: ...2 Intel 82574L Gigabit Ethernet controllers one each for LAN 1 and LAN 2 Two 2 RJ 45 Rear IO Panel Connectors with Link and Activity LEDs Single Realtek RTL8201FN to support IPMI 2 0 LAN I O Devices S...

Страница 20: ...heat LED and control CPU Thermal Trip support Thermal Monitor 2 TM2 support Fan Control Fan status monitoring with firmware 4 pin Pulse Width Modulation fan speed control Low noise fan speed control S...

Страница 21: ...DIMM2 Far DIMM1 DIMM2 Far 4 UDIMM MISC VRs 1333 1066MHz 1333 1066MHz 8 0Gb x4 DMI II 5 0Gb 5 0Gbps PCIe_x4 PCIe x8 SLOT 6 4 SATA PORTS SATA II 300MB s 9 USB PORTS USB2 0 480Mbps FLASH SPI 64Mb SPI PCI...

Страница 22: ...peed Direct Media Interface DMI for chip to chip true iso chronous communication providing up to 10 Gb s of software transparent data transfer rate on each read write direction In addition the X9SCM I...

Страница 23: ...ne the sensitivity of the voltage monitor Fan Status Monitor with Firmware Control PC health monitoring in the BIOS can check the RPM status of the cooling fans The onboard CPU and chassis fans are co...

Страница 24: ...ation that is compatible with Windows XP Windows Vista and Windows 2008 Operating Systems Slow Blinking LED for Suspend State Indicator When the CPU goes into a suspend state the chassis power LED wil...

Страница 25: ...cy speed with baud rate of up to 115 2 Kbps as well as an advanced speed with baud rates of 250 K 500 K or 1 Mb s which support higher speed modems The Super I O provides functions that comply with AC...

Страница 26: ...0R interfaces with a host system via PCI interface to communicate with the Graphics core It supports USB 2 0 and 1 1 for remote keyboard mouse virtual media emulation It also provides LPC interface to...

Страница 27: ...omponents Read this section in its entirety before installing or configuring components in the Supermicro chassis Battery Handling Warning There is a danger of explosion if the battery is replaced inc...

Страница 28: ...e explosi n si la bater a se reemplaza de manera incorrecta Re emplazar la bater a exclusivamente con el mismo tipo o el equivalente recomen dado por el fabricante Desechar las bater as gastadas seg n...

Страница 29: ...erfolgen Advertencia Al deshacerse por completo de este producto debe seguir todas las leyes y regla mentos nacionales Attention La mise au rebut ou le recyclage de ce produit sont g n ralement soumis...

Страница 30: ...ges only do not touch its components peripheral chips memory modules or gold contacts When handling chips or modules avoid touching their pins Put the motherboard and peripherals back into their antis...

Страница 31: ...make sure that you use an Intel certified multi directional heatsink only Make sure to install the system board into the chassis before you install the CPU heatsink When receiving a server board with...

Страница 32: ...old the CPU at the North center edge and the South center edge of the CPU 4 Align the CPU key that is the semi circle cutouts against the socket keys Once it is aligned carefully lower the CPU straigh...

Страница 33: ...age your CPU Instead open the load plate again and double check that the CPU is aligned properly CPU properly installed Load lever locked into place 5 Do not rub the CPU against the surface or against...

Страница 34: ...pplied 2 Place the heatsink on top of the CPU so that the four mounting holes are aligned with those on the Motherboard s and the Heatsink Bracket under neath 3 Screw in two diagonal screws i e the 1...

Страница 35: ...equence as shown in the illustration below 2 Gently wriggle the heatsink to loosen it from the CPU Do not use excessive force when wriggling the heatsink 3 Once the CPU is loosened remove the CPU from...

Страница 36: ...at the wires are routed through the bottom of the heatsink 4 Remove the thin layer of the protec tive film from the copper core of the heatsink Warning CPU may overheat if the protective film is not r...

Страница 37: ...t each fastener so that the narrow end of the groove is pointing outward 8 Repeat Step 7 to insert all four heatsink fasteners into the mounting holes 9 Once all four fasteners are securely inserted i...

Страница 38: ...o prevent damage done to the CPU or other components Active Heatsink Removal 1 Unplug the power cord from the power supply 2 Disconnect the heatsink fan wires from the fan header 3 Use your finger tip...

Страница 39: ...the release tabs outwards on both ends of the DIMM slot to unlock it 3 Align the key of the DIMM module with the receptive point on the memory slot 4 Align the notches on both ends of the module agai...

Страница 40: ...ules of the same size type and speed Mixed DIMM speeds can be installed However all DIMMs will run at the speed of the slowest DIMM The motherboard will support one DIMM module or three DIMM modules i...

Страница 41: ...mplemented a design change in the Win dows XP with Service Pack 2 SP2 and Windows Vista This change is specific to the behavior of Physical Address Extension PAE mode which improves driver compatibili...

Страница 42: ...1 I SATA3 I SATA4 I SATA2 I SATA1 I SATA0 I SATA5 SLOT5 PCI E 2 0 X4 ON X8 KB MOUSE DIMM1B DIMM1A JPG1 VGA JWF1 DOM PWR JL1 CHASSIS INTRUSION JBT1 2 5 Motherboard Installation All motherboards have s...

Страница 43: ...ssis as needed 5 Install the motherboard into the chassis carefully to avoid damaging mother board components 6 Using the Philips screwdriver insert a Pan head 6 screw into a mounting hole on the moth...

Страница 44: ...S CLEAR SLOT7 PCI E 2 0 X8 LAN2 LAN1 JPUSB1 B P USB WAKE UP 1 2 ENABLE 2 3 DISABLE DIMM2B DIMM2A JI2C1 JI2C2 USB2 3 SLOT6 PCI E 2 0 X8 2 3 Disable 1 2 Enable CPU JLED1 3 pin Power LED OFF Disable ON E...

Страница 45: ...ee the table at right for pin definitions PS 2 Keyboard Mouse Pin Definitions PS2 Keyboard PS2 Mouse Pin Definition Pin Definition 1 KB Data 1 Mouse Data 2 No Connection 2 No Connection 3 Ground 3 Gro...

Страница 46: ...n nection 10 Key 4 3 5 6 1 2 1 1 JI2C2 JI2C1 SLOT4 PCI E 2 0 X4 ON X8 U3 U4 JS2 JS1 J31 JTPM JPME2 JPME1 J29 JL1 T SGPIO2 T SGPIO1 JWF1 JPW2 JWOL J12 JSPK JPI2C JF1 JPW1 B1 JS6 JS3 JS4 JS5 J24 JLAN2 J...

Страница 47: ...dedicated net work connection for IPMI 2 0 These ports accept RJ45 type cables Notes Please refer to the LED In dicator Section for LAN LED information 1 LAN1 2 LAN2 3 IPMI Dedicated LAN 1 2 3 LAN Po...

Страница 48: ...LAN1 COM1 SPKR1 LE3 LE4 LE2 JWD JLED JPL2 JPG1 JPB JPL1 JPUSB1 FANA FAN1 FAN4 FAN3 FAN2 U82 DIMM2 DIMM3 DIMM1 DIMM4 LE7 FF DDR3 1066 1333 UDIMM required GND GND 5V 1 2 RST 2 3 NMI JWD USB4 5 USB 12 13...

Страница 49: ...onnector is used to provide video and CRT display Refer to the board layout below for the location VGA CRT Pin Definitions Pin Definition Pin Definition 1 Red 10 Ground 2 Green 11 NC 3 Blue 12 MS1 SDA...

Страница 50: ...sable 1 2 Enable CPU JLED1 3 pin Power LED OFF Disable ON Enable 2 3 DISABLE 1 2 ENABLE JF1 ON LED LED PWR HDD NIC1 NIC2 OH X RST PWR USB 0 1 I SATA3 I SATA4 I SATA2 I SATA1 I SATA0 I SATA5 SLOT5 PCI...

Страница 51: ...16 Ground A PWR LED B HDD LED HDD LED The HDD LED connection is located on pins 13 and 14 of JF1 Attach a cable here to indicate the status or HDD related activity See the table on the right for pin...

Страница 52: ...s JF1 Pin Definition 9 11 Vcc 10 12 LAN Active A NIC1 LED B NIC2 LED C OH Fan Fail Overheat OH Fan Fail Front Connect an LED cable to the OH Fan Fail connections on pins 7 and 8 of JF1 to display adva...

Страница 53: ...ght for pin definitions Power Button Pin Definitions JF1 Pin Definition 1 Signal 2 Ground Reset Button The Reset Button connection is located on pins 3 and 4 of JF1 Attach it to a hardware reset switc...

Страница 54: ...KB MOUSE DIMM1B DIMM1A JPG1 VGA JWF1 DOM PWR JL1 CHASSIS INTRUSION JBT1 2 7 Connecting Cables This section provides brief descriptions and pin out definitions for onboard headers and connectors Be sur...

Страница 55: ...PCI E 2 0 X4 ON X8 KB MOUSE DIMM1B DIMM1A JPG1 VGA JWF1 DOM PWR JL1 CHASSIS INTRUSION JBT1 Fan Header Pin Definitions Pin Definition 1 Ground Black 2 2 5A 12V Red 3 Tachometer 4 PWM_Control Fan Heade...

Страница 56: ...CPU JLED1 3 pin Power LED OFF Disable ON Enable 2 3 DISABLE 1 2 ENABLE JF1 ON LED LED PWR HDD NIC1 NIC2 OH X RST PWR USB 0 1 I SATA3 I SATA4 I SATA2 I SATA1 I SATA0 I SATA5 SLOT5 PCI E 2 0 X4 ON X8 K...

Страница 57: ...PU JLED1 3 pin Power LED OFF Disable ON Enable 2 3 DISABLE 1 2 ENABLE JF1 ON LED LED PWR HDD NIC1 NIC2 OH X RST PWR USB 0 1 I SATA3 I SATA4 I SATA2 I SATA1 I SATA0 I SATA5 SLOT5 PCI E 2 0 X4 ON X8 KB...

Страница 58: ...JL1 CHASSIS INTRUSION JBT1 C Trusted Platform Module Header Pin Definitions Pin Definition Pin Definition 1 LCLK 2 GND 3 LFRAME 4 No Pin 5 LRESET 6 VCC5 7 LAD3 8 LAD2 9 VCC3 10 LAD1 11 LAD0 12 GND 13...

Страница 59: ...3 pin Power LED OFF Disable ON Enable 2 3 DISABLE 1 2 ENABLE JF1 ON LED LED PWR HDD NIC1 NIC2 OH X RST PWR USB 0 1 I SATA3 I SATA4 I SATA2 I SATA1 I SATA0 I SATA5 SLOT5 PCI E 2 0 X4 ON X8 KB MOUSE DIM...

Страница 60: ...FF Disable ON Enable 2 3 DISABLE 1 2 ENABLE JF1 ON LED LED PWR HDD NIC1 NIC2 OH X RST PWR USB 0 1 I SATA3 I SATA4 I SATA2 I SATA1 I SATA0 I SATA5 SLOT5 PCI E 2 0 X4 ON X8 KB MOUSE DIMM1B DIMM1A JPG1 V...

Страница 61: ...PWR HDD NIC1 NIC2 OH X RST PWR USB 0 1 I SATA3 I SATA4 I SATA2 I SATA1 I SATA0 I SATA5 SLOT5 PCI E 2 0 X4 ON X8 KB MOUSE DIMM1B DIMM1A JPG1 VGA JWF1 DOM PWR JL1 CHASSIS INTRUSION JBT1 Clear CMOS JBT1...

Страница 62: ...ABLE JF1 ON LED LED PWR HDD NIC1 NIC2 OH X RST PWR USB 0 1 I SATA3 I SATA4 I SATA2 I SATA1 I SATA0 I SATA5 SLOT5 PCI E 2 0 X4 ON X8 KB MOUSE DIMM1B DIMM1A JPG1 VGA JWF1 DOM PWR JL1 CHASSIS INTRUSION J...

Страница 63: ...0 I SATA5 SLOT5 PCI E 2 0 X4 ON X8 KB MOUSE DIMM1B DIMM1A JPG1 VGA JWF1 DOM PWR JL1 CHASSIS INTRUSION JBT1 A A BP USB 0 1 Wake up B BMC Enable USB Wake Up Use the jumper JPUSB1 to wake up your system...

Страница 64: ...SB WAKE UP 1 2 ENABLE 2 3 DISABLE DIMM2B DIMM2A JI2C1 JI2C2 USB2 3 SLOT6 PCI E 2 0 X8 2 3 Disable 1 2 Enable CPU JLED1 3 pin Power LED OFF Disable ON Enable 2 3 DISABLE 1 2 ENABLE JF1 ON LED LED PWR H...

Страница 65: ...0 X4 ON X8 KB MOUSE DIMM1B DIMM1A JPG1 VGA JWF1 DOM PWR JL1 CHASSIS INTRUSION JBT1 C LAN 1 LAN 2 LEDs Two LAN ports LAN 1 LAN 2 are located on the I O backpanel of the motherboard Each Ethernet LAN p...

Страница 66: ...oard Power LED is located at LE2 on the motherboard A lit LE2 indicates that the motherboard is either booting or it is up and running See the layout below for the LED location A Onboard PWR LED B Uns...

Страница 67: ...C1 NIC2 OH X RST PWR USB 0 1 I SATA3 I SATA4 I SATA2 I SATA1 I SATA0 I SATA5 SLOT5 PCI E 2 0 X4 ON X8 KB MOUSE DIMM1B DIMM1A JPG1 VGA JWF1 DOM PWR JL1 CHASSIS INTRUSION JBT1 2 10 SATA Connections Note...

Страница 68: ...2 42 X9SCM IIF X9SCL IIF Series User s Manual Notes...

Страница 69: ...onents 2 Make sure that there are no short circuits between the motherboard and chassis 3 Disconnect all ribbon wire cables from the motherboard including those for the keyboard and mouse Also be sure...

Страница 70: ...s recommended that you use the memory modules of the same type and speed for all DIMMs in the system Do not use memory modules of different sizes different speeds and different types on the same mothe...

Страница 71: ...be downloaded from our website at http www supermi cro com support bios Note Not all BIOS can be flashed Some cannot be flashed it depends on the boot block code of the BIOS 3 If you ve followed the i...

Страница 72: ...amed ami bat with the new BIOS ROM file from your bootable device or USB pen thumb drive Use the following format F ami bat BIOS ROM filename xxx Enter Note Always use the file named ami bat to update...

Страница 73: ...ver when installing Windows on my motherboard Answer To solve this issue disable the IPMI jumper Another solution is to use a USB floppy drive instead of the onboard floppy drive For the IPMI jumper l...

Страница 74: ...the battery s polarity The positive side should be facing up 3 Insert the battery into the battery holder and push it down until you hear a click to ensure that the battery is securely locked Warning...

Страница 75: ...ermicro com support rma When you return the motherboard to the manufacturer the RMA number should be prominently displayed on the outside of the shipping carton and mailed prepaid or hand carried Ship...

Страница 76: ...3 8 X9SCM IIF X9SCL IIF Series User s Manual Notes...

Страница 77: ...isplays all the options that can be configured Grayed out options cannot be configured Options in blue can be configured by the user The right frame displays the key legend Above the key legend is an...

Страница 78: ...Do not upgrade the BIOS unless your system has a BIOS related issue Flashing the wrong BIOS can cause irreparable damage to the system In no event shall Supermicro be liable for direct indirect specia...

Страница 79: ...b key or the arrow keys to move between fields The date must be entered in Day MM DD YY format The time is entered in HH MM SS format Note The time is in the 24 hour format For example 5 30 P M appear...

Страница 80: ...rmal POST messages The op tions are Enabled and Disabled AddOn ROM Display Mode This sets the display mode for Option ROM The options are Force BIOS and Keep Current Bootup Num Lock This feature selec...

Страница 81: ...Override and Instant Off Restore on AC Power Loss Use this feature to set the power state after a power outage Select Power Off for the system power to remain off after a power loss Select Power On f...

Страница 82: ...ease refer to Intel s web site for detailed information Hardware Prefetcher Available when supported by the CPU If set to Enabled the hardware prefetcher will pre fetch streams of data and instruc tio...

Страница 83: ...ssor power consumption limit in Watts during a long duration time window Long duration maintained this is the time in milliseconds where the Long Duration Power Limit is maintained Short duration powe...

Страница 84: ...ng for the PCIE maximum Read Request size The options are Auto 128 Bytes 256 Bytes 512 Bytes 1024 Bytes 2048 Bytes and 4096 Bytes PCI Express Port This feature controls the PCI Express Port The option...

Страница 85: ...guration When this submenu is selected the AMI BIOS automatically detects the presence of the IDE Devices and displays the following items SATA Mode This item selects the mode for the installed drives...

Страница 86: ...e user to set the PCI PnP configurations for the following items PCI Latency Timer This feature sets the latency Timer of each PCI device installed on a PCI bus Select 64 to set the PCI latency to 64...

Страница 87: ...ial Port 1 and Serial Port 2 Select Disabled to prevent the serial port from accessing any system resources When this option is set to Disabled the serial port physically becomes unavailable Select 3F...

Страница 88: ...Mark or Space Stop Bits 1 or 2 Flow Control None or Hardware RTS CTS VT UTF8 Combo Key Support Enabled or Disabled Recorder Mode Disabled or Enabled Resolution 100x31 Disabled or Enabled Legacy OS Re...

Страница 89: ...lect the ACPI Sleep when the system is in sleep mode Se lect S1 POS to erase all CPU caches and stop executing instructions Power to the CPU s and RAM is maintained but RAM is refreshed Select Suspend...

Страница 90: ...all logged events The options are No Yes Next reset and Yes Every reset When Log is Full This option automatically clears the Event Log memory of all messages when it is full The options are Do Nothi...

Страница 91: ...r 4 AMI BIOS 4 15 METW The Multiple Event Time Window METW defines number of minutes must pass between duplicate log events before MECI is incremented This is in minutes from 0 to 99 The default value...

Страница 92: ...after each system reboot The options are No Yes On next reset and Yes On every reset When SEL is Full This feature allows the user to decide what the BIOS should do when the system event log is full S...

Страница 93: ...tem manually in the field If Unspecified is selected the BIOS will search the next available IP address for this computer without modifying BMC network parameters The options are Do Nothing Static and...

Страница 94: ...This option controls what devices the system can boot from The options are UEFI and Legacy Legacy Only and UEFI Only Boot Option Priorities This feature allows the user to specify which devices are bo...

Страница 95: ...Chapter 4 AMI BIOS 4 19 Delete Boot Option This feature allows the user to delete a previously defined boot device from which the system boots during startup...

Страница 96: ...ord is defined ONLY this password will need to be entered during each system startup or boot and will also have Administrator rights in the setup Passwords must be at least 3 and up to 20 characters l...

Страница 97: ...xit from the Exit menu and press Enter Discard Changes and Exit Select this option to quit the BIOS Setup without making any permanent changes to the system configuration and reboot the computer Selec...

Страница 98: ...o save any changes to the BIOS setup for future use Restore User Defaults To set this feature select Restore User Defaults from the Exit menu and press En ter Use this feature to retrieve user defined...

Страница 99: ...rror oc curs you should consult with your system manufacturer for possible repairs These fatal errors are usually communicated through a series of audible beeps The numbers on the fatal error list cor...

Страница 100: ...A 2 X9SCM IIF X9SCL IIF Series User s Manual Notes...

Страница 101: ...diskette by booting into a Driver CD please set the SATA Configuration to Compatible Mode and configure SATA as IDE in the BIOS Setup After making the driver diskette be sure to change the SATA setti...

Страница 102: ...Doctor III displays crucial system information such as CPU temperature system voltages and fan status See the Figure below for a display of the SuperDoctor III interface Note 1 The default user name a...

Страница 103: ...al may be downloaded from our Website at http www supermicro com products accessories software SuperDoctorIII cfm For Linux we still recommend that you use SuperDoctor II this version is also availabl...

Страница 104: ...B 4 X9SCM IIF X9SCL IIF Series User s Manual Notes...

Страница 105: ...add on card to boot up the system UEFI offers a clean hand off control to a computer system at bootup How to Recover the UEFI BIOS Image the Main BIOS Block An AMIBIOS flash chip consists of a boot se...

Страница 106: ...ile into the disc Root Directory of a USB device or a writeable CD DVD Note If you cannot locate the Super ROM file in your driver disk visit our website at www supermicro com to download the BIOS ima...

Страница 107: ...ess the Enter key You will see the progress of BIOS Recovery as shown in the screen below Note Do not interrupt the process of BIOS flashing until it is completed 6 After the process of BIOS Recovery...

Страница 108: ...is completed 9 After seeing the message that BIOS update is completed unplug the AC power cable to clear CMOS and then plug in the AC power cable to power on the system 10 Press Del continuously to e...

Страница 109: ...expected to result in significant injury or loss of life or catastrophic property damage Accordingly Supermicro disclaims any and all liability and should buyer use or sell such products for use in su...

Отзывы: