background image

Chapter 2: Installation

2-3

Installing the Heatsinks

We recommend the use of active type heatsinks (except for 1U systems). Use any 

onboard fan header for the CPU's heatsink fan. To install the heatsink, please follow 

the installation instructions included with your heatsink package (not included).

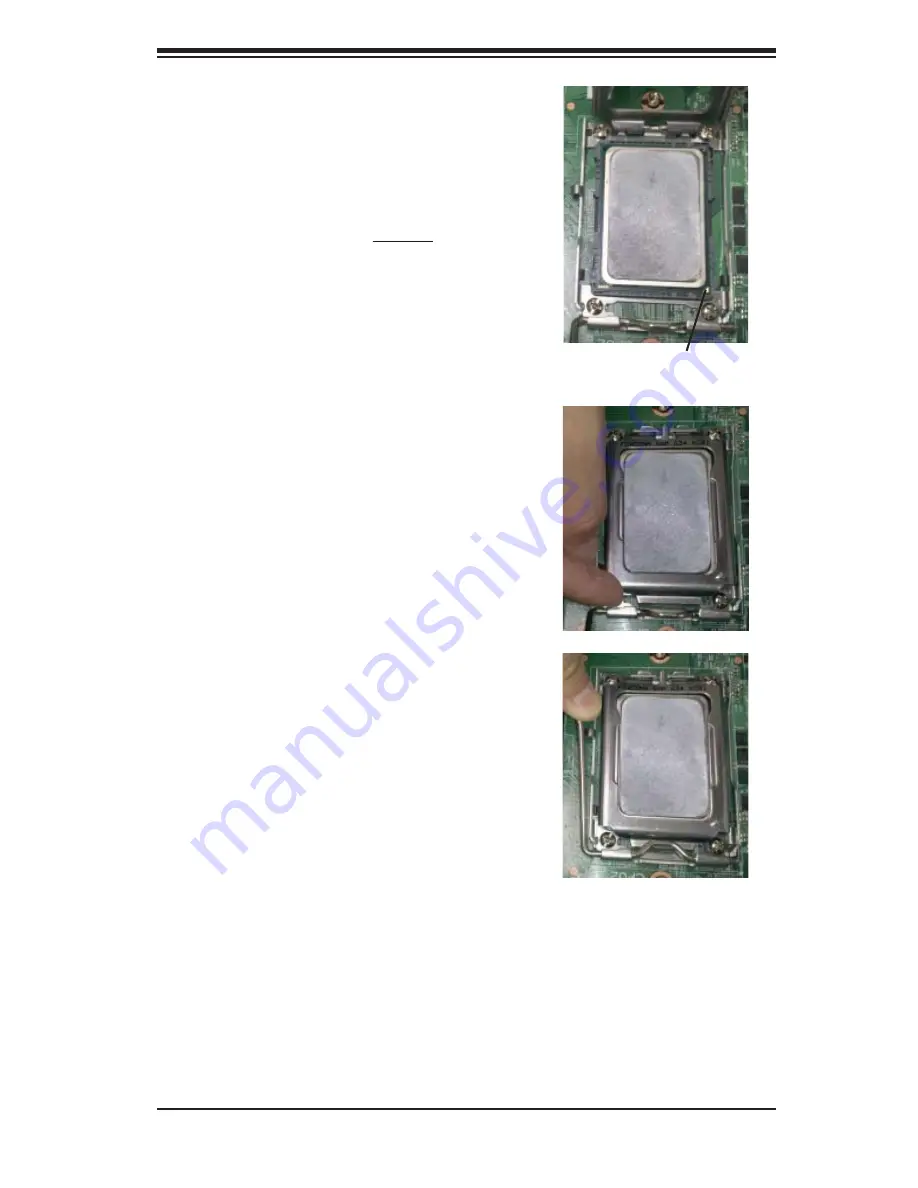
Triangle

Use your thumb and your index fi nger 

3. 

to hold the CPU. Locate and align pin 

1 of the CPU socket with pin 1 of the 

CPU. Both are marked with a triangle.

Align pin 1 of the CPU with pin 1 of the 

4. 

socket. Once aligned, carefully place 

the CPU into the socket. 

Do not drop 

the CPU on the socket, move the CPU 

horizontally or vertically or rub the CPU 

against the socket or against any pins 

of the socket, which may damage the 

CPU and/or the socket

.

With the CPU inserted into the socket, 

5. 

inspect the four corners of the CPU to 

make sure that it is properly installed 

and fl ush with the socket. Then, gently 

lower the silver CPU retention plate into 

place.

Carefully press the CPU socket lever 

6. 

down until it locks into its retention 

tab.  For a dual-CPU system, repeat 

these steps to install another CPU into 

the CPU#2 socket (and into CPU#2, 

#3 and #4 sockets for a quad-CPU 

confi guration).

Note:

 in single and dual-CPU confi gurations, memory must be installed in the DIMM 

slots associated with the installed CPU(s). Memory is limited to a maximum of 128 

for single CPU and 256 GB for dual CPU confi gurations.

Содержание H8DGU

Страница 1: ...H8DGU H8DGU F USER S MANUAL Revision 1 0 SUPER...

Страница 2: ...H DAMAGES IN PARTICULAR SUPERMICRO SHALL NOT HAVE LIABILITY FOR ANY HARDWARE SOFTWARE OR DATA STORED OR USED WITH THE PRODUCT INCLUDING THE COSTS OF REPAIRING REPLACING INTEGRATING INSTALLING OR RECOV...

Страница 3: ...specifications and performance of the motherboard and provides detailed information about the chipset Chapter 2 begins with instructions on handling static sensitive devices Read this chapter when ins...

Страница 4: ...iv H8DGU F Serverboard User s Manual Notes...

Страница 5: ...atic Sensitive Devices 1 Precautions 1 Unpacking 1 2 2 Processor and Heatsink Installation 2 2 3 Mounting the Motherboard into a Chassis 4 2 4 Installing Memory 5 Memory Support 5 DIMM Module Populati...

Страница 6: ...I2C to PCI Express Slot 16 Watch Dog Enable Disable 16 LAN1 2 Enable Disable 16 VGA Enable Disable 16 2 9 Onboard Indicators 17 LAN1 LAN2 LEDs 17 Dedicated IPMI LAN LEDs 17 UID LED LE1 17 Power LED 1...

Страница 7: ...dvanced Settings Menu 2 Boot Feature 2 Processor and Clock Options 3 Advanced Chipset Control 4 IDE Configuration 6 PCI PnP Configuration 8 SuperIO Device Configuration 9 Remote Access Configuration 9...

Страница 8: ...Notes viii H8DGU F Serverboard User s Manual...

Страница 9: ...ed with the utmost attention to detail to provide you with the highest standards in quality and performance Please check that the following items have all been included with your motherboard If anythi...

Страница 10: ...ess Super Micro Computer B V Het Sterrenbeeld 28 5215 ML s Hertogenbosch The Netherlands Tel 31 0 73 6400390 Fax 31 0 73 6416525 Email sales supermicro nl General Information support supermicro nl Tec...

Страница 11: ...Chapter 1 Introduction 1 3 Figure 1 1 H8DGU F Image...

Страница 12: ...D JPG1 FAN3 FAN8 FAN2 FAN1 FAN7 FAN4 FAN5 FAN6 LE1 UIOP JPW2 JPW3 IPMB JPI2C DP2 BATTERY SATA5 SATA0 SATA1 SATA2 SATA3 SATA4 T SGPIO2 T SGPIO1 UID P1 DIMM4A P2 DIMM1B P1 DIMM4B P2 DIMM1A USB0 1 USB6 U...

Страница 13: ...OM1 Serial Port Header FAN 1 8 Chassis CPU Fan Headers IPMB System Management Bus Header for the IPMI Slot IPMI LAN Dedicated IPMI LAN Port H8DGU F only JD1 Speaker Header JF1 Front Panel Connector JL...

Страница 14: ...ansion Slots 1U Left One 1 PCI E x16 Gen 2 or One 1 PCI E x8 Gen 2 One 1 UIO or Two 2 PCI E x8 Gen 2 2U Left One 1 PCI E x16 Gen 2 One 1 UIO or Two 2 PCI E x8 Gen 2 One 1 UIO or Three 3 PCI E x8 Gen 2...

Страница 15: ...serial port one header and one port Seven 7 USB Universal Serial Bus 2 0 ports 2x rear 4x header 1x type A Two 2 LAN ports supported by an onboard Intel 82576 dual port Ethernet controller for 10 100...

Страница 16: ...L KAWELA RJ45 A Link SP5100 BMC VGA WPCM450 R PCI LPC SMBus SIO W83527 HWM W83795G SPI Flash KB MS RMII DDR2 SDRAM 64Mb X16bit PSU I2C IPMB FE PHY RTL8201N VGA RJ45 7xUSB Clock Gen TPM OPT RJ45 PCI E...

Страница 17: ...8x between integrated circuits This is done partly by reducing the number of buses in the chipset to reduce bottlenecks and by enabling a more efficient use of memory in multi processor systems The en...

Страница 18: ...be off and responds immediately to user or other requests Slow Blinking LED for Suspend State Indicator When the CPU goes into a suspend state the chassis power LED will start blinking to indicate tha...

Страница 19: ...terfacing with floppy disk drives The Super I O provides two high speed 16550 compatible serial communication ports UARTs one of which supports serial infrared communication Each UART in cludes a 16 b...

Страница 20: ...1 12 H8DGU F Serverboard User s Manual Notes...

Страница 21: ...its components peripheral chips memory modules or gold contacts When handling chips or modules avoid touching their pins Put the motherboard and peripherals back into their antistatic bags when not i...

Страница 22: ...rocedure Follow the procedures as listed below to install the motherboard into a chassis Install the processor s and the heatsink s 1 Install the motherboard in the chassis 2 Install the memory and ad...

Страница 23: ...the CPU horizontally or vertically or rub the CPU against the socket or against any pins of the socket which may damage the CPU and or the socket With the CPU inserted into the socket 5 inspect the fo...

Страница 24: ...serverboard requires a chassis that can support a board of 1 12 1 x 13 304 x 330 mm in size Make sure that the I O ports on the motherboard align with their respective 2 holes in the I O shield at the...

Страница 25: ...r best memory performance please install memory modules of the same type and same speed on the memory slots as indicated on the tables below Insert each DIMM module vertically into its slot Pay attent...

Страница 26: ...1B P2 2A P2 2B P2 3A P2 3B P2 4A P2 4B DIMM Module Population Configuration For memory to work properly follow the tables below for memory installation DIMM Population Table DIMM Slots per Channel DI...

Страница 27: ...card is used to support one standard size full height full length PCI expansion card Installing a PCI Expansion Card Confirm that you have the correct riser card for your chassis model and the 1 add...

Страница 28: ...Locations and Definitions Front Control Panel JF1 contains header pins for various front control panel connectors See Figure 2 3 for the pin definitions of the various connectors Refer to Section 2 6...

Страница 29: ...n doing so will void the manufacturer warranty on your power supply and motherboard Reset Connector The reset connector is located on pins 3 and 4 of JF1 and attaches to the reset switch on the comput...

Страница 30: ...n definitions Power On LED The Power On LED connector is located on pins 15 and 16 of JF1 This connection is used to provide LED indication of power being supplied to the system See the table on the r...

Страница 31: ...ders Pin Definitions USB4 5 USB2 Pin Definition USB3 Pin Definition 1 5V 1 5V 2 PO 2 PO 3 PO 3 PO 4 Ground 4 Ground 5 Key 5 NC Fan Header Pin Definitions Pin Definition 1 Ground 2 12V 3 Tachometer 4 P...

Страница 32: ...nnect this connector to the power supply to provide adequate power to the UIO device installed on the slot for this device to function properly UIO Power Connector Pin Definitions UIOP Pin Definition...

Страница 33: ...r See the tables on the right for pin definitions If you wish to use the onboard speaker you should close pins 6 7 with a jumper Connect a cable to pins 4 7 of JD1 to use an external speaker Speaker C...

Страница 34: ...ication of a system unit that may be in need of service IPMB A System Management Bus header for the IPMI slot is located at IPMB Connect the appropriate cable here to use the IPMB I2C connection on yo...

Страница 35: ...On two pin jumpers Closed means the jumper is on and Open means the jumper is off the pins Connector Pins Jumper Setting 3 2 1 3 2 1 CMOS Clear JBT1 is used to clear CMOS which will also clear any pa...

Страница 36: ...nabled Open Disabled Watch Dog Enable Disable JWD enables the Watch Dog function a system monitor that takes action when a software application freezes the system Jumping pins 1 2 will have WD reboot...

Страница 37: ...s activity while the green LED on the left indicates the speed of the connection See the table at right for more information IPMI LAN Link LED Left Activity LED Right Color Status Definition Link Left...

Страница 38: ...SATA Ports There are no jumpers to configure the SATA ports which are designated SATA0 through SATA5 See the table on the right for pin definitions SATA Ports Pin Definitions SATA0 SATA3 Pin Definitio...

Страница 39: ...alling the OS operating system and SATA RAID driver you must decide if you wish to have the operating system installed as part of a bootable RAID array or installed to a separate non RAID hard drive I...

Страница 40: ...S Setup Utlility After the Setup Utility loads Use the arrow keys to move to the Exit menu Scroll down with the arrow 1 keys to the Load Optimal Defaults setting and press Enter Select OK to confirm t...

Страница 41: ...ing the RAID Driver During OS Installation You may also use the procedure below to install the RAID driver during the Window s OS installation With the Windows OS installation CD in the CD ROM drive r...

Страница 42: ...your CD ROM drive the display shown in Figure 2 6 should appear If this display does not appear click on the My Computer icon and then on the icon representing your CD ROM drive Finally double click...

Страница 43: ...nformation such as CPU temperature system voltages and fan status See the Figure below for a display of the Supero Doctor III interface Note The default User Name and Password for SuperDoctor III is A...

Страница 44: ...at ftp ftp supermicro com utility Supero_Doctor_III You can also download the Super Doctor III User s Guide at http www supermicro com PRODUCT Manuals SDIII UserGuide pdf For Linux we recommend that...

Страница 45: ...your power supply 2 Make sure that no short circuits exist between the motherboard and chassis 3 Disconnect all cables from the motherboard including those for the keyboard 4 and mouse Remove all add...

Страница 46: ...1 You should be using registered ECC Non ECC DDR 3 memory see next 2 page Also it is recommended that you use the same memory type and speed for all DIMMs in the system See Section 2 4 for memory det...

Страница 47: ...revision number BIOS release date version this can be seen on the initial display when your system first boots up System configuration An example of a Technical Support form is posted on our web site...

Страница 48: ...ve instant off capabilities as long as the BIOS has control of the system When the Standby or Suspend feature is enabled or when the BIOS is not in control such as during memory count the first screen...

Страница 49: ...h as F1 F2 etc Each main BIOS menu option is described in this manual The Main BIOS screen has two main frames The left frame displays all the options that can be configured Grayed out options cannot...

Страница 50: ...ys to move between fields The date must be entered in DAY MM DD YYYY format The time is entered in HH MM SS format Please note that time is in a 24 hour format For example 5 30 A M appears as 05 30 00...

Страница 51: ...when you turn off the system Options include 4 second Overide and Instant Off Restore on AC Power Loss This sets the action that occurs when an AC power loss occurs Options include Power Off Power On...

Страница 52: ...te in the OS Options include P state 0 through P state 4 ACPI SRAT Table This option Enables or Disables the building of the ACPI SRAT Table CPU Down Core This option sets down core support for the CP...

Страница 53: ...ts the DRAM scrub rate based on its setting Options in clude Disabled Basic Good Super Max and User Selecting User activates the other options for user setting DRAM ECC Enable This setting allows hard...

Страница 54: ...for USB Legacy Disable Legacy support if there are no USB devices installed in the system Auto disabled Legacy support if no USB devices are connected The options are Disabled Enabled and Auto IDE Con...

Страница 55: ...e IDE disk drive support cannot be determined Select 0 to allow BIOS to use PIO mode 0 which has a data transfer rate of 3 3 MBs Select 1 to allow BIOS to use PIO mode 1 which has a data transfer rate...

Страница 56: ...n the system PCI Latency Timer This option sets the latency of all PCI devices on the PCI bus Select a value to set the PCI latency in PCI clock cycles Options are 32 64 96 128 160 192 224 and 248 ROM...

Страница 57: ...ailable Select 2F8 IRQ3 to allow the serial port to use 2F8 as its I O port address and IRQ 3 for the interrupt address Options include Disabled 2F8 IRQ3 3E8 IRQ4 and 2F8 IRQ3 Serial Port 2 Attribute...

Страница 58: ...Hardware Health Configuration CPU Overheat Alarm This setting allows you to specify the type of alarm for CPU overheating Options include The Early Alarm and The Default Alarm Fan Speed Control This f...

Страница 59: ...and ACPI v3 0 IPMI Configuration This menu shows static information about the IPMI firmware revision and status of the BMC as well as options for IPMI configuration View BMC System Event Log Pressing...

Страница 60: ...xxx xxx with xxx having a value of less than 256 and in decimal form only The IP address and current IP address in the BMC are shown Subnet Mask In the field provided here enter the Subnet address in...

Страница 61: ...visor and a User password If you use both passwords the Supervisor password must be set first Change Supervisor Password Select this option and press Enter to access the sub menu and then type in the...

Страница 62: ...t is in parenthesis has been disabled in the correspond ing type menu Retry Boot Devices This option allows you to retry boot devices Options include Enabled and Dis abled 4 5 Exit Menu Select the Exi...

Страница 63: ...nd press Enter Then Select OK to allow BIOS to automatically load the Optimal Defaults as the BIOS Settings The Optimal settings are designed for maximum system performance but may not work best for a...

Страница 64: ...4 16 H8DGU F Serverboard User s Manual Notes...

Страница 65: ...up pro cedure If a fatal error occurs you should consult with your system manufacturer for possible repairs These fatal errors are usually communicated through a series of audible beeps The numbers on...

Страница 66: ...A 2 H8DGU F Serverboard User s Manual Notes...

Страница 67: ...itialization code checksum will be verified D1h Initializing the DMA controller performing the keyboard controller BAT test starting memory refresh and entering 4 GB flat mode next D3h Starting memory...

Страница 68: ...ooking for a floppy diskette in drive A Reading the first sector of the diskette Efh A read error occurred while reading the floppy drive in drive A F0h Next searching for the AMIBOOT ROM file in the...

Страница 69: ...Initialize CMOS RAM in every boot AMIBIOS POST option was set in AMIBCP or the End key was pressed 12h Next disabling DMA controllers 1 and 2 and interrupt controllers 1 and 2 13h The video display h...

Страница 70: ...ch is on Initializing data to check memory wraparound at 0 0 next 45h Data initialized Checking for memory wraparound at 0 0 and finding the total system memory size next 46h The memory wraparound tes...

Страница 71: ...ular buffer next 83h The command byte was written and global data initialization has completed Checking for a locked key next 84h Locked key checking is over Checking for a memory size mismatch with C...

Страница 72: ...s next A3h The soft error display has completed Setting the keyboard typematic rate next A4h The keyboard typematic rate is set Programming the memory wait states next A5h Memory wait state programmin...

Отзывы: