background image

6-4

S

UPER

S

ERVER 6015X-3/6015X-T/6015X-8 User's Manual

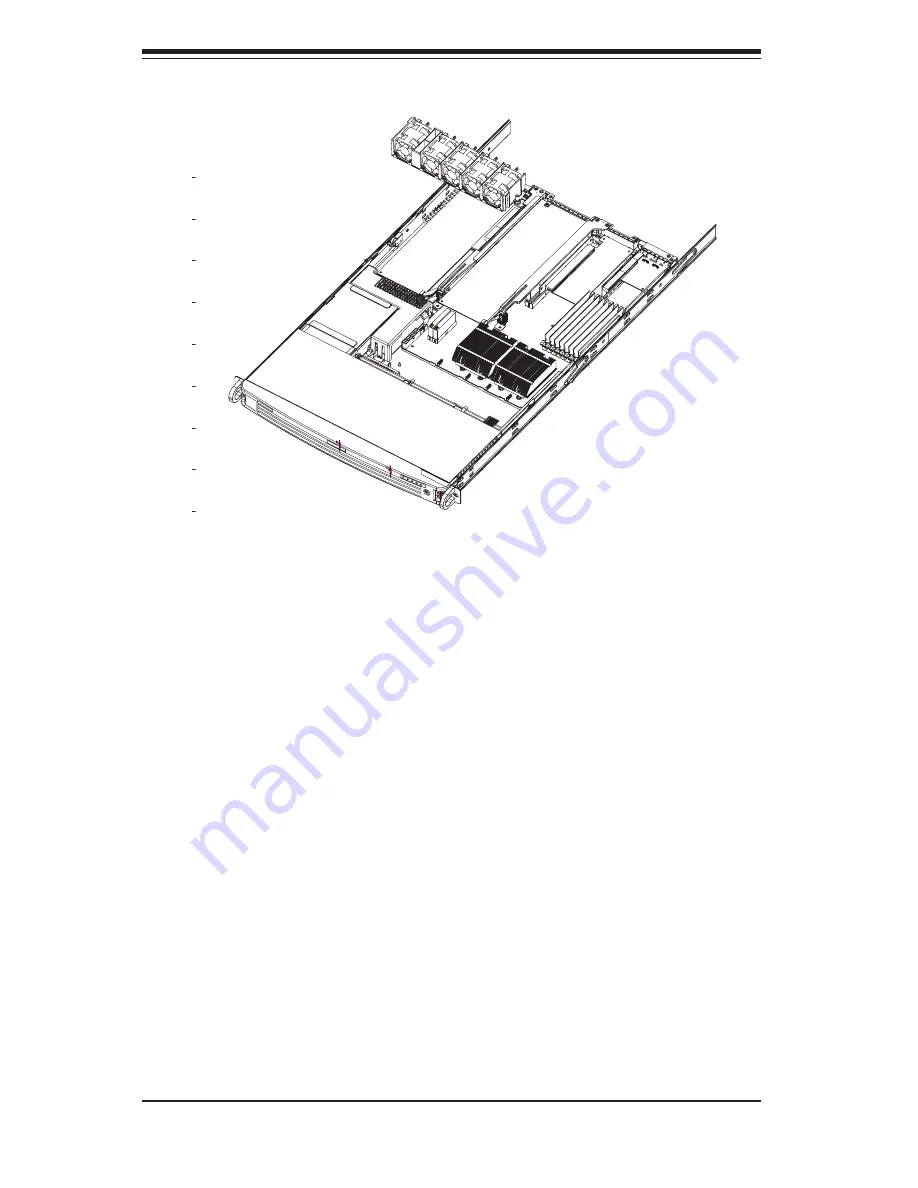
Figure 6-2.  System Cooling Fans

6-4 Drive 

Bay 

Installation/Removal

Removing the Front Bezel

If your system has a front bezel (optional) attached to the chassis, you must fi rst 

remove it to gain access to the drive bays. To remove the bezel, fi rst unlock the 

front of the chassis then press the release knob (see Figure 6-3). Carefully re-

move the bezel with both hands. A fi lter located within the bezel can be removed 

for replacement/cleaning. It is recommended that you keep a maintenance log of 

fi lter cleaning/replacement, since its condition will affect the airfl ow throughout the 

whole system.


1

2

3

4

5

6

7

8

9

Содержание SUPERSERVER 6015X-3

Страница 1: ...SUPERSERVER 6015X 3 SUPERSERVER 6015X T SUPERSERVER 6015X 8 USER S MANUAL 1 0a SUPER...

Страница 2: ...LIABLE FOR DIRECT INDIRECT SPECIAL INCIDENTAL SPECULATIVE OR CONSEQUENTIAL DAMAGES ARISING FROM THE USE OR INABILITY TO USE THIS PRODUCT OR DOCUMENTATION EVEN IF ADVISED OF THE POSSIBILITY OF SUCH DAM...

Страница 3: ...ovides a checklist of the main components included with the server system and describes the main features of the X7DBX i X7DBX 8 serverboard and the SC819TQ 700 SC819S 700 chassis which comprise the 6...

Страница 4: ...mory and when recon guring the serverboard Chapter 6 Advanced Chassis Setup Refer to Chapter 6 for detailed information on the SC819TQ 700 SC819S 700 server chassis You should follow the procedures gi...

Страница 5: ...v Preface Notes...

Страница 6: ...Setup 2 1 Choosing a Setup Location 2 2 Rack Precautions 2 2 Server Precautions 2 2 Rack Mounting Considerations 2 3 2 4 Installing the System into a Rack 2 4 2 5 Checking the Serverboard Setup 2 8 2...

Страница 7: ...alling Memory 5 7 5 6 Adding PCI Cards 5 9 5 7 Serverboard Details 5 10 X7DBX i X7DBX 8 Layout 5 10 X7DBX i X7DBX 8 Quick Reference 5 11 5 8 Connector De nitions 5 12 ATX Main Power Connector 5 12 9 p...

Страница 8: ...20 Onboard Power LED 5 21 Unit Identi er 5 21 5 11 Floppy IDE SCSI and SATA Drive Connections 5 22 Floppy Connector 5 22 IDE Connectors 5 23 SATA Ports 5 23 SCSI Connectors 5 24 Chapter 6 Advanced Ch...

Страница 9: ...Contents ix 7 5 Security 7 24 7 6 Boot 7 25 7 7 Exit 7 26 Appendices Appendix A BIOS POST Messages A 1 Appendix B BIOS POST Codes B 1 Appendix C Software Installation C 1 Appendix D System Speci cati...

Страница 10: ...Notes x SUPERSERVER 6015X 3 6015X T 6015X 8 User s Manual...

Страница 11: ...X 8 as listed below One 1 slim DVD ROM drive DVM PNSC 824 B Five 5 sets of 4 cm counter rotating fans FAN 0085 One 1 front control panel cable CBL 0087 One 1 rackmount kit CSE PT51 SAS Accessories 601...

Страница 12: ...card with an LSI 1068E controller chip to support up to three SAS drives in the system which are RAID 0 1 and 10 sup ported The SAS drives are hot swappable units Note The operating system you use mu...

Страница 13: ...roller and one onboard ATA 100 controller are provided to support up to two IDE hard drives or ATAPI devices The color coded I O ports include one COM port a VGA monitor port two USB 2 0 ports PS 2 mo...

Страница 14: ...o support three SAS 6015X 3 SATA 6015X T or SCSI 6015X 8 hard drives which are hot swap pable units Note The operating system you use must have RAID support to enable the hot swap capability of the SA...

Страница 15: ...JPCIE1 PCI EX8 PCI EX8 EBUS CONN EXPBUS IDE CONN ATA100 KB VRM ISL6307 2 3 4 6 7 4 3 1 2 0 VRM ISL6307 PROCESSOR 1 MT S 667 1067 1333 MT S PCI X Slot FBD DIMM FBD DIMM FBD DIMM EHF USB PCIE X8 PCIE X...

Страница 16: ...Europe Address SuperMicro Computer B V Het Sterrenbeeld 28 5215 ML s Hertogenbosch The Netherlands Tel 31 0 73 6400390 Fax 31 0 73 6416525 Email sales supermicro nl General Information support superm...

Страница 17: ...in any way If the server itself shows damage you should le a damage claim with the carrier who delivered it Decide on a suitable location for the rack unit that will hold the 6015X 3 6015X T 6015X 8 I...

Страница 18: ...should be attached to the rack In multiple rack installations the racks should be coupled together Always make sure the rack is stable before extending a component from the rack You should extend onl...

Страница 19: ...mised Mechanical Loading Equipment should be mounted into a rack so that a hazardous condition does not arise due to uneven mechanical loading Circuit Overloading Consideration should be given to the...

Страница 20: ...ctions that came with the rack unit you are using Identifying the Sections of the Rack Rails You should have received two rack rail assemblies in the rack mounting kit Each assembly consists of two se...

Страница 21: ...cket to the front side of the outer rail with two M4 screws and the long bracket to the rear side of the outer rail with three M4 screws Repeat these steps for the left outer rail Locking Tabs Both ch...

Страница 22: ...ust enough space to accommodate the width of the telco rack Finish by sliding the chassis into the rack and tightening the brackets to the rack Installing the Server into the Rack You should now have...

Страница 23: ...Chapter 2 Server Installation 2 7 Figure 2 3 Installing the Server into a Rack...

Страница 24: ...full access to the inside of the server To remove the system from the rack completely depress the locking tabs in the chassis rails push the right side tab down and the left side tab up to continue to...

Страница 25: ...Chapter 2 Server Installation 2 9 Figure 2 4 Accessing the Inside of the System...

Страница 26: ...isk drive to the system 3 Check the SAS SATA SCSI disk drives Depending upon your system s con guration your system may have one or more drives already installed If you need to install SAS SATA SCSI d...

Страница 27: ...d to take 3 2 Control Panel Buttons There are two push buttons located on the front of the chassis These are in order from left to right a reset button and a power on off button UID Depressing the UID...

Страница 28: ...rn this LED off Overheat Fan Fail When this LED ashes it indicates a fan failure When on continuously on and not ashing it indicates an overheat condition which may be caused by cables obstructing the...

Страница 29: ...The SES2 compliant backplane activates the red LED to indicate a drive failure If one of the SAS drives fail you should be noti ed by your system management software Please refer to Chapter 6 for inst...

Страница 30: ...icates drive activity A connection to the SCSI SCA backplane enables this LED to blink on and off when that particular drive is being accessed Red The SAF TE compliant backplane activates the red LED...

Страница 31: ...er you should rst power down the system with the operating system and then unplug the power cords from all the power supply modules in the system When working around exposed electrical circuits anothe...

Страница 32: ...r be pulled into a cooling fan Remove any jewelry or metal objects from your body which are excellent metal conductors that can create short circuits and harm you if they come into contact with printe...

Страница 33: ...l components and printed circuit boards PCBs in their antistatic bags until ready for use Touch a grounded metal object before removing any board from its antistatic bag Do not let components or PCBs...

Страница 34: ...chassis cover is in place when the 6015X 3 6015X T 6015X 8 is operating to ensure proper cooling Out of warranty damage to the 6015X 3 6015X T 6015X 8 system can occur if this practice is not strictl...

Страница 35: ...that the size and weight of the serverboard can cause it to bend if handled improperly which may result in damage To prevent the serverboard from bending keep one hand under the center of the board t...

Страница 36: ...tel certi ed multi direc tional heatsinks and fans 2 When purchasing a Xeon 5300 5100 5000 series processor or when receiving a serverboard with one pre installed make sure that the CPU plastic cap is...

Страница 37: ...or vertically and do not rub the CPU against any surface or any of the contacts which may damage the CPU and or contacts 7 With the CPU in the socket in spect the four corners of the CPU to make sure...

Страница 38: ...ism 3 Screw in two diagonal screws i e the 1 and the 2 screws until just snug Do not fully tighten the screws or you may damage the CPU 4 Add the two remaining screws then nish the installation by ful...

Страница 39: ...1 locations If you are con guring the system keep the air ow in mind when routing the cables The following data cables with their serverboard connector locations noted should be connected See the serv...

Страница 40: ...posite sides of each header All JF1 wires have been bundled into single keyed ribbon cable to simplify their connection The red wire in the ribbon cable plugs into pin 1 of JF1 Connect the other end o...

Страница 41: ...odules at a time of the same type and same speed See the Memory Installation Table on the following page 2 Insert each DIMM module vertically into its slot Pay attention to the notch along the bottom...

Страница 42: ...OS limitations some operating systems may not show more than 4 GB of memory Maximum memory 32 GB of FBD ECC DDR2 667 533 In a dual CPU con gura tion memory support is halved for a 16 GB maximum Optimi...

Страница 43: ...w and designated optional Remove the screws that secure the riser cards to the rear of the chassis then lift the riser card assembly from the chassis Insert the PCI card into the riser card slot pushi...

Страница 44: ...1A DIMMB 1B DIMMB 2A DIMMB 2B DIMMB 3A DIMMB 3B DIMMB 4A DIMMB 4B SIM 1U Kb Mse COM1 VGA U320 SCSI CH B SPEC UID AIC 7902 BIOS ATI ES1000 Slot 6 PCI X 133 MHz Slot 7 PCI X 100 MHz ZCR PXH I SATA 0 3 E...

Страница 45: ...COM2 Serial Port Header FAN 1 2 9 10 Fan Headers IDE 1 IDE 2 IDE Drive Compact Flash Card Connectors I SATA0 5 Serial ATA Ports JA1 JB1 U320 SCSI Channel A B Connector JF1 Front Panel Connector JFDD1...

Страница 46: ...e interrupt button header is located on pins 19 and 20 of JF1 Refer to the table on the right for pin de nitions NMI Button Pin De nitions JF1 Pin De nition 19 Control 20 Ground Power LED The Power LE...

Страница 47: ...the table on the right for pin de nitions OH Fan Fail LED Pin De nitions JF1 Pin De nition 7 Vcc 8 Control NIC1 LED Pin De nitions JF1 Pin De nition 11 Vcc 12 NIC1 Active NIC2 LED Pin De nitions JF1...

Страница 48: ...PB UID UID LED A Unit Identi er button LED is located next to the VGA port on the rear of the chassis and a UID LED and but ton separate are located on the front control panel The UID LED connec tion...

Страница 49: ...included is needed for the connection See the table on the right for pin de nitions Universal Serial Bus Headers Pin De nitions USB2 3 USB4 USB2 Pin De nition USB3 Pin De nition 1 5V 1 5V 2 PO 2 PO 3...

Страница 50: ...eader is desig nated JWOR This function allows your computer to receive and wake up by an incoming call to the modem when in suspend state See the table on the right for pin de nitions You must have a...

Страница 51: ...rnet ports desig nated LAN1 and LAN2 are located beside the COM2 port These Ether net ports accept RJ45 type cables 5 9 Jumper Settings Explanation of Jumpers To modify the operation of the serverboar...

Страница 52: ...connector to clear CMOS The onboard battery does not need to be removed when clearing CMOS however you must short JBT1 for at least four seconds JBT1 contact pads VGA Enable Disable JPG1 allows you t...

Страница 53: ...order for the SCSI drives to function properly please do not change the default setting enabled set by the manufacturer SCSI Term Enable Disable Jumper Settings JPA2 JPA3 Jumper Setting De nition Ope...

Страница 54: ...nboard Indicators LAN1 LAN2 LEDs The Ethernet ports located beside the VGA port have two LEDs On each Gb LAN port one LED indicates activity when blinking while the other LED may be green amber or off...

Страница 55: ...While servicing the system if you nd you need to work on the other side of the unit push the UID button located on the far left of the control panel on the front and to the right of the VGA port on t...

Страница 56: ...his special cable should be used to take advantage of the speed this new technology offers The blue connector connects to the onboard IDE connector interface and the other connector s to your hard dri...

Страница 57: ...12 Host Data 12 13 Host Data 2 14 Host Data 13 15 Host Data 1 16 Host Data 14 17 Host Data 0 18 Host Data 15 19 Ground 20 Key 21 DRQ3 22 Ground 23 I O Write 24 Ground 25 I O Read 26 Ground 27 IOCHRDY...

Страница 58: ...6 46 DB 6 13 DB 7 47 DB 7 14 DB P 48 DB P 15 Ground 49 Ground 16 DIFFSENS 50 Ground 17 TERMPWR 51 TERMPWR 18 TERMPWR 52 TERMPWR 19 Reserved 53 Reserved 20 Ground 54 Ground 21 ATN 55 ATN 22 Ground 56...

Страница 59: ...o prevent damage to any printed circuit boards PCBs it is important to handle them very carefully The following measures are generally suf cient to protect your equipment from ESD damage Precautions U...

Страница 60: ...Control Panel PCB printed circuit board Make sure the red wire plugs into pin 1 on both connectors Pull all excess cabling out of the air ow path The control panel LEDs inform you of system status Se...

Страница 61: ...the top chassis cover while the system is still running to determine which of the fans has failed Then power down the system before replacing a fan Removing the power cord s is also recommended as a...

Страница 62: ...emove it to gain access to the drive bays To remove the bezel rst unlock the front of the chassis then press the release knob see Figure 6 3 Carefully re move the bezel with both hands A lter located...

Страница 63: ...nstructions DVD ROM Floppy Disk Drives For installing removing a DVD ROM or oppy disk drive you will need to gain access to the inside of the 6015X 3 6015X T 6015X 8 by removing the top cover of the c...

Страница 64: ...e install a drive into the carrier with the printed circuit board side facing down so that the mounting holes align with those in the carrier Secure the drive to the carrier with six screws as shown i...

Страница 65: ...the unit straight out see Figure 6 5 Note Your operating system must have RAID support to enable the hot plug ca pability of the SAS SATA SCSI drives Figure 6 5 Removing a SAS SATA SCSI Drive from th...

Страница 66: ...ss to the inside of the server With the chassis cover removed unplug the power and data cables from the drive you want to remove Then locate the locking tab at the rear of the drive It will be on the...

Страница 67: ...e Preface As there is only one power supply unit in the 6015X 3 6015X T 6015X 8 power must be completely removed from the server before removing and replacing the power supply unit for whatever reason...

Страница 68: ...6 10 SUPERSERVER 6015X 3 6015X T 6015X 8 User s Manual Figure 6 6 Removing Replacing the Power Supply...

Страница 69: ...off a backup battery pro vides power to the CMOS Logic enabling it to retain system parameters Each time the computer is powered on the computer is con gured with the values stored in the CMOS Logic b...

Страница 70: ...1 By pressing Delete immediately after turning the system on or 2 When the message shown below appears brie y at the bottom of the screen during the POST Power On Self Test press the Delete key to ac...

Страница 71: ...ate Using the arrow keys highlight the month day and year elds and enter the correct data Press the Enter key to save the data BIOS Date This eld displays the date when this version of BIOS was built...

Страница 72: ...ed in the sub menu are Type Selects the type of IDE hard drive The options are Auto which allows the BIOS to automatically determine the hard drive s capacity number of heads etc a number from 1 39 to...

Страница 73: ...ormat Multi Sector Transfers This item allows the user to specify the number of sectors per block to be used in multi sector transfer The options are Disabled 4 Sectors 8 Sectors and 16 Sectors LBA Mo...

Страница 74: ...is supported by the Windows 2000 OS or a later version When the SATA Controller Mode is set to Enhanced the following items will display Serial ATA SATA RAID Enable Select Enable to enable Serial ATA...

Страница 75: ...litymainmenuwiththearrowkeys You should see the following display The items with a triangle beside them have sub menus that can be accessed by highlighting the item and pressing Enter Boot Features Ac...

Страница 76: ...e power management on your system The options are Yes and No Power Button Behavior If set to Instant Off the system will power off immediately as soon as the user hits the power button If set to 4 sec...

Страница 77: ...ons are Uncached Write Through Write Protect and Write Back Cache Base 512K 640K If enabled this feature will allow the data stored in the memory area 512K 640K to be cached written into a buffer a st...

Страница 78: ...e Enabling this option provides the capitally to boot from SCSI HDD The options are Disabled and Enabled PCI Parity Error Forwarding The feature allows SERR and PERR errors detected in PCI slots to be...

Страница 79: ...f a new software you might want to change this setting and try again A different OS requires a different Bus Master clock rate Large Disk Access Mode This setting determines how large hard drives are...

Страница 80: ...ates with Intel I O AT Acceleration Technology to accelerate the performance of TOE devices Note A TOE device is a specialized dedicated processor that is installed on an add on card or a network card...

Страница 81: ...ailable when supported by the CPU Set to Enabled to use Thermal Management 2 TM2 which will lower CPU voltage and frequency when the CPU temperature reaches a prede ned overheat threshold Set to Disab...

Страница 82: ...ogy Available when supported by the CPU Select Enabled to use the feature of Virtualization Technology to allow one platform to run multiple operating systems and applications in independent partition...

Страница 83: ...s setting allows you to assign control of serial port B The options are Enabled user de ned Disabled Auto BIOS controlled and OS Controlled Mode This setting allows you to set the type of device that...

Страница 84: ...he event log capacity It is not a setting View DMI Event Log Highlight this item and press Enter to view the contents of the event log Event Logging This setting allows you to Enable or Disable event...

Страница 85: ...onsole Type This item allows you to choose from the available options to select the console type for console redirection The options are VT100 VT100 8bit PC ANSI 7bit PC ANSI VT100 and VT UTF8 Flow Co...

Страница 86: ...U1 Temperature CPU1 Second Core CPU2 Temperature CPU2 Second Core System Temperature Fan1 Fan10 Speeds If the feature of Auto Fan Control is enabled the BIOS will automatically display the status of t...

Страница 87: ...ically display the status of the fans indicated in this item Fan Speed Control Modes This feature allows the user to decide how the system controls the speeds of the onboard fans The CPU temperature a...

Страница 88: ...an1 Fan10 Speeds If the feature of Auto Fan Control is enabled the BIOS will automatically display the status of the fans indicated in this item Fan Speed Control Modes This feature allows the user to...

Страница 89: ...ace The options are Enabled and Disabled Clear System Event Logging Enabling this function to force the BIOS to clear the system event logs during the next cold boot The options are Enabled and Disabl...

Страница 90: ...e ignore this option when OS Boot Watch Dog is set to Disabled Time Out Option This feature allows the user to determine what action to take in an event of a system boot failure The options are No Act...

Страница 91: ...Chapter 7 BIOS 7 23 Realtime Sensor Data This feature display information from motherboard sensors such as temperatures fan speeds and voltages of various components...

Страница 92: ...a supervisor password has been entered for the system User Password Is This displays whether a user password has been entered for the system Clear means such a password has not been used and Set means...

Страница 93: ...bootable devices listed in the sequence of boot order as speci ed The boot functions for the devices included in the candidate list above are currently disabled Use a key or a key to move the device u...

Страница 94: ...etup utility Exit Discarding Changes Highlight this item and hit Enter to exit the BIOS Setup utility without saving any changes you may have made Load Setup Defaults Highlight this item and hit Enter...

Страница 95: ...Keyboard controller failed test May require replacing keyboard controller Keyboard locked Unlock key switch Unlock the system to proceed Monitor type does not match CMOS Run SETUP Monitor type not co...

Страница 96: ...used Previous POST did not complete successfully POST loads default values and offers to run Setup If the failure was caused by incorrect values and they are not corrected the next boot will likely f...

Страница 97: ...Software NMI Failed ServerBIOS2 test error Cannot generate software NMI Non Maskable Interrupt Fail Safe Timer NMI Failed ServerBIOS2 test error Fail Safe Timer takes too long device Address Con ict A...

Страница 98: ...successfully tested nnnn kB System RAM Passed Where nnnn is the amount of system RAM in kilobytes successfully tested One or more I2O Block Storage Devices were excluded from the Setup Boot Menu Ther...

Страница 99: ...d Write down and follow the information shown on the screen Press F2 to enter Setup Optional message displayed during POST Can be turned off in Setup PS 2 Mouse PS 2 mouse identi ed Run the I2O Con gu...

Страница 100: ...A 6 SUPERSERVER 6015X 3 6015X T 6015X 8 User s Manual Notes...

Страница 101: ...error in the top left corner of the screen The following is a list of codes that may be written to port 80h Appendix B BIOS POST Codes POST Code Description 01h IPMI Initialization 02h Verify Real Mod...

Страница 102: ...shut down 38h Shadow system BIOS ROM 3Ah Auto size cache 3Ch Advanced con guration of chipset registers 3Dh Load alternate registers with CMOS values 41h Initialize extended memory for RomPilot option...

Страница 103: ...and IRQs optional 81h Late POST device initialization 82h Detect and install external RS232 ports 83h Con gure non MCD IDE controllers 84h Detect and install external parallel ports 85h Initialize PC...

Страница 104: ...h POST done prepare to boot operating system B4h 1 One short beep before boot B5h Terminate QuietBoot optional B6h Check password optional B7h Initialize ACPI BIOS and PPM Structures B9h Prepare Boot...

Страница 105: ...ory type EDh Initialize Memory size EEh Shadow Boot Block EFh System memory test F0h Initialize interrupt vectors F1h Initialize Run Time Clock F2h Initialize video F3h Initialize System Management Ma...

Страница 106: ...B 6 SUPERSERVER 6015X 3 6015X T 6015X 8 User s Manual Notes...

Страница 107: ...version of the ESB2 SATA RAID Utility can only support Windows XP 2000 2003 Operating Systems Serial ATA SATA Serial ATA SATA is a physical storage interface that uses a single cable with a minimum of...

Страница 108: ...allows you the change the HDD partition size without any data Con guring BIOS for SATA RAID Functions Native Mode 1 Press the Del key during system bootup to enter the BIOS Setup Utility Note If it i...

Страница 109: ...r the Power On Self Test b When you see the above screen press the Ctrl and the I keys simultane ously to have the main menu of the SATA RAID Utility appear Note All graphics and screen shots shown in...

Страница 110: ...and press Space to select it A triangle appears to con rm the selection of the drive f Use the Up Arrow Down Arrow keys to select the stripe size ranged from 4 KB to 128 KB for the RAID 0 array and hi...

Страница 111: ...t the previous menu c When RAID Level item is highlighted press the Up Arrow Down Arrow keys to select RAID 1 Mirror and hit Enter d When the Capacity item is highlighted enter your RAID volume capaci...

Страница 112: ...rrow Down Arrow keys to select the stripe size from 4 KB to 128 KB for your RAID 10 and hit Enter The default setting is 6 4KB Note For a server please use a lower stripe size and for a multimedia sys...

Страница 113: ...elect it A triangle appears to con rm the selection of the drive f Use the Up Arrow Down Arrow keys to select the stripe size ranged from 4 KB to 128 KB for the RAID 5 array and hit Enter For a server...

Страница 114: ...n Arrow keys to select the RAID set you want to delete and press Del A Warning message displays c When asked Are you sure you want to delete this volume Y N press Y to delete the RAID volume or type N...

Страница 115: ...RAID set drive A warning message displays d Press Y to reset the drive or type N to go back to the main menu Exiting the Intel Matrix Storage Manager Utility a From the main menu select Exit and press...

Страница 116: ...5000P Chipset the ESB2 I O Controller Hub provides the I O subsystem with access to the rest of the system It supports 1 channel Ultra ATA 100 Bus Master IDE controller PATA and one Adaptec s Se rial...

Страница 117: ...o load the default settings for the BIOS 3 Use the arrow keys to select the Main section in BIOS 4 Scroll down to SATA Control Mode and press the Enter key to select En hanced 5 Scroll down to SATA RA...

Страница 118: ...ications Using the Adaptec RAID Con guration Utility ARC The Adaptec RAID Con guration Utility an embedded BIOS Utility includes the following Array Con guration Utility Use this utility to create con...

Страница 119: ...stallation C 13 Managing Arrays Select this option to view array properties and con gure array settings To select this option using the arrow keys and the enter key select Managing Arrays from the mai...

Страница 120: ...ble on the disk and may make any data on the disk inaccessible If the drive is used in an array you may not be able to use the array again Do not con gure a disk that is part of a boot array To determ...

Страница 121: ...ives you want to con gure and press Insert 3 The drive you ve selected will appear in the Selected Drives Dialog Box on the right as shown below Repeat the same steps until all drives that you want to...

Страница 122: ...UPERSERVER 6015X 3 6015X T 6015X 8 User s Manual 5 Read the warning message as shown in the screen below 6 Make sure that you have selected the correct disk drives to con gure If correct type Y to con...

Страница 123: ...t is recommended that you con gure devices before you create arrays To create an array 1 From the main menu shown on page D 4 select Create Array 2 Select the disks for the new array and press Insert...

Страница 124: ...nge the default setting 4 The item Create RAID via allows you to select between the different ways of creating methods for RAID 0 and RAID 1 The following table gives examples of when each is appropri...

Страница 125: ...t sizes in a RAID However you can only select a smaller drive as the source or rst drive during a build operation 5 When migrating from single volume to RAID 0 migrating from a larger drive to a small...

Страница 126: ...ted An asterisk will appear next to the bootable array as shown in the picture below Deleting a Bootable Array To delete a bootable array 1 From the Main menu select Manage Arrays 2 From the List of A...

Страница 127: ...e and press Insert and then press Enter 3 Press Yes when the following prompt is displayed Do you want to create spare Yes No The spare you have selected will appear in the Selected drives Menu To del...

Страница 128: ...e Arrays and hit Enter as shown on the previous page 2 From the List of Arrays dialog box shown below select the array you want to view and press Enter The Array Properties dialog box appears as shown...

Страница 129: ...Rebuild to restore its functionality For a critical array rebuild operation the optimal drive is the source drive Note 2 If no spare array exists and a hard disk drive fails you need to create a spar...

Страница 130: ...te and press delete 3 In the Array Properties dialog box select Delete and press Enter The follow ing prompt is displayed Warning Deleting the array will render array unusable Do you want to delete th...

Страница 131: ...ities The Disk Utilities enable you to format or verify the media of your Serial ATA hard disks To access the disk utilities 1 From the Adaptec RAID Con guration Utility Menu select Disk Utilities as...

Страница 132: ...ed at the factory and do not need to be low level formatted again 1 When the screen shown below displays select Format Disk and press Enter The following screen appears 2 Read the warning message when...

Страница 133: ...hen the screen shown above displays select Verify Disk Media and press Enter 4 A message will display indicating that the selected drive will be scanned for me dia defects Select Yes and hit Enter to...

Страница 134: ...6015X 3 6015X T 6015X 8 User s Manual To Exit the Adaptec RAID Con guration Utility 1 Once you have completed RAID array con gurations press ESC to exit The following screen will appear 2 Press Yes to...

Страница 135: ...F6 key when the message Press F6 if you need to install a third party SCSI or RAID driver displays 8 When the Windows OS Setup screen appears press S to specify additional device s 9 Insert the driver...

Страница 136: ...from the list indicated in the XP 2000 2003 setup screen and press the Enter key 6 Press the Enter key to continue the installation process If you need to specify any additional devices to be install...

Страница 137: ...ge C 14 Driver Tool Installation Display Screen Note Click the icons showing a hand writing on paper to view the readme les for each item Click the computer icons to the right of these items to instal...

Страница 138: ...e Supero Doctor III program included on the CDROM that came with your motherboard allows you to moni tor the environment and operations of your system Supero Doctor III displays crucial system informa...

Страница 139: ...d from our Web Site at ftp ftp supermicro com utility Supero_Doctor_III You can also download SDIII User s Guide at http www supermicro com PRODUCT Manuals SDIII UserGuide pdf For Linux we will still...

Страница 140: ...C 34 SUPERSERVER 6015X 3 6015X T 6015X 8 User s Manual Notes...

Страница 141: ...SAS Subsystem 6015X 3 Add on card AOC USAS L4i and SAS backplane CSE SAS 818TQ to support three 3 hot swap SAS drives SATA Subsystem 6015X T On chip ESB2 controller RAID 0 1 5 and 10 supported and SAT...

Страница 142: ...m Cooling Five 5 4 cm counter rotating fans FAN 0085 System Input Requirements AC Input Voltage 100 240 VAC Rated Input Current 10 4A Rated Input Frequency 50 to 60 Hz Power Supply Rated Output Power...

Страница 143: ...N 61000 4 5 EN 61000 4 6 EN 61000 4 8 EN 61000 4 11 Safety EN 60950 IEC 60950 Compliant UL Listed USA CUL Listed Canada TUV Certi ed Germany CE Marking Europe California Best Management Practices Regu...

Страница 144: ...D 4 SUPERSERVER 6015X T 6015X 8 User s Manual Notes...

Отзывы: