


Отзывы:
Нет отзывов
Похожие инструкции для AOC-ATG-i2T

Gigabit Network Set
Бренд: Hama Страницы: 6

DKHiQV-PCI
Бренд: CHIPS Страницы: 32
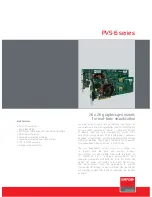
PVS-6000
Бренд: Barco Страницы: 2

Y10A252-B1
Бренд: Rocstor Страницы: 2

PCE3500AH
Бренд: SENAO Страницы: 14

YD-8V14
Бренд: Y-E Data Страницы: 38

PCI1PM
Бренд: StarTech.com Страницы: 16

X-FI FATAL1TY - SB X-FI PLATINIUM FATAL1TY QUICKSTART BACK EN FR DE IT ES NL
Бренд: Creative Страницы: 1

RX600XT-TD128E
Бренд: MSI Страницы: 2

GV-NX88S512H-B
Бренд: Gigabyte Страницы: 38

Access Control
Бренд: HP Страницы: 52

FL863UT - Workstation - Z400
Бренд: HP Страницы: 222

FL863UT - Workstation - Z400
Бренд: HP Страницы: 10

CZ208A
Бренд: HP Страницы: 10

FL863UT - Workstation - Z400
Бренд: HP Страницы: 9

AR20M-MF
Бренд: Siemens Страницы: 34

SRD7202P
Бренд: FnL Страницы: 6

APC8640 Series
Бренд: Acromag Страницы: 19


