1
16
17
2
4
22
5
6
7
10
12
13
11
3
8
9
15
14
18
19
C
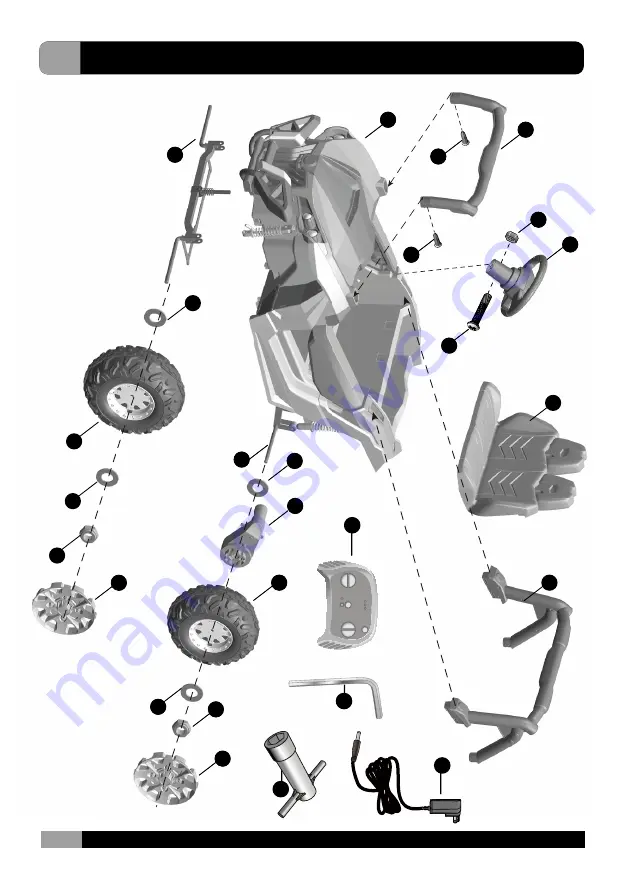
HINT: Some parts shown are assembled on both sides of vehicle
Parts Diagram
Страница 1: ...Maximum user weight 50 kg Please keep this manual for future reference as it contains important information Before first time use charge the battery for at least 8 12 hours Read and understand this entire manual before using with Assembly Instructions ...
Страница 2: ... be removed from the toy before being charged Rechargeable batteries are only to be charged under adult supervision Different types of batteries or new and used batteries are not to be mixed Batteries are to be inserted with the correct polarity Exhausted batteries are to be removed from the toy The supply terminals are not to be short circuited Congratulations on the purchase of your ride on UTV ...
Страница 3: ...n in Parts Diagram Not shown in Parts Diagram Vehicle body Gear box Wheel Φ12 washer Lock nut Wheel cover Front bar Seat Rear bar Rear axle Steering wheel M5X45 machine screw Φ5 nut Remote controller Charger Φ 4x16 screw Front axle Hex wrench Spanner Driving wheel Mp3 cable Split pin Φ10 plastic wahser Φ8 plastic wahser Please contact your local Supercheap Auto store to request any required replac...
Страница 4: ...1 16 17 2 4 22 4 5 6 6 16 7 10 12 13 11 3 1 16 17 2 4 22 4 5 6 6 16 7 10 12 13 11 8 9 3 4 4 5 15 14 18 19 C HINT Some parts shown are assembled on both sides of vehicle Parts Diagram ...
Страница 5: ...when child is in vehicle To avoid falls and collisions please ensure child is supervised at all times Ensure use in safe environment not to be used on roadways steep inclines steps or near bodies of water Ensure child is seated during operation This toy is not suitable for children under 3 years of age due to maximum speed Vehicle has no brake Keep child safely secured in vehicle with seat belt En...
Страница 6: ...c washer onto the screw 3 Line up the holes on the rear axle frame with the holes on the rear shock absorber and reinsert the screw 4 Slide a plastic washer onto the opposite end of the screw 5 Fasten the nut with the hex wrench Repeat for the other side Attach the Rear Shock Absorbers Rear bottom view Rear bottom view Rear axle frame Tools required Hex wrench x2 ...
Страница 7: ...e 4 Slide the wheel onto the rear axle ensure the wheel match up with the gear box 5 Slide another Φ12 washer onto the rear axle 6 Tighten a lock nut to the end of the rear axle with a spanner Repeat the above procedure to assemble the other rear wheel to the rear axle HINT An extra spanner has been provided to hold the Lock Nut on the other side of the rear axle while tightening the Lock Nut on t...
Страница 8: ...he opposite side Repeat for the other side 5 6 Insert the bent end of the steering column into the hole on the front axle linkage Fit a Φ10 plastic washer to the bent end of the steering column and insert a split pin into the hole on the steering column bend the ends of split pin back using a long nose pliers not included HINT You may tighten the nuts on the shock absorber to adjust the tightness ...
Страница 9: ...ith a spanner DO NOT over tighten 4 Insert the tabs on the wheel cover into the slots on the wheel Turn the vehicle body over 5 Plug the sound unit connector on the steering wheel into the connector on the vehicle body 6 Fit the steering wheel to the end of the steering column 7 Line up the holes on the steering wheel with the holes on the steering column insert the M5x45 machine screw 8 Fasten a ...
Страница 10: ...into the holds on the vehicle body Push until you hear it snap into place 2 Insert two Φ4x16 screws through the vehicle wall and into the front bar and tighten 3 Insert the tabs on the rear bar into the opening on the rear of vehicle and push until you hear it click into place ...
Страница 11: ...base till the tabs on the back of seat inserted into the holes on the vehicle HINT The seat is adjustable and has three position You can move the seat back as your child grows Button for adjust the seat Button for adjust the seat 3 Press the button located at the front of hood and lift up the hood 4 Plug the red power connector into the red termianl on the battery Replace the hood Hood button Hood...
Страница 12: ...recharge the battery please 1 One button start Turns the vehicle on and off 2 Forward Reverse lever Changes the direction that vehicle moves from forward to reverse To move the vehicle forward shift the lever to D1 slow speed D2 normal speed D3 fast speed position To move the vehicle backward shift the lever to R position To stop the vehicle shift the lever to the P position HINT The vehicle is de...
Страница 13: ...seconds the status indicator flashes then turn on the power switch located on the the vehicle dash when the status indicator turns off about 2 seconds and turns into long bright means the connection successful If the status indicator makes no response means the connection failed Replace the batteries and try again 2 Brake button Press the button to stop the vehicle press it again to release the br...
Страница 14: ...k the vehicle indoors or cover it with a tarp to protect it from wet weather Keep the vehicle away from sources of heat such as stoves and heaters Plastic parts may melt Recharge the battery after each use Only an adult can handle the battery Recharge the battery at least once a month when the vehicle is not being used Do not wash the vehicle with a hose Do not wash the vehicle with soap and water...
Страница 15: ...elivered to the terminal connection and the vehicle needs repair Contact your distributor please Attempting to shift while the vehicle is motion Completely stop the vehicle and shift see Use Your New Vehicle Check that the battery connectors are firmly plugged into each other when recharging Replace battery contact your distributor please Replace battery contact your distributor please Replace bat...
Страница 16: ...e motor electric system or battery is overloaded The fuse will reset and power will be restored after the unit is turned OFF for 20 seconds and then turned ON again If the thermal fuse trips repeatedly during normal use the vehicle may need repair Contact your distributor please To avoid losing power follow these guidelines Do not overload the vehicle Do not tow anything behind the vehicle Do not ...