background image

S

ST

TE

EP

P 2

2..11

S

Seelleecctt  T

Ty

yp

pee  o

off  C

Co

on

nssttrru

uccttiio

on

n

Choose the best thin-set, thick-set, or self-

leveling mortar installation detail for your
application. Consult with building profession-
als and/or SunTouch personnel for specific
details concerning proper installation.

S

ST

TE

EP

P  2

2..2

2  

F

Fllo

oo

orr  P

Prreep

pa

arra

attiio

on

n

The floor must be completely swept of 

all debris including all nails, dirt, wood, and
other construction debris. Make absolutely
sure there are no objects on the floor that
might damage the SunTouch wire.

S

ST

TE

EP

P  2

2..3

3

S

Sttu

ud

dy

y  tth

hee  F

Fa

acctto

orry

y--ssu

up

pp

plliieed

d  

IItteem

mss  a

an

nd

d  tth

hee  D

Deessiig

gn

n

Make sure all of the correct materials have

been purchased. A general list of materials 
is found at the beginning of this manual.

Study the design carefully before installa-

tion. Review the thermostat location and
where the mat begins and ends, as well as the
general layout pattern. 

Do not cut the wire or shorten the 

mat to make it fit the space. Doing so 
will cause dangerous overheating and 
will void the warranty!

S

ST

TE

EP

P  2

2..4

4

M

Mo

orrtta

arr  a

an

nd

d  T

Th

hiin

n--S

Slla

ab

b  A

Ap

pp

plliicca

attiio

on

nss

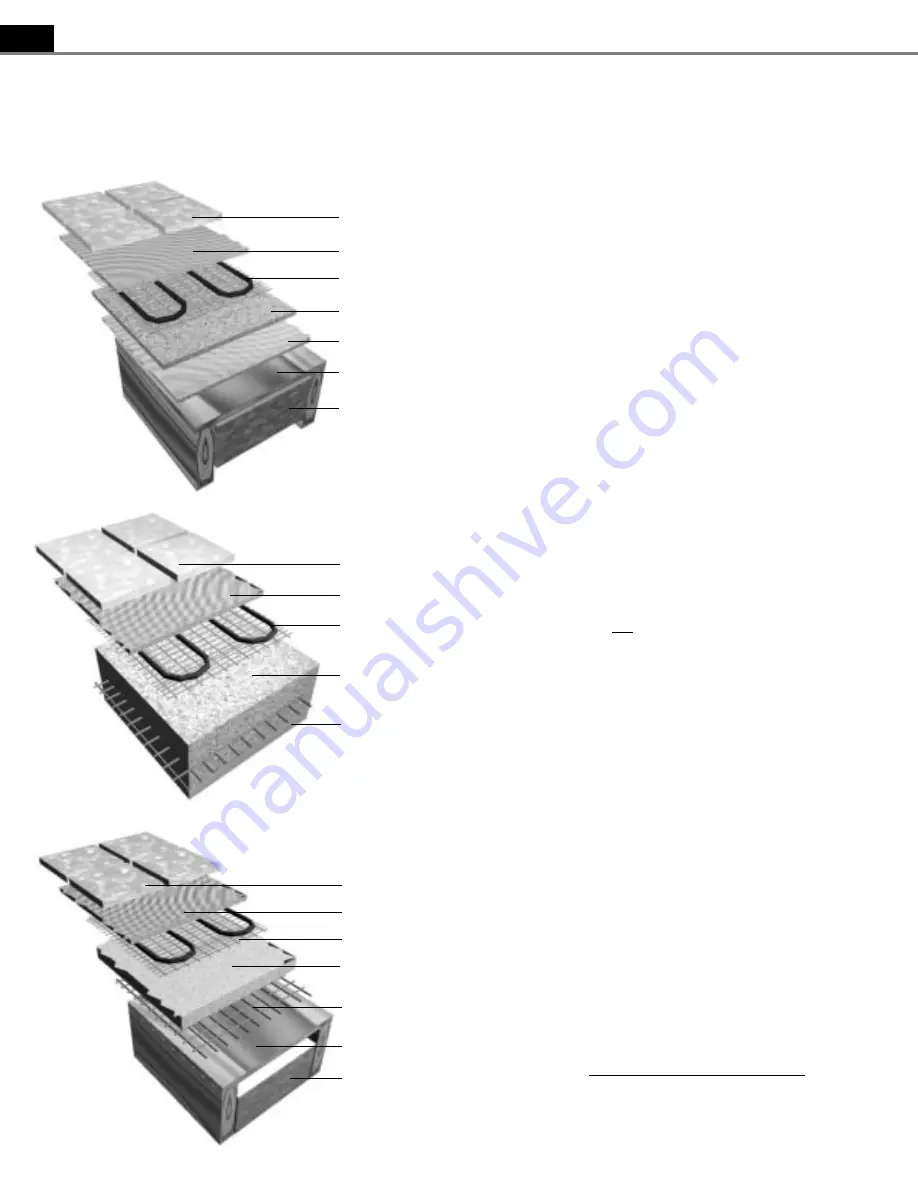
SunTouch can be installed in two types of

construction applications:

1. Thin-set or thick-set mortar beds (3/8"–1").
2. Self-leveling mortar beds (1/4"–1/2").

No matter the application, always install

SunTouch before installing mortar or cement.
Do not lay SunTouch in wet mortar.

We strongly recommend installing tile and

stone flooring according to manufacturer’s
recommendations, TCA guidelines, and ANSI
specifications.

If installing non-masonry floor coverings,

such as hardwood, vinyl, laminate or carpet,
follow industry and manufacturer’s recom-
mendations. 

If installing non-masonry coverings, the 

best method is cover the SunTouch in a self-
leveling mortar (illustrations #5 and #6). 

M

MO

OR

RT

TA

AR

R  A

AP

PP

PL

LIIC

CA

AT

TIIO

ON

NS

S

Insulation (per International 
Residential Code, Chapter 11)

Insulation (per International 
Residential Code, Chapter 11)

Latex-Portland cement mortar
bond coat

11.. T

TH

HIIN

N--S

SE

ET

T  M

MO

OR

RT

TA

AR

R  O

OV

VE

ER

R  F

FR

RA

AM

ME

ED

D  F

FL

LO

OO

OR

R

(Dry-set or latex cement mortar; TCA #F144-2K)

SunTouch

Backer board

Mortar bed

Plywood

Tile/stone

SunTouch

Slab

Latex-Portland cement mortar
bond coat

Tile/stone

2

2.. T

TH

HIIN

N--S

SE

ET

T  M

MO

OR

RT

TA

AR

R  O

OV

VE

ER

R  S

SL

LA

AB

B

(Dry-set or latex cement on slab; TCA #113-2K)

3

3.. T

TH

HIIC

CK

K--S

SE

ET

T  C

CE

EM

ME

EN

NT

T  M

MO

OR

RT

TA

AR

R  M

ME

ET

TA

AL

L  L

LA

AT

TH

H

(Cement mortar metal lath; TCA #145-2K)

Tile/stone or laminate flooring

Latex-Portland cement mortar bond coat

SunTouch

Mortar bed

Metal lath

Plywood

Insulation (per International 
Residential Code, Chapter 11) 

6

SunTouch Space Warming Manual

P

Ph

ha

assee  2

2.. S

Su

un

nT

To

ou

ucch

h  IIn

nsstta

alllla

attiio

on

n..

Содержание D12 series

Страница 1: ...hen installing our product just give us a call We re here to help 8 8 8 8 8 8 4 4 3 3 2 2 8 8 9 9 3 3 2 2 w w w w w w s s u u n n t t o o u u c c h h n n e e t t S Sp pa ac ce e W Wa ar rm mi in ng g...

Страница 2: ...falls below the mat s capabilities Please refer to specific design information provided for heat ing applications especially when installing non masonry flooring materials The designer must determine...

Страница 3: ...ed ceramic tile mortar N NE EV VE ER R forget to install the floor sensor if using the SunTouch FloorStat Control N NE EV VE ER R install mats under cabinets or other built ins Excessive heat will bui...

Страница 4: ...mat is fastened to the floor after floor coverings are installed Also checking these measurements often during tile installation is highly recommended to avoid burying a damaged wire C Ch he ec ck ki...

Страница 5: ...ox If conduit is required by code install 1 2 minimum conduit from the bottom plate up to the electrical box For multiple power leads multiple mats install 3 4 conduit which will accom modate multiple...

Страница 6: ...beds 3 8 1 2 Self leveling mortar beds 1 4 1 2 No matter the application always install SunTouch before installing mortar or cement Do not lay SunTouch in wet mortar We strongly recommend installing...

Страница 7: ...ti io on n M Me em mb br ra an ne e Install the SunTouch above the membrane whenever possible unless rec ommended otherwise by the membrane manufacturer I In ns su ul la at ti io on n Do not install r...

Страница 8: ...utions that must be observed see pg 13 for more details 1 Never install SunTouch in shower walls or any other wall 2 Never make a field splice to mats installed in shower Do not attempt to repair or m...

Страница 9: ...of the toilet if need be approximately 20 from wall SunTouch Space Warming Manual 9 F Fi il ll l i in n T Te ec ch hn ni iq qu ue e U Us se e c cl li ip ps s o or r h ho ot t g gl lu ue e t to o a at...

Страница 10: ...av ve e t th he e s se en ns so or r i in nt to o t th he e m ma at t o or r y yo ou u m ma ay y p pr re ef fe er r t to o u us se e a a c cl li ip p S ST TE EP P 4 4 1 1 I In ns st ta al ll l t th h...

Страница 11: ...8 88 8 4 43 32 2 8 89 93 32 2 SunTouch Space Warming Manual 11 A Ap pp pe en nd di ix x I In ns st ta al ll la at ti io on n O Ov ve er rv vi ie ew w 4 square electrical box Bottom plate cut outs Powe...

Страница 12: ...Up to New Positon Cut Cut Cut 9 90 0 o or r F Fl li ip p T Tu ur rn n R Ro ol ll l o ov ve er r T Tu ur rn n 1 18 80 0 o or r B Ba ac ck k t to o B Ba ac ck k T Tu ur rn n F Fi il ll l i in n T Te ec...

Страница 13: ...net The heat only conducts about 1 1 2 from the wire Install mats 4 6 away from wax ring 18 20 from back wall Fill in triangular areas by removing wire from mat and fastening with wire clips Do not be...

Страница 14: ...on ne e 1 12 2 x x 3 35 5 m ma at t T Ty yp pi ic ca al l m mu ud dr ro oo om m l la ay yo ou ut t T Tw wo o 3 36 6 x x 1 10 0 m ma at ts s C Co on nt tr ro ol l Install mats right up to the face of a...

Страница 15: ...to o i in ns si id de e h ho ou us se e B Ba at th h T Tu ub b V Va an ni it ty y S Sm ma al ll l b ba at th h l la ay yo ou ut t 1 1 O On ne e 3 36 6 x x 5 5 m ma at t F Fr ro on nt t e en nt tr ry y...

Страница 16: ...120V Typical Electrical Wiring Diagram with FloorStat Controller and Contactor 120V 120V Control back Line Black Neutral White Ground Bare or Green Load Black Load White Mat Green Mat Black Mat White...

Страница 17: ...e Blue Ground Bare or Green Load Black Load Red Mat Green Mat Black Mat Blue Control Black Control Red Upper terminals not used for sensor Sensor Wire no polarity Sensor Contactor 240V Coil All electr...

Страница 18: ...us se e An analog type ohm meter was used has a needle indicator If measurement is showing an open or short circuit cable has been damaged If measurement is just a little low or high room temperature...

Страница 19: ...S WARRANTY UNLESS SUCH EXTENSION OR MODIFICATION IS MADE IN WRITING BY A CORPORATE OFFICER DUE TO DIFFERENCES IN BUILDING AND FLOOR INSULATION CLIMATE AND FLOOR COVERINGS WATTS RADIANT MAKES NO REPRES...

Страница 20: ...06 67 7 F Fa ax x 2004 Watts Radiant SunTouch Space Warming Manual LIT STSPCMAN0404 Effective 04 08 2004 U S and foreign patents and trademarks applied for SunTouch SunTouch like a walk on the beach...

Отзывы: