Suntek HC-300 Скачать руководство пользователя страница 6

bookmark this section and refer to it as you read through 
the rest of the manual. 
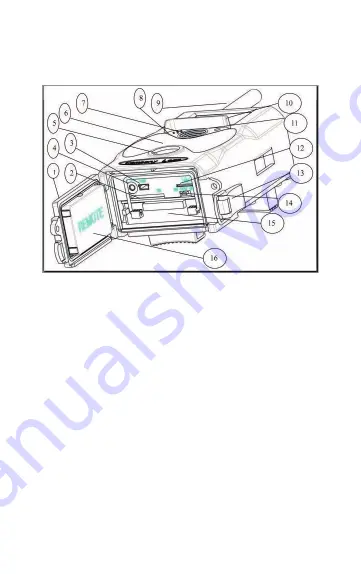
1.3 Camera components and features

1) Bottom Cover                    9) GSM Antenna
2) SD-Card Slot                      10) 2 inch color LCD Display    
3) USB Connector                 11) Sound recorder
4) TV Out connector            12) SIM card slot          
5) PIR                                      13) Lock 
6) Infrared Flash                   14) Power witch
7) Lens                                   15) Battery Depot 
8) Microphone                     16) Portable remote controller

2

Содержание HC-300

Страница 1: ...Infrared Mobile HD Digital Trail Camera HC 300 User s Manual ...

Страница 2: ......

Страница 3: ...er Supply 7 3 2 Insert the SD card and the SIM card 7 3 3 Power on and Enter into the ON Mode 8 3 4 Enter into the TEST Mode 8 3 4 1 Custom Settings 9 3 4 2 Manual Capturing 9 3 4 3 View Images or Videos 9 3 4 4 Send MMS 9 3 5 Power Off 9 4 Advanced Operations 10 4 1 Settings Menu 10 4 1 1 Camera setting 11 4 1 2 Video setting 11 4 1 3 System settings 12 4 1 4 Default Settings 13 4 1 5 General Set...

Страница 4: ...l Time 16 4 1 15 Set PIR Sensitivity 17 4 1 16 Set Timer 17 4 1 17 MMS Settings 18 4 1 18 Set GSM Mode 18 4 1 19 Enter Password 19 4 2 Playback 19 4 2 1 Viewing Photo or Video 19 4 2 2 Delete Photo or Video 20 4 3 Laser Pointer 20 4 4 File Numbering 20 4 5 Firmware Upgrade 21 Appendix I Technical Specifications 22 Appendix II Parts List 23 ...

Страница 5: ...ufficient light dusk when it begins to take infrared monochrome photos and video It is easy to use because there is a 2 inch colorful LCD display on camera and a sound recorder speaker embedded in the camera A laser pointer is used to help target the photo area of the camera And it supports MMS SMS E mail via GPRS Network It is resistant against water and snow for outside uses Furthermore the came...

Страница 6: ...Camera components and features 1 Bottom Cover 9 GSM Antenna 2 SD Card Slot 10 2 inch color LCD Display 3 USB Connector 11 Sound recorder 4 TV Out connector 12 SIM card slot 5 PIR 13 Lock 6 Infrared Flash 14 Power witch 7 Lens 15 Battery Depot 8 Microphone 16 Portable remote controller 2 ...

Страница 7: ...of the camera and is primarily used for customer settings and password input This is an infrared type wireless remote control The maximum remote distance is 9 meters There are fifteen buttons on the remote control Note Remote control is inside of the camera 3 ...

Страница 8: ...o make selection 1 4 2 Characters Press the punctuation for laser pointer 1 5 Shooting Information Display When the camera is turned on the power switch is slid to ON or TEST position the shooting information will be displayed in the monitor Select Item UP Select Item DOWN Select Option Left Display Menu Exit MENU Selection OK Select option RIGHT ...

Страница 9: ...tering incorrect settings of your mobile carrier parameters There are 5 submenu settings about the MMS function Including APN MMSC WAP Gateway MMS Phone MMS Mail refer to 4 1 table MMS Set means to have the right MMS setting parameters according to your network Send to means to input the phone number or email address which you want to send All 5 submenus must have correct settings 1 7 Supported Fo...

Страница 10: ...he power switch is at ON position It is recommended to format the SD card by the camera when used at the first time The camera will be in USB mode when connected to a USB port of a computer In this case the SD card functions as a removable disk Please ensure sufficient power when having firmware upgrade otherwise the upgrade process could be interrupted incorrectly If any fault occurs after improp...

Страница 11: ...battery slots Slot 1 and 2 form one group 1 will mark on depot while slot 3 and 4 form the other group 2 will mark on depot where each group can supply the power individually When in low battery state camera will be automatically shut down Please change the batteries in time If you have set the MMS function it will send you a SMS or Email to indicate the low battery situation 3 2 Insert the SD car...

Страница 12: ...switch to the ON position Left to power on the camera and enter into the ON mode Before entering into the ON mode you can adjust the camera the target area by laser pointer Related information please refer to section 4 3 After switching on the camera the motion indication LED red will blink for about 20s The 20s is a buffering time before automatic capturing photos or videos e g for closing and lo...

Страница 13: ...There are two ways to view the captured images or videos 1 LCD screen on camera 2 TV monitors which connects to camera with TV cable Press Right to view images the latest image will be shown in the LCD screen on camera or TV monitor Press UP to view the previous image and press DOWN for the next The detailed operations like deleting images or videos will be described in Advanced Operations chapter...

Страница 14: ...he above three modes the OFF mode is the specified safe mode when replacing the SD card or batteries and transporting the camera This chapter explains the advanced operations for customizing the camera settings The settings can only be customized in TEST mode and the remote control is needed 4 1 Settings Menu To view the camera settings menu press MENU in the TEST mode called settings menu in this...

Страница 15: ...4 1 1 Photo Setting 4 1 2 Video Setting 11 ...

Страница 16: ...4 1 3 System Setting 12 ...

Страница 17: ...rd TV Mode NTSC NTSC PAL GSM Mode Instant 99 Instant Off APN CMwap MMSC http mmsc monternet com WAP Gateway 10 0 0 172 80 MMS Phone MMS Email Password Off Off On 4 1 5 General Settings The operating steps are suitable for following menu items Camera Mode Photo Size Video Size Multi Video Length Delay Timer and GSM Mode 4 1 6 Set Camera Mode There are two camera modes Camera or Video The way to set...

Страница 18: ...Press MENU to cancel setting and return to info display 4 1 8 Set Photo Size This parameter has three values 12MP 8MP and 5MP The default value is 12 mega pixels The following shows how to set pixel size as 8M Pixel a Press MENU to display the setting menu b Press DOWN to select Resolution c Press Right to select Photo Size d Press DOWN to select 8 M Pixel e Press OK to save the current setting th...

Страница 19: ... following a Press MENU to display the setting menu b Press right button enter into system c Press DOWN to select Date Time d Press Right Button to Display Date Time Interface Press UP and DOWN to change the Value e Press OK to save all current setting then press MENU to return to info display Press MENU to cancel setting and return to info display 4 1 11 Set Multi This parameter affects the numbe...

Страница 20: ...lay the VOICE setting Interface d Press UP to select OFF e Press OK to save the current setting then press MENU to return to info display Press MENU to cancel setting and return to info display 4 1 14 Set PIR Triggering Interval Time This parameter means that how long the PIR Passive Infrared motion sensor will be disabled after each triggering in ON mode During this time the PIR of the device wil...

Страница 21: ...ittle interference and to use lower sensitivity for outdoor or environment with lots of Interference like hot wind smoke near window etc Furthermore the sensitivity of the PIR is strongly related to the temperature Higher temperature leads to lower sensitivity Therefore it is suggested to set a higher sensitivity for high temperature environment The following shows how to set PIR sensitivity as Lo...

Страница 22: ... to previous menu 4 1 17 MMS Settings There are some settings to be entered the steps are as follows 1 Edit the file gsm_info txt in the computer to set the MMS parameters then save it to SD card below is for reference Please note that this is only an example for more details please contact your network service provider and 3 network provider parameters needs to be edited PHONE and EMAIL could be ...

Страница 23: ...o select Password c Press DOWN to select On then press Right to select 4 numbers as password d Press OK to save the current setting then press MENU to return to info display f The LCD screen will prompt to enter password next time you switch on the camera Press MENU to cancel setting and return to previous menu 4 2 Playback In playback mode images or videos can be viewed deleted The images and vid...

Страница 24: ...deleting a picture or a video file the deleted files can t be restored Furthermore in order to delete all the images and video clips in the SD card it is suggested to format the SD card please refer to 4 1 7 4 3 Laser Pointer The laser pointer can be turned on and is especial y useful when it is somewhat dark as an additional function for pointing to an object or a certain region of interested ROI...

Страница 25: ...nzip the update file 2 Copy the FW18NA bin to SD card 3 Insert the SD card into the camera 4 Power on the camera 5 The camera will read it and update itself automatically When updating the camera its screen is black 6 The screen will light on after being finished 7 Plug out the SD card then insert it into pc delete the FW18NA bin in the SD card If you don t do this the camera will enter update mod...

Страница 26: ...stable High Normal Low Operation mode CAMERA VIDEO CAMERA VIDEO Trigger Time 1 1s Trigger interval 5sec 30min Programmable Timer Time Lapse Programmable Time stamp Date and Time Photo Burst 1 3 6 9 Power Supply 8 AA or 4 AA or solar power supply Stand by Current 0 25 mA 6mAh Day Power Consumption 400 videos interval 5min video length 10s 500 MMS use 8 AA batteries Microphone speaker Available Low ...

Страница 27: ...List Part Name Quantity Digital Camera 1 Wireless Remote 1 USB Cable 1 TV cable 1 Belt One 1 User Manual 1 Antenna One 1 SD card Optional Black 940NM IR flash Optional Battery Not included Solar power supply Optional 23 ...

Страница 28: ......

Отзывы: