Sunshine Kids Radian 80 Скачать руководство пользователя страница 24

C

M

Y

CM

MY

CY CMY

K

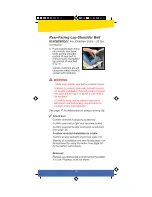
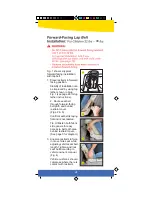
Fig. 1 shows a typical

forward-facing installation

with lap belt.
1. Place restraint in forward

facing position.
Stability of installation can

be improved by using top

tether shown in blue,     

Fig. 1 (see page 28 for top

tether instructions).
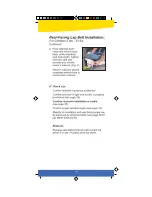
2. Route seat belt 

through forward-facing 

belt path and behind 

restraint cover.              

(Figs. 2 & 3)
Confirm seat belt is laying

flat and is not twisted.
Tip: Unfasten both fabric

side panels for easy 

access to belt path area 

behind restraint cover.

  (See page 3 for diagram)

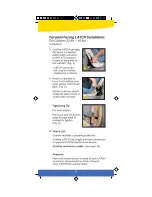
3. Kneel on restraint to force

it into vehicle seat while 

adjusting vehicle seat belt

length. Tighten and lock 

seat belt according to 

vehicle owner’s manual.

(Fig. 4)
Vehicle cushions should

compress where there is

contact with restraint.

24

80

Содержание Radian 80

Страница 1: ...C M Y CM MY CY CMY K...

Страница 2: ...lation 22 to 48 lbs 20 Forward facing Lap Shoulder Belt installation 22 to 80 lbs 22 Forward facing Lap Belt installation 22 to 80 lbs 24 Checking Restraint Stability 25 Aircraft Installation 26 SafeS...

Страница 3: ...e panel 4 Forward facing belt path 15 Harness clip 5 Rear facing belt path 16 Buckle pad 6 Release lever 17 Harness adjuster lever 7 Harness adjuster strap 18 Buckle slot 8 Metal harness yoke 19 Buckl...

Страница 4: ...5 kg forward facing 80 lbs 36 kg Only secure this child restraint with the vehicle s lower universal anchorage system LATCH if available or with vehicle seat belt Do not use vehicle s LATCH anchorage...

Страница 5: ...C M Y CM MY CY CMY K...

Страница 6: ...C M Y CM MY CY CMY K...

Страница 7: ...C M Y CM MY CY CMY K...

Страница 8: ...C M Y CM MY CY CMY K...

Страница 9: ...and body support Fig 1 Toddler Body Support Remove head support Fig 1A to use support cushion Fig 1B for toddlers Head Support Cushion Support cushion can be attached higher on the seat to provide hea...

Страница 10: ...C M Y CM MY CY CMY K...

Страница 11: ...C M Y CM MY CY CMY K...

Страница 12: ...C M Y CM MY CY CMY K...

Страница 13: ...etal tab to lock base Fig 3 1 Lift metal tab to unlock base Fig 3 2 Slide base forward the opposite direction as shown in Fig 2 3 Pull base away from restraint bottom Tip To carry detachable base fit...

Страница 14: ...C M Y CM MY CY CMY K...

Страница 15: ...C M Y CM MY CY CMY K...

Страница 16: ...C M Y CM MY CY CMY K...

Страница 17: ...C M Y CM MY CY CMY K...

Страница 18: ...C M Y CM MY CY CMY K...

Страница 19: ...C M Y CM MY CY CMY K...

Страница 20: ...C M Y CM MY CY CMY K ALWAYS use SafeStop with LATCH installation for forward facing child under 40 lbs see page 26...

Страница 21: ...C M Y CM MY CY CMY K...

Страница 22: ...C M Y CM MY CY CMY K For lap shoulder belt installation ONLY use SafeStop with top tether and with child under 40 lbs see page 26 80...

Страница 23: ...ck seat belt will result in an unsafe installation that will greatly increase the potential for injury or death to the child in an accident Carefully read vehicle owner s manual to determine seat belt...

Страница 24: ...ough forward facing belt path and behind restraint cover Figs 2 3 Confirm seat belt is laying flat and is not twisted Tip Unfasten both fabric side panels for easy access to belt path area behind rest...

Страница 25: ...the potential for injury or death to the child in an accident Confirm stability of restraint after installation and before each use Grasp restraint near belt path being used Attempt to move restraint...

Страница 26: ...ollow installation instructions on page 18 Instructions 1 Remove harness straps from metal yoke of harness adjuster Fig 1 2 Thread bottom of SafeStop on to metal yoke of harness adjuster Fig 2 3 Threa...

Страница 27: ...fore operating adjustable bottom Lowering adjustable bottom 1 Pull bar upward Fig 2 2 Pull adjustable bottom out to its lowered position then release bar Fig 3 3 Confirm adjustable bottom is locked in...

Страница 28: ...ing installations attach top tether to approved vehicle tether anchorage points ONLY as labeled by vehicle manufacturer ALWAYS use SafeStop with top tether with forward facing child under 40 lbs see p...

Страница 29: ...me vehicle models the top tether hook may not fit structural parts of vehicle seat or there may not be a suitable anchorage point for top tether hook It may be necessary to use the tether connecting s...

Страница 30: ...ss Buckle To Fasten Insert one buckle tongue at a time into buckle A click confirms proper connection after each tongue is inserted Fig 1 To Unfasten Press the red button on the face of buckle and bot...

Страница 31: ...ORTANT Position harness clip at proper height for child level with child s armpits Fig 1 To Fasten Push both halves together until a click confirms proper engagement To Unfasten Squeeze middle tabs to...

Страница 32: ...des 4 Place child in restraint 5 Position harness straps around child and fasten buckle and harness clip Figs 2 3 Confirm harness clip and buckle are properly fastened by gently tugging on each 6 Gent...

Страница 33: ...11 Confirm harness buckle location is correct see page 35 for correct center buckle position Proper Harness Height and Child Height 1 Secure child in restraint see page 32 for properly securing the ha...

Страница 34: ...pull shoulder straps out and re thread them through the correct height harness slots Fig 3 4 From back of seat re attach shoulder straps to metal harness yoke Fig 2 IMPORTANT Make sure loop ends of BO...

Страница 35: ...B 3 If harness buckle strap angles sharply back towards child Fig C move buckle to a rear buckle location See below Harness Buckle Removal and Installation Installing harness buckle 1 Locate correct h...

Страница 36: ...Push harness buckle strap down 2 inches into rear facing belt path tunnel 4 Position metal buckle strap retainer so that it is vertical Fig 2 5 Guide buckle strap and metal retainer upward and rotate...

Страница 37: ...If you have any questions about the specific type of seat belt system in your vehicle and its operation consult vehicle owner s manual or contact vehicle manufacturer 1 Remove locking clip from stora...

Страница 38: ...aps from back of restraint see page 34 adjusting harness height 2 Remove fasteners securing cover to inside of restraint bottom Fig 1 A 3 Remove fasteners securing cover to outside of restraint bottom...

Страница 39: ...damage to the locking mechanisms that could prevent safe functioning Do NOT oil or lubricate any part of the restraint Do NOT use restraint if there is any appearance of rust on any metal surface Rem...

Страница 40: ...ess Clean with damp cloth only wet cloth with warm water and mild soap and wring thoroughly so it is NOT dripping water Towel dry Do NOT use solvents or abrasive cleaners Cleaning harness adjuster Per...

Страница 41: ...inse thoroughly in mildly hot water or soak overnight to loosen dried liquid or hardened food debris Fig 1 3 Towel dry 4 Confirm proper buckle functioning repeatedly fasten and un fasten buckle with b...

Страница 42: ...ress on the back of this instruction manual Please register this product within 30 days of original date of purchase by completing and mailing the registration card Warranty Limitations This warranty...

Страница 43: ...hereunder is in lieu of any implied warranties including implied warranties of merchantability and appropriateness for a particular purpose and shall be limited to the duration and terms of this expre...

Страница 44: ...C M Y CM MY CY CMY K...

Отзывы: