930473 Rev. B
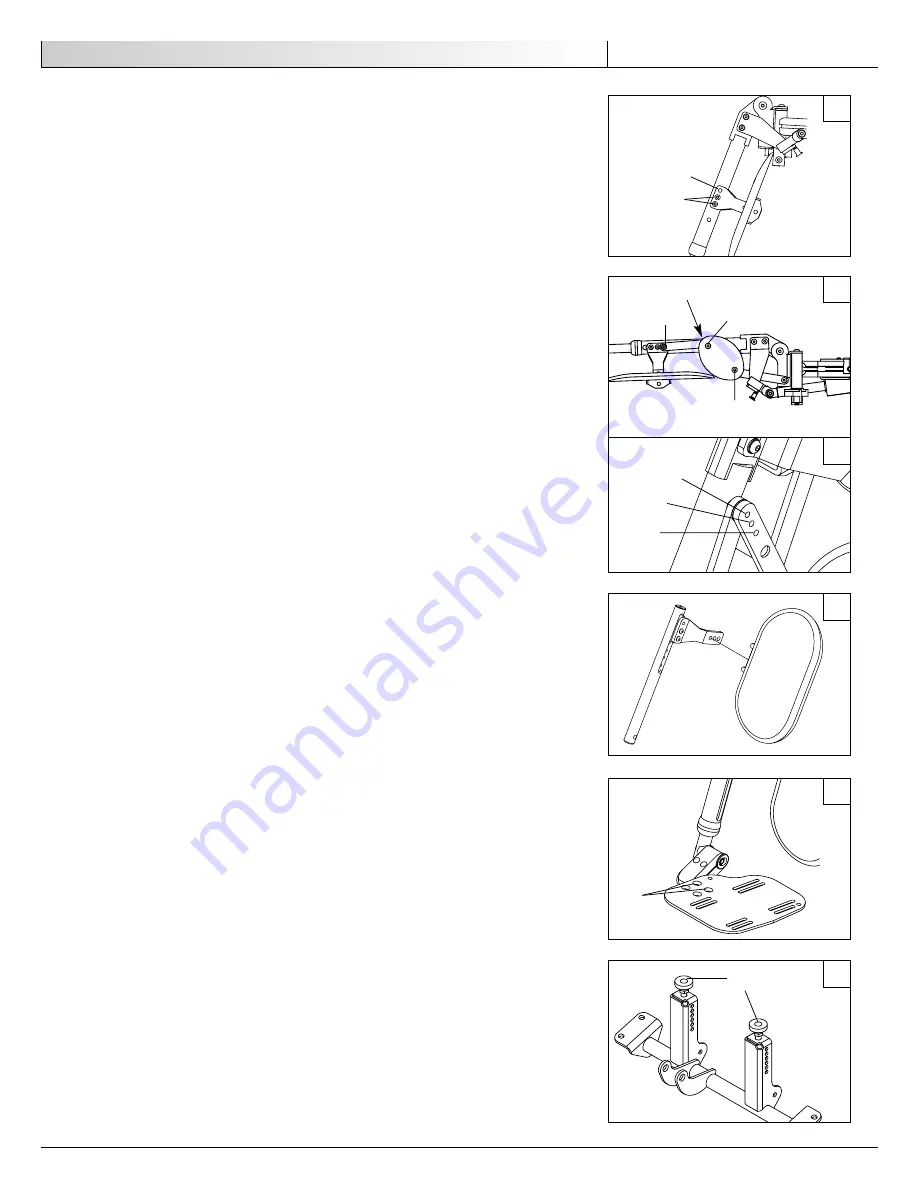
L. LEGREST (Figs. 8, 9, 10, 11)
1. Legrest Length is adjusted in 5/8" increments (
Fig. 8
).
Remove Legrest from chair. Using a 5/32 hex wrench, remove the lower two 1/4-28
screws (A). Loosen, but do not remove the upper 1/4 -20 screw (B) until the exten-
sion tube will slide within hanger. Reposition and reinstall screws.
2. Legrest Articulation (if so equipped) (
Figs. 9a & 9b
)
The amount of articulation in the legrest may be adjusted from 1.5 to 2.5 inches.
To adjust:
a. Remove knee plate padding.
b. Remove screw A.
c. Remove top 1/4-20 screw (B) as shown.
d. Loosen screw C so knee plate rotates.
e. Rotate linkage so forward screw (D) is accessible beneath legrest.
f. Remove screw D and reposition linkage.
g. Note linkage extension positions: 1=2.5"; 2=2"; 3=1.5". (
Fig. 9b
)
3. Calf Pad (
Fig. 10
)
Calf pad can be moved forward and rearward by repositioning it in different mounting
holes.
4. Footplate (
Fig. 11
)
Footplate may by angled or repositioned by loosening the 1/4-28 flathead screws (F)
located on the top of the footplate.
M. SEAT FRAME TILT STOP PADS (Fig. 12)
The position of the tilt stop pads (A) are adjustable vertically by loosening the jam nuts
and rotating the stop pads counter clockwise to raise (or clockwise to lower). The stop
pads should be positioned to support the seat frame at its lowest front position when the
user prefers a pre-tilted driving position. Once position is established, use jam nut to hold
position of stop pads on tower. “Re-home”-ing of seating system is required after adjust-
ment of stop pads (see section XI: E).
N. CHECK-OUT
Once the seating system is assembled and adjusted, it should operate smoothly and easily.
All accessories should also perform smoothly.
After the seating system has been set up and programmed be sure the seating system per-
forms to your specified operational settings (see Operating Instructions: Electronic
Controls). If the seating system does not perform to specifications, turn the seating system
OFF and reprogram operational specifications using the QMAC Pendant Programmer.
Repeat this procedure until the seating system performs to specifications before attempting
active use of the seating system.
If you have any problems, follow these procedures:
1. Review the set-up, check-out, operating and troubleshooting sections to make sure
seating system was properly prepared.
2. If your problem persists, contact your authorized supplier. If you still have a problem
after contacting your authorized supplier, contact Sunrise customer service. See the
introduction page for details on how to contact your authorized supplier or Sunrise
customer service.
I X . O p e r a t i n g I n s t r u c t i o n s – M e c h a n i c a l
17
E n g l i s h
8
10
11
12
A
F
A
B
9a
D (not shown)
B
C
A
9b
3
1
2
Содержание Quickie Smart Seat
Страница 23: ......


