Safety & Warnings
•
This device contains lithium battery that shall be stored and disposed properly.
• DO NOT expose the device to moisture.
Operations
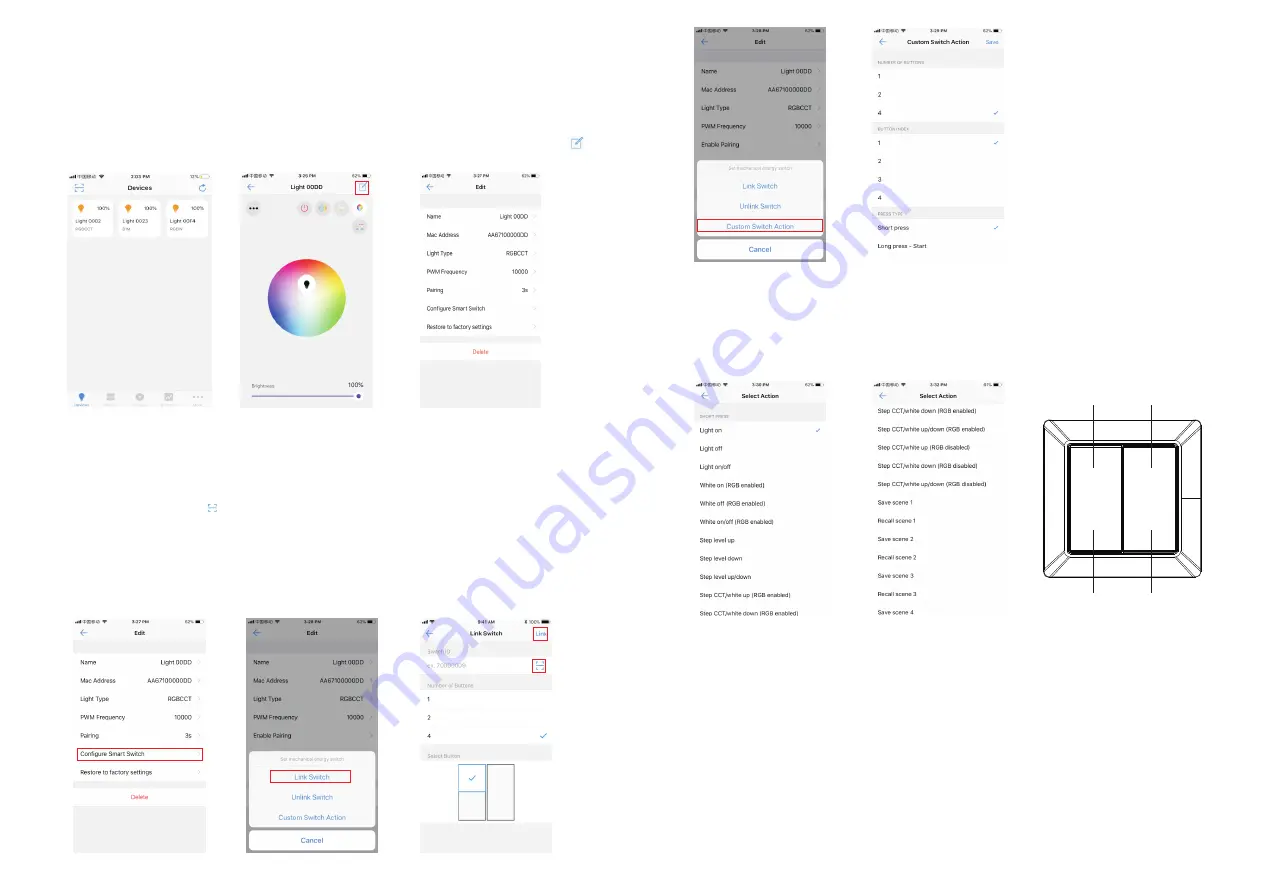
Figure 9
Figure 10
Figure 11
BUTTON INDEX
1
2
4
3
Pair a RF+Bluetooth Receiver to the APP
Step 1:
Add the RF+Bluetooth LED receiver to EasyThings APP (please refer to the instruction of EasyThings APP to
learn how).
Step 2:
Press and hold the added device icon to enter into control interface of the LED receiver, then tap button at
upper right corner to enter into edit page of this device (As shown in
Figure 1
&
Figure 2
&
Figure 3
).
Figure 1
Figure 2
Figure 3
Configure the Smart Switch
Step 1:
Tap
“Configure Smart Switch”
(As shown in
Figure 4
) to go to configuration page
.
“
Link Switch
” is the 1st step
to configure a coupler, tap “
Link Switch
” (As shown in
Figure 5
), then choose “
Number of Buttons
” as 4, 1/2/4 means
1-button/2-button/4-button switch respectively, “
Select Button
” is to select a button you would like to link, tick and select a
button. Then tap the scan button “ ” to scan the QR code or manually input the Switch ID printed at the back side of the
switch. Then tap “Link” at the upper right corner, the selected button will be linked to the app. To configure all 4 buttons, you
need to select and link the 4 buttons respectively (As shown in
Figure 6
). “
Unlink Switch
” enables the user to unlink a smart
switch from the app by scan QR code or manually input the ID on the back of the switch, the operation is similar to “
Link
”.
“
Custom Switch Action
” is to configure the function of a linked switch, tap “
Custom Switch Action
” to enter into setting
page of a linked switch (As shown in
Figure 7
&
Figure 8
).
Figure 4
Figure 5
Step 2:
“
NUMBER OF BUTTONS
” is to choose the number of push buttons of the switch (1/2/4 buttons), choose 4 here
(As shown in
Figure
8
). “
BUTTON INDEX
” is to choose a button that you would like to configure (As shown in
Figure 8
).
“
PRESS TYPE
” is to choose an operation of the button for example “
Short press
” (As shown in
Figure 8
). After choosing
an operation, the available functions can be triggered by the operation will be listed, tap to choose a function that you
would like to assign to the operation (As shown in
Figure 9
&
Figure 10
).
Figure 6
Figure 7
Figure 8
For the configuration of
“Long press”
operation of a button, 2 steps should executed,
step 1
is to configure “
Long press
start
” which means the button is pressed without releasing,
step 2
is to configure “
Long press end
” which means the button
is released.
Meanings of the available configurable actions for
“Long press start”
are as follows (As shown in
Figure 12, Figure 13
):
Move level up: dim up brightness.
Move level down: dim down brightness.
Move level up/down: first operation to dim up brightness, second operation to dim down brightness.
Move CCT/white up (RGB enabled): for RGBCCT or RGBW devices, increase WW and decrease CW, or increase W
channel, RGB channels are enabled.
Move CCT/white down (RGB enabled): for RGBCCT or RGBW devices, increase CW and decrease WW, or decrease W
channel, RGB channels are enabled.
Move CCT/white up/down (RGB enabled): for RGBCCT devices, first operation to increase WW and decrease CW, second
operation to decrease WW and increase CW, for RGBW devices, first operation to increase W channel, second operation
to decrease W channel, RGB channels are enabled.


