4
ASSEMBLY INSTRUCTIONS
We value your experience using Sunny Health and Fitness products. For assistance with parts or
troubleshooting, please contact us at
or 1-877-90SUNNY (877-
907-8669).
57
58
62
62
62
62
63
63
26
26
26
26
63
63
107
#63 D8*
φ
20*R30 4PCS
#62 M8*60 4PCS
#26 M8*S13 4PCS
#B S13-14-15 1PC
110
19
19
19
19
10
10
10
10
10
10
20
20
20
20
20
20
19
19
13
57
2
106
69
14A
2
106
14A
69
#10 D8 6PCS
#20 D8*
φ
16 6PCS
#19 M8*16*S5 6PCS
#A S5 1PC
A
B
14
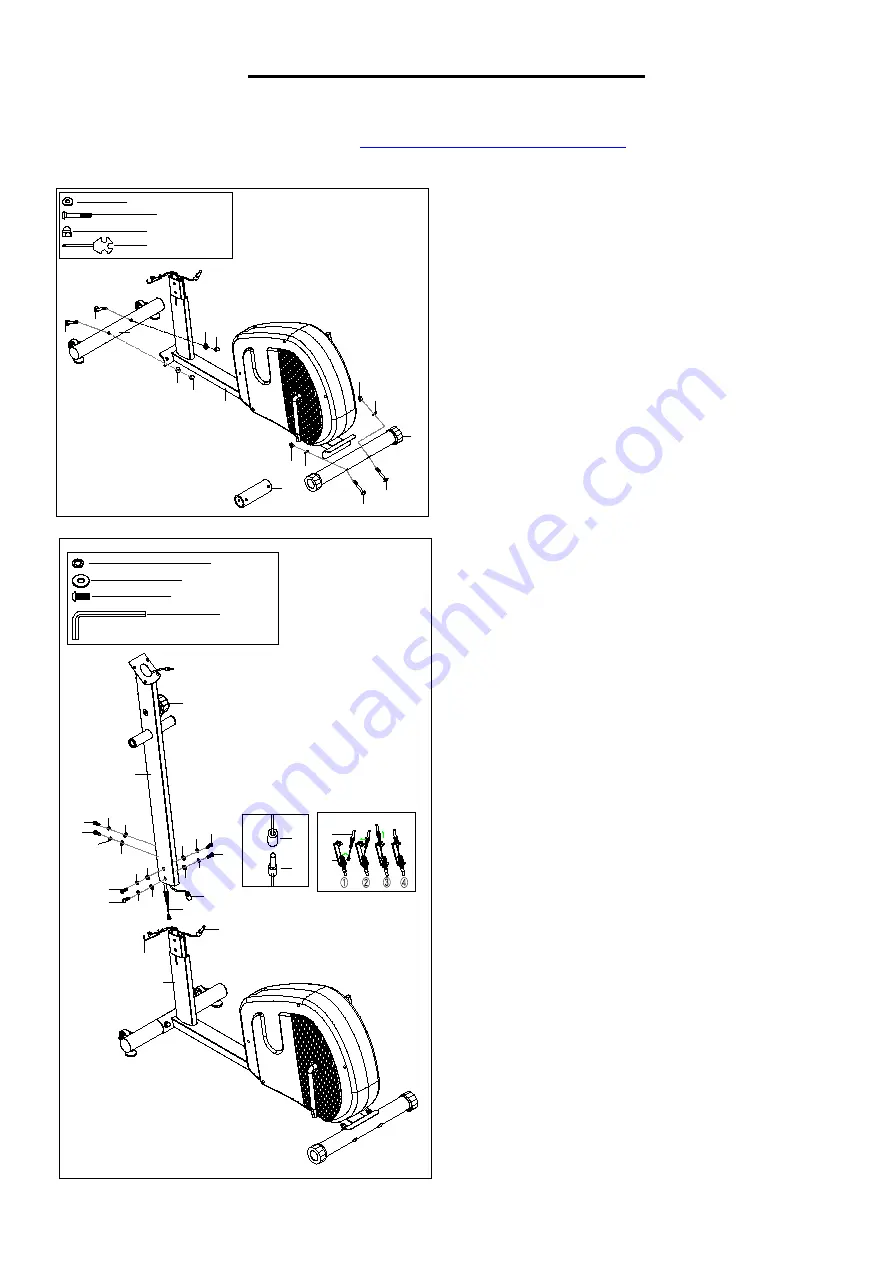
STEP 1:
Remove 4
Bolts (No. 62)
, 4
Arc Washers
(No. 63)
, 4
Cap
Nuts (No. 26)
and
Rear
Shipping Tube (No. 110)
from the
Front
Stabilizer (No. 58)
and
Main Frame (No. 57)
by
Spanner (No. B)
.
Attach the
Front Stabilizer (No. 58)
and
Rear
Stabilizer (No. 107)
to the
Main Frame (No.
57)
using 4
Bolts (No. 62)
, 4
Arc Washers
(No. 63)
and
4
Cap
Nuts (No. 26)
that were
removed. Tighten and secured with
Spanner
(No. B)
.
STEP 2:
Remove 6
Bolts (No. 19)
, 6
Spring Washers
(No. 10)
and 6
Washers (No. 20)
from
Main
Frame (No. 57)
by
Spanner (No. A)
.
Check the
Tension Control Knob (No. 14)
is
at level 1 (lowest resistance) to ensure the
wire is the longest. Connect the
Tension
Control Wire (No. 14A)
with
Lower Tension
Control (No. 69)
as shown in picture B, then
Connect
Sensor Trunk Wire (No. 2)
with
Sensor Wire (No. 106)
as shown in picture A.
Fix
Post Bar (No. 13)
into
Main Frame (No.
57)
, then tighten and secure with 6
Bolts (No.
19)
, 6
Spring Washers (No. 10)
and 6
Washers (No. 20)
that were removed by
Spanner (No. A)
.
Содержание E321003
Страница 17: ......


