7
ASSEMBLY INSTRUCTIONS
We value your experience using Sunny Health and Fitness products. For assistance with parts or
troubleshooting, please contact us at [email protected] or 1-877-90SUNNY (877-
907-8669).
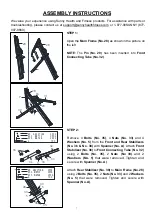
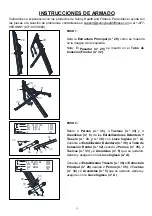
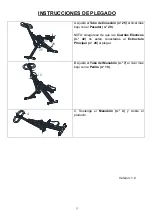
STEP 1:
Open the
Main Frame (No. 28)
as shown in the picture on
the left.
NOTE:
The
Pin (No. 29)
has been inserted into
Front
Connecting Tube (No. 32)
.
STEP 2:
Remove 4
Bolts (No. 35)
, 4
Nuts (No. 33)
and 4
Washers (No. 5)
from the
Front and Rear Stabilizers
(No. 36 & No. 38)
with
Spanner (No. A)
. Attach
Front
Stabilizer (No. 36)
to
Front Connecting Tube (No. 32)
using 2
Bolts (No. 35)
, 2
Nuts (No 33)
and 2
Washers (No. 5)
that were removed. Tighten and
secure with
Spanner (No. A)
.
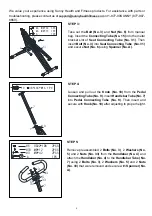
Attach
Rear Stabilizer (No. 38)
to
Main Frame (No. 28)
using 2
Bolts (No. 35)
, 2
Nuts (No. 33)
and 2
Washers
(No. 5)
that were removed. Tighten and secure with
Spanner (No. A)
.
28
28
28
15
31
25
9
29
32
35
36
5 33
5 33
32
#35 M8*48 2PCS
A 1PC
#33 M8*12 2PCS
#5 OD22*ID8 2PCS
35
38
33
5
5
33
#35 M8*48 2PCS
A 1PC
#33 M8*12 2PCS
#5 OD22*ID8 2PCS
28
Содержание P2100
Страница 40: ...39 ...


