1
2
3
4
5
6
7
8
9
10
11
12
13
14
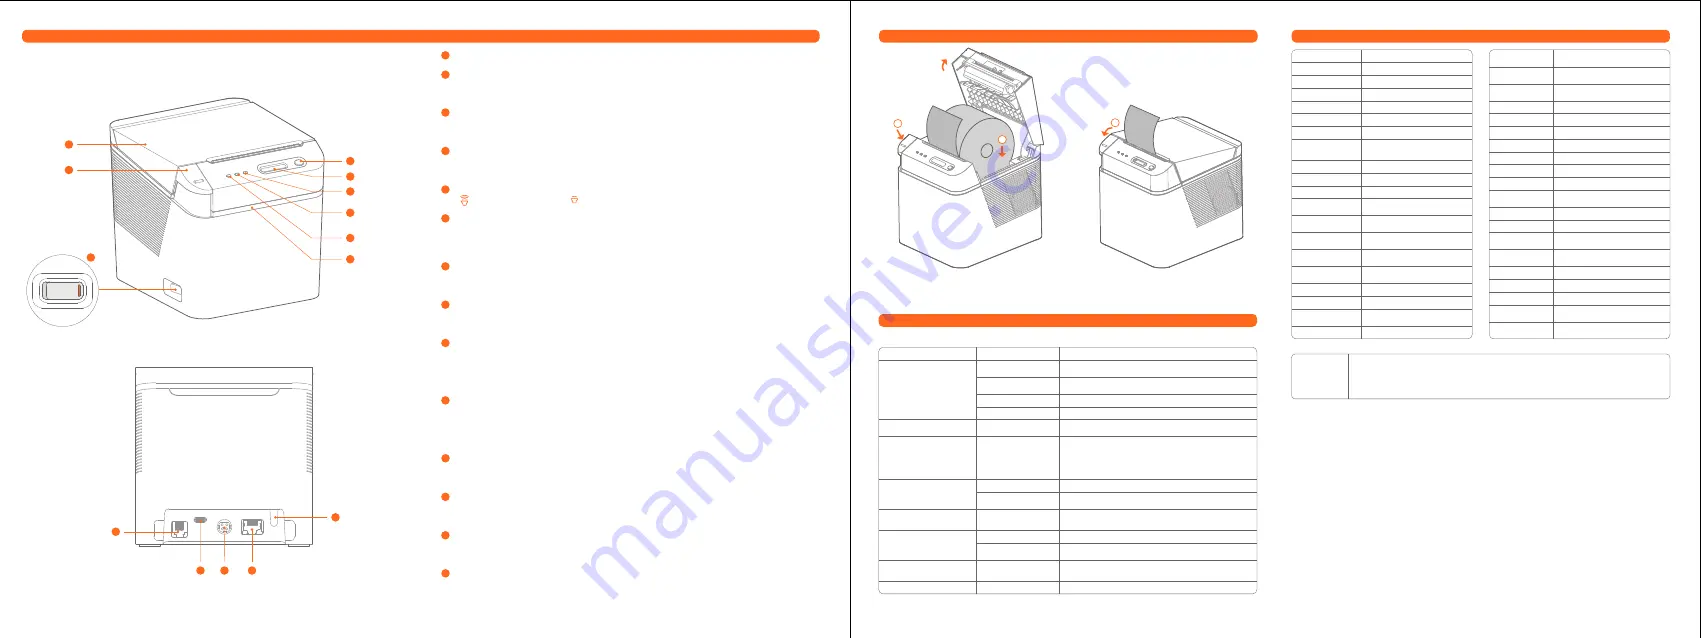
Printer Profile
Paper Loading Instructions
Door Cover
Door Cover Button
It is used to open the door cover and install/replace the printing roll paper. Press the
door cover button and the door cover will pop open automatically.
Power Button
Used for controlling the printer power; Press "|" to turn on the printer, and press "No
ID" to turn off the printer.
Paper Feed Button
Long press the paper feed button to start blank paper feed, and release to stop
paper feed.
Volume Adjustment Button
“ ”means volume up,
,
“ ”means volume down.
Abnormality Indicator
The red light is on, indicating that the printer is short of paper, blocked with paper or
with abnormal voltage. The red light flashes, indicating that the print head is
overheated. The red light goes out, indicating that the printer is normal.
Network Indicator
The blue light is on, indicating that the device is connected to the server. The blue
light goes out, indicating that the device is disconnected from the server.
Power Indicator
The green light is on, indicating the startup state; The green light goes off, indicating
the shutdown state.
Reminder Indicator
The white light flashes, indicating that there is paper to be taken away or the paper
is blocked. The white light is on, indicating that the paper roll is about to run out
(only the sensor with paper will be equipped with this function); The white light goes
out, indicating that there is no reminder.
Cash Box Port
Connect the cash box and drive the cash box to unlock. This equipment only
supports external 24V/1A cash box. Please pay attention to the electrical
performance parameters of the cash box. When connecting the cash box, ensure
that it is shut down.
USB Port
Connect POS machines and other equipment to realize USB printing; Ensure that the
printer is shut down when connecting the data cable.
DC Power Port
Connect 24V/2.5A DC to supply power to the printer; When connecting the power
cord, ensure that the printer power button is in the off position
Lan Network Port
Connect the LAN to complete the printing of issued orders from other devices in the
LAN; Connect to the WAN to complete the printing of orders issued in the cloud.
Pairing Button
Long press for more than 3 seconds to enter the network pairing state. Double-click
to execute the network self-inspection program and print the network detection
report.
5
10
11
12
13
14
1
2
①
Press the door cover button to open the
printer flip cover.
②
Place the printer roll in the direction shown
in the figure.
③
Cover the printer flip cover (Note:
When printing blank, please make
sure that the paper roll is installed in
the correct direction)
Basic Specs
Print Method
Direct thermal
DC 24V/2.5A
RJ12 24V/1A
TYPE-C USB2.0
RJ45 Max. 100 Mbps
Thermal receipt paper
0.075 - 0.008 mm
130×130×130 mm
ESC/POS
IP52
3W
≥105 dB
Max. 80 mm
576 Dots
72 mm (±0.1 mm)
Max. 250 mm/s
64 MB
256 MB
Unicode character set UTF-8,
GB18030, KSC5601, JIS0208 and
other multi-country codes
Support
Out of paper
Cover flip detection
Printing paper blockage
detection
80/58 mm (58 mm paper bin is
required)
Max. ø80 mm
Automatic Paper Cutting: Full
Cutting/Half Cutting Mode
Easy-loading structure with the
upturning cover
Paper exhaustion detection
(optional)
Printed paper pick-up detection
Blue
White
Overheat detection &
protection
Black label printing paper
Detection
Green
Red
Printing Paper Width
Print Line Dots
Print Speed
Memory
Flash Memory
Font Library
Custom Character
Out of Paper Sensor
Paper Blockage
Sensor
Paper Pick-Up
Sensor
Abnormality
Indicator
Reminder Indicator
Temperature Sensor
Black Label Sensor
Power Indicator
Network Indicator
Paper Exhaustion
Sensor
Cover flip Sensor
Effective Print Width
Speaker Power
Speaker Volume
Cash Drawer Port
USB Port
Lan Port
Paper Type
Paper Thickness
Dimensions
Print Instruction
Protection Level
UPC-A\UPC-E\EAN-13\EAN-8\Code 11\Code 39\Code 39 Extended\Code 2 of 5
Matrix\Code 2 of 5 Interleaved\Code 2 of 5 Industrial\Code 2 of 5 IATA\PDF417
Truncated\PDF417\Code 2 of 5 Datalogic\CODABAR\Code 93\Code 128\GS1
DataBar\GS1 DataBar Expanded\MSI Plessey
Barcode
Specifications
Common Problems & Troubleshooting
In case of printer failure, please refer to this chapter for corresponding treatment. If the problem still
cannot be solved, please contact the distributor or manufacturer.
Note: When cleaning the print head or paper feed rubber roller, do not scratch the print head and rubber stick with hard objects
(such as tweezers);
In order to improve the service life of the print head, it is recommended to clean the print head and rubber stick every month.
Please use cotton swabs dipped in anhydrous alcohol to gently wipe the print head heating sheet during cleaning.
Failure symptoms
Power indicator is not on
Possible causes
The printer is not
powered on
The printer power
button is not turned on
Power cord damage
Circuit board damage
The printing paper is out
of use.
Solutions
Connect the printer to power
Turn on the printer power button
Replace the power cord
Contact dealer or manufacturer
Install new paper roll
Turn off the printer and check the input voltage
Wait until the print head cools to recover
Replace printer core.
Clean print head or paper feed stick.
Refer to the prompt to place consumables.
Check whether the paper roll is loaded correctly.
Open the upper cover, check the paper outlet and
remove the blocked paper.
Double-click the pairing button to print the network
self-inspection page and check according to the
self-inspection report.
Abnormal input voltage
Print head overheating
Paper blocked
Print head damaged
Paper blocked
Device disconnected
from the server
Dirty print head or
paper feed stick
Printing paper
consumables are
reversed.
Abnormality indicator is on
Abnormality indicator flashes
The network indicator is not
on
The printed content is not
clear or tainted.
Print out a blank page
Print out a blank page
Abnormality indicator is on;
Voice broadcast:
Printer voltage is too high,
please check
Printer voltage is too low,
please check
4
6
7
8
1
9
2
3
3
Temperature: 0
℃
to
45
℃
Humidity: 30% to 85%
Temperature: -20
℃
to 60
℃
Humidity: 10% - 90%
Working
Environment
Storage
Environment
GSM/TD-SCDMA/UMTS
TDD-LTE/FDD-LTE
4G (NT312 and
NT313 models only)
BT (NT311 and
NT312 models only)
Power Supply Input
Paper Width
Till Roll OD
Paper Cutting
Method
Till Roll Loading
Method
BT4.2 BLE 2.4GHz
WiFi (NT311 and
NT312 models only)
IEEE 802.11 b/g/n 2.4G
Manufacture
Shanghai Sunmi Technology Co., Ltd.
Room 605,Block 7,KIC Plaza,No.388 Song Hu Road Yang Pu
District,Shanghai,China
Please read this Guide carefully before using the product and keep it properly.
For more help, please feel free to visit SUNMI's website www.sunmi.com


