STEP5 STEP6
1
2
B
B
B
A
A
1
2
1
2
3
4
3
3
3
3
4
5
Fig.5
E
H
I
A
Fig.6
D
D
D
G
G
G
J
Now your gazebo is ready for use.
USE & CARE:
1. This Gazebo is not a permanent structure and should be disassembled & stored away after use.
2. Do not repack your gazebo until completely dry.
3. This Gazebo must be assembled by two adults or more.
4. This Gazebo must not be left erect in windy conditions.
WARNINGS:
1. Assembly Instructions must be followed.
2. Pegs and ropes supplied must be used to secure this gazebo in place when assembled.
3. Warranty does not cover damage due to extreme weather conditions.
CUSTOMER SERVICE
Sunjoy Industries warrants to the original purchaser that this item is free from defects in workmanship and materials of
your item provided the item was factory-sealed at the time of purchase and is maintained with care and used only for
personal, residential purposes. The item is warranted to be free from defects in material or workmanship for a period of
6 months. Should any manufacturing defect arise within this warranty period, Sunjoy Industries will repair or replace (at
our option) any defective merchandise upon proof of purchase; however, transportation and delivery costs, as well as
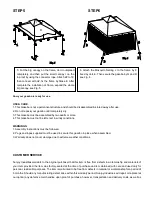
5. Put the big canopy on the frame, don’t outspread
completely, and then put the small canopy I on the
top roof by using the connector rope. Attach 2# to 1#,
then connect with A#, fix the frame by Stake E. After
complete the installation of frame, expand the whole
big canopy, see Fig. 5.
6. Attach the Mosquito Netting J to the frame by F,
fixed by Velcro. Then secure the gazebo by G and D,
see Fig. 6.


