background image


LOCATION 

Your Gas appliance  must be installed  on a flat,  stable surface, away from  any combustible  materials or 
construction. 

SET-UP 

Your Gas appliance comes  assembled, ready for a Gas connection. 
1-  Remove  the  appliance  from  container   box  and  place  it  on  any  level,  outdoor,  non-combustible 

surface. 
NOTE: Do not place this  appliance on grass or dirt area. This may prevent  proper safety venting. 

2-  Open the gas  door, put the cylinder inside. 
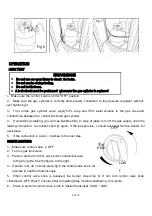
3-  Unscrew  the battery box  as shown in  Fig 1.Insert the  negative electrode  side of the  battery into the 

bottom of battery box as  shown in Fig 2. Then screw the battery box as  shown in Fig 3. 

OFF 

OFF 

ON 

HIGH 

OFF 

ON 

HIGH 

ON 

HIGH 

LOW 

LOW 

LOW 

Fig 1 

Fig 2 

Fig 3 

Note: If the battery  of the pulse electronic igniter runs  out of power, please replace the new  battery as 
above. 

Gas Connection 

1-  Open the door,  put the chain and control valve outside. See  Fig 4. 
2-  Put the cylinder  into the cylinder rack. See Fig 5. 
3-  Connect  the  regulator  and  the cylinder  as  per  Fig.6.  Make  sure there  is  no  leakage  or damage 

(please refer to “Leak Test”  on page 9 and the damage checking on  page 4). 

4-  Fix the cylinder  by the chain. See Fig 7. 

Fig 4 

Fig 5 

8 of 12 

Содержание D-DN1377SAL-A

Страница 1: ...cing this Propane tank not included AA battery needed not included equipment WARNING Do not store or use gasoline or other flammable vapors and liquids in the vicinity of this or any other appliance An LP cylinder not connected for use should not be stored in the vicinity of this or any other appliance DANGER CARBON MONOXIDE HAZARD This appliance can produce carbon monoxide which has no odor Using...

Страница 2: ...CST Monday Friday In the continental Canada you can call us toll free at 1 844 SUNJOY1 1 844 786 5691 from 8 a m to 5 p m CST Monday Friday You can fax the replacement part form which is in the box to 740 283 3549 You can also send us an email to customer care sunjoydirect com General information 2 Specification 3 Important safety information and precaution 3 4 Expanded view 5 Parts list 6 Install...

Страница 3: ...tible with the connection for the appliance Always place the appliance on a firm and level surface Solid fuels shall not be burned in this gas appliance Burn ONLY Tempered Glass INCLUDED The appliance shall be used only outdoors in a well ventilated space and shall not be used in a building garage or any other enclosed area When in use keep the appliance area clear and at least 40 in 101 6 cm side...

Страница 4: ... the control system and any gas control which has been under water LP gas supply cylinder to be used must be constructed and marked in accordance with the specifications for LP gas cylinders of the U S Department of Transportation DOT The cylinder supplies system must be arranged for vapor withdrawal and the cylinder must include a collar to protect the cylinder valve Use only 20 lb 9 kg LP Gas cy...

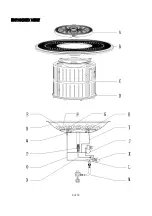
Страница 5: ...EXPANDED VIEW 5 of 12 ...

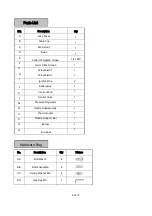
Страница 6: ... BB CC DD Flat Washer M6 Spring Washer M6 Hex Key M6 4 4 1 6 of 12 Cullet Tempered Glass Armor Plate Screen Windshield 1 Windshield 2 Ignition Wire Battery Box Control Knob Control Valve Pressure Regulator Nozzle Subassembly Thermocouple Nozzle Support Bar Burner Description Lazy Susan Table Top Main Body Base 1 1 1 2 1 1 1 1 1 1 1 1 1 ...

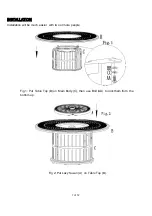
Страница 7: ...INSTALLATION Installation will be much easier with two or more people Fig 1 Put Table Top B on Main Body C then use Bolt AA to lock them from the bottom up Fig 2 Put Lazy Susan A on Table Top B 7 of 12 ...

Страница 8: ...nsert the negative electrode side of the battery into the bottom of battery box as shown in Fig 2 Then screw the battery box as shown in Fig 3 OFF OFF ON HIGH OFF ON HIGH ON HIGH LOW LOW LOW Fig 1 Fig 2 Fig 3 Note If the battery of the pulse electronic igniter runs out of power please replace the new battery as above Gas Connection 1 Open the door put the chain and control valve outside See Fig 4 ...

Страница 9: ...ON HIGH 1 Make sure control valve is OFF 2 Turn on gas tank valve 3 Press in and turn control valve knob counterclockwise to High to ignite See the figure to the right 4 If burner is lit do not stop pressing in the control valve knob for a minute to heat the thermocouple LOW 5 When control valve knob is released the burner should be lit If not turn control valve knob clockwise to OFF Wait 5 minute...

Страница 10: ...d and sheltered area protected from inclement weather and dust out of the reach of children and not in a building garage or any other closed area The appliance may be stored indoors only if the cylinder is disconnected and removed Keep the appliance area clear and free from combustible materials gasoline and other flammable vapors and liquids Installation and repair should be done by a qualified s...

Страница 11: ...nal purchaser to be free from defects in workmanship and materials for twelve 12 months from the date of purchase Satisfactory proof of the purchase date must be furnished at the time of notification of the defect for any claim under the warranty to be enforceable This warranty covers all parts found defective in workmanship and or materials during the warranty period and can be repaired or replac...

Страница 12: ...a swab that is moistened with soapy water Keep the holes unobstructed by using a heavy duty pipe cleaner The burner must be dry before normal use Cleaning period should be 1 year While washing your unit be sure to keep the area around the burner and pilot assembly dry at all times If the gas control is exposed to water in any way DO NOT try to use it It must be replaced After a long break from ope...

Отзывы: