background image

10

Battery Pack Operation

The equipment is fitted with a lithium-ion battery. The battery 

pack is completely closed and maintenance free.

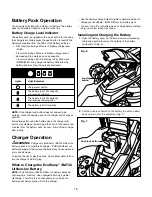
Battery Charge Level Indicator

The battery pack is equipped with a push button for checking 

the charge level. Simply press the push button to read off the 

battery charge level from the LEDs of the battery indicator:

•  All 3 level monitoring LEDs are lit: Battery charge level  

is high.

•  2 level monitoring LEDs are lit: Battery charge level is 

decreasing. Stop work as soon as possible.

•  1 level monitoring LED is lit: Battery is flat. Stop work 

IMMEDIATELY and charge the battery. Otherwise the 

battery’s service life will be greatly shortened.

NOTE: 

If the charge level button does not appear to be 

working, place the battery pack on the charger and charge as 

needed.
Immediately after using the battery pack, the charge level 

button may display a lower charge than it will if checked a few 

minutes later. The battery cells “recover” some of their charge  

after resting.

Charger Operation

m

WARNING! 

Charge only EcoSharp

 iBAT40 lithium-ion 

battery packs in compatible EcoSharp

 iCHRG40 lithium-ion 

battery chargers. Other types of batteries may cause personal 

injury and damage.
To reduce the risk of electric shock, do not allow water to flow 

into the charger's AC/DC plug.

When to Charge the EcoSharp

 iBAT40 

Lithium-Ion Battery

NOTE: 

The EcoSharp

 iBAT40 lithium-ion battery packs do 

not develop a "memory" when charged after only a partial 

discharge.  Therefore, it is not necessary to run down the 

battery pack before placing it into the charger. 

•  Use the battery charge indicator lights to determine when to 

charge your EcoSharp

 iBAT40 lithium-ion battery pack. 

•  You can "top-off" your battery pack's charge before starting 

a big job or after a long day of use.

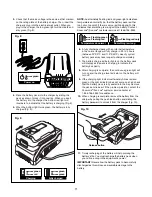
Installing and Charging the Battery

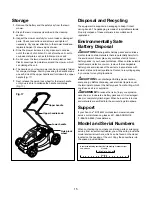
1. 

Open the battery cover on the lawn mower by depressing 

the locking button found on the outside of the battery 

compartment (Fig. 6).

2. 

Pull the push lock button on the battery to pull the battery 

pack up and out of the equipment (Fig. 7).

Charge level button 
The battery is at 30% capacity 

and requires charging
The battery is at 60% capacity 

and requires charging soon

The battery is at full capacity

Light Indicators

Lights

Fig. 6

Locking 

button

Fig. 7

Push lock button

Содержание iON16LM

Страница 1: ...ould also not be used by those lacking the proper experience and or knowledge unless they are supervised by a person who is responsible for their safety or they have received instructions from such a person on how to safely use the mower 8 Store idle lawn mower indoors When not in use the lawn mower should be stored indoors in a dry locked place out of the reach of children 9 Maintain the lawn mow...

Страница 2: ...aight down Be particularly careful when you change direction on a slope Do not mow on overly steep inclines Take extra caution when turning the mower around and when pulling it towards you Switch the mower off remove the battery and wait until the cutters have reached a complete standstill when tipping the mower over transporting it over surfaces other than grass and when moving the mower to and f...

Страница 3: ... and cord Never carry the charger by its cord or yank it by the cord to disconnect it from the receptacle Keep the cord away from heat oil and sharp edges Make sure the cord will not be stepped on tripped over or subjected to damage or stress when the charger is in use Do not use the charger with a damaged cord or plug Replace a damaged charger immediately Do not use an extension cord unless it is...

Страница 4: ...uipment for safety reasons IMPORTANT Do not press the ON OFF switch any more if the protective cut off has been activated This may damage the battery pack 11 Use only original battery packs The use of other batteries poses a fire risk and may result in injuries or an explosion Information about the charger and the charging process 1 Please check the data marked on the rating plate of the battery c...

Страница 5: ...sure to direct sunlight will result in overheating and cell damage Never charge or work with batteries that have been overheated replace them immediately if possible 7 Store the charger and your cordless tool only in dry locations with an ambient temperature of 50 104 F 10 40 C Store your lithium ion battery pack in a cool dry place at a temperature of 50 68 F 10 20 C Protect the battery pack char...

Страница 6: ... for several seconds after you turn off the machine Double Insulation Severing of toes or fingers by rotary mower blade CAUTION Objects picked up and thrown by the rotating blade can cause severe injury Cutting dismemberment hazard of hand Keep hands away from the rotating blade Wear eye and hearing protection For protection against injury wear ear defenders and safety goggles Keep bystanders and ...

Страница 7: ...city 9 25 gal 35 l Wheel size 6 in 15 2 cm front 8 in 20 3 cm rear Weight mower alone 34 6 lbs 15 7 kg Weight mower with battery installed 37 3 lbs 16 9 kg 2 10 11 12 13 14 15 16 17 3 4 5 7 8 6 19 20 22 21 18 1 9 1 Switch bar lever 2 Safety switch button 3 Cable clip 2 4 Upper handle knob and bolt 2 5 Grass indicator window 6 Battery cover 7 Battery compartment 8 Safety key 9 Locking button for ba...

Страница 8: ...small scale residential lawns and home hobby gardens Public facilities sporting halls and agricultural forestry applications are excluded Please note that this equipment has not been designed for commercial trade or industrial applications The warranty will be voided if the machine is used in commercial trade or industrial businesses or for equivalent purposes Keep these instructions and refer to ...

Страница 9: ...ting height make sure the motor is switched off and the safety key has been pulled 1 To set the cutting height on your lawn mower pull out the cutting height adjustment lever move the lever to the left or right and push it back into one of the six cutting positions indicated below Make sure that the lever engages properly Fig 5 6 Position Height Adjustment 1 1 18 in 30 mm 4 2 17 in 55 mm 2 1 38 in...

Страница 10: ...harp iBAT40 lithium ion battery packs in compatible EcoSharp iCHRG40 lithium ion battery chargers Other types of batteries may cause personal injury and damage To reduce the risk of electric shock do not allow water to flow into the charger s AC DC plug When to Charge the EcoSharp iBAT40 Lithium Ion Battery NOTE The EcoSharp iBAT40 lithium ion battery packs do not develop a memory when charged aft...

Страница 11: ...ake longer to charge completely 7 The battery charge indicator lights on the battery pack will display as the pack is charging to indicate the battery s capacity 8 After charging is complete the continuous green light will turn on and the charge level indicator on the battery will turn off 9 If the charging light indicator alternately blinks red and green or the light indicator does not come on at...

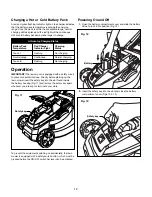
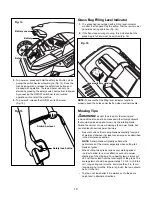
Страница 12: ...ttery housing Fig 11 and remove the safety key again whenever you interrupt or terminate your work To prevent the equipment switching on accidentally the lawn mower is equipped with a safety switch button which must be pressed before the ON OFF switch bar lever can be activated Powering On and Off 1 Open the battery compartment cover and slide the battery down to lock it into position Fig 12 2 Ins...

Страница 13: ... all the stones sticks wires and other foreign objects that could be picked up and thrown by the rotating blade Failure to comply not only will damage the mower blade but can also lead to serious personal injury Be sure to check the mowing blade periodically for signs of wear and sharpen it at least once per year as described in the maintenance section NOTE A sharp blade will greatly enhance the p...

Страница 14: ...ssure water Keep the handles dry clean and free of oil and grease At the end of the season perform a general inspection of the lawn mower and remove any grass dirt or other debris that may have accumulated At the start of each season check the condition of the mower blade If repairs are necessary please call the Snow Joe Sun Joe customer service center for assistance at 1 866 766 9563 Servicing En...

Страница 15: ...less electric tools contain materials that are potentially harmful to the environment Never place any cordless electric tools or battery packs in your household refuse When cordless electric tools become defective or worn remove the rechargeable battery pack and dispose of these items in accordance with federal state and local regulations Contact a recycling agency in your area for recycling locat...

Страница 16: ...ed service center b Charge battery pack c Check the cable d Contact an authorized service center e Contact an authorized service center f Start motor on shorter grass or previously mowed area change cutting height if necessary g Clean housing so that the blade can run freely h Insert safety key Fig 13 i Remove the battery and reinsert a Grass too tall or damp b Mower housing is clogged c Blades ba...

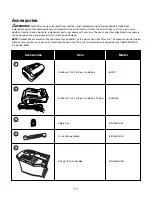
Страница 17: ...nt or accessory can be dangerous and could cause injury or mechanical damage NOTE Accessories are subject to change without any obligation on the part of Snow Joe Sun Joe Accessories can be ordered online at snowjoe com or via phone by contacting the Snow Joe Sun Joe customer service department at 1 866 SNOWJOE 1 866 766 9563 EcoSharp 40 V Lithium Ion Battery EcoSharp 40 V Lithium Ion Battery Char...

Страница 18: ...18 NOTES ...

Страница 19: ...d by this warranty Parts used that are not genuine Snow Joe parts are not covered by this warranty Damages resulting from misuse alteration improper assembly improper adjustment neglect or accident which requires repair is not covered under this warranty Belts augers and tines are not covered under warranty belts augers and tines wear out and can be purchased at snowjoe com or by calling 1 866 766...

Страница 20: ...snowjoe com ...
Отзывы: