background image

67

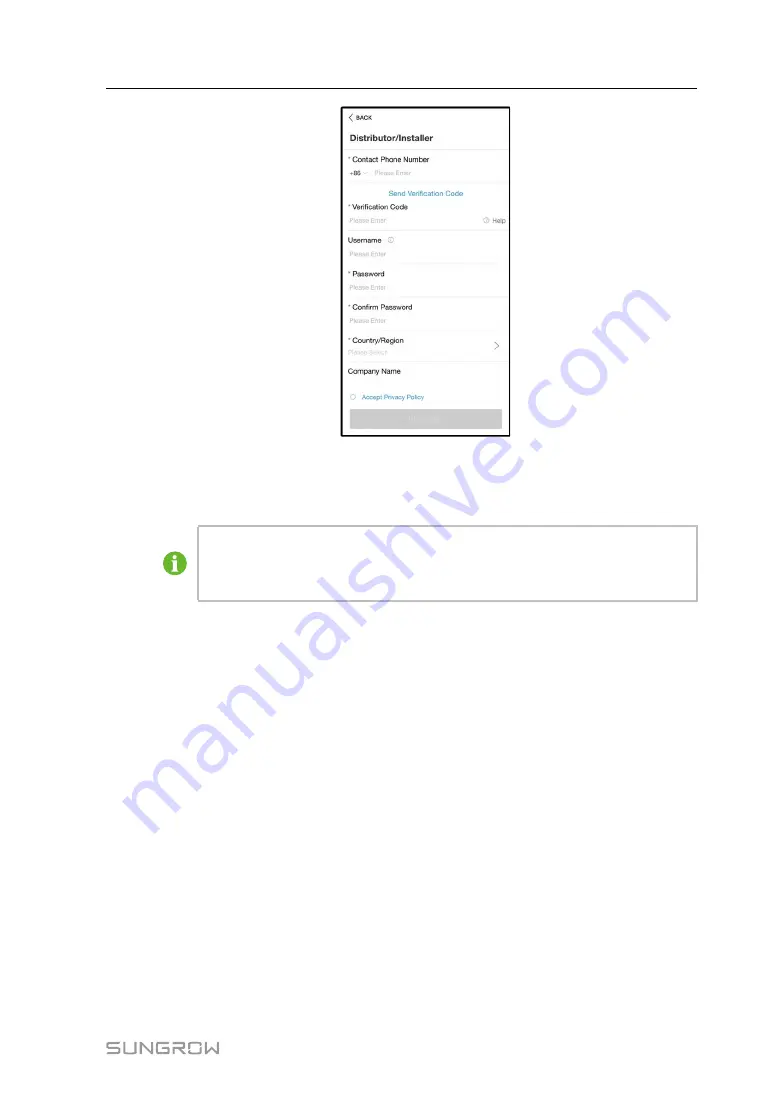
step 4 Fill in the registration information, including email, verification code, password and affirm-

ance and country (region). The distributor/installer has the permission to fill in the company
name and the code of upper level installer/distributor.

The code of upper level distributor/installer can be obtained from the upper level

distributor/installer. Only when your organization belongs to the upper level distrib-

utor/installer organization, can you fill in the corresponding code.

step 5 Tick

Accept privacy protocol

and tap

Register

to finish the registration operation.

- - End

7.4

Login

7.4.1 Requirements

The following requirements should be met:

The AC and DC sides or the AC side of the inverter is powered-on.

The WLAN function of the mobile phone is enabled.

The mobile phone is within the coverage of the wireless network produced by the com-
munication module.

7.4.2 Login Procedure

step 1 For the WiNet-S module, press the multi-function button 3 times to enable the WLAN hot-

spot. No password is required and the valid time is 30 minutes.

User Manual

7 iSolarCloud App

Содержание SG10RS

Страница 1: ... ADA SG8 0RS SG9 0RS SG10RS1 Phase PV Grid Connected InverterUser ManualSG5 0 10RS UEN Ver15 202211 User Manual 1 Phase PV Grid Connected Inverter SG5 0RS ADA SG8 0RS SG9 0RS SG10RS SG5 0 10RS UEN Ver15 202211 ...

Страница 2: ......

Страница 3: ...manual are owned by SUNGROW All other trademarks or registered trademarks mentioned in this manual are owned by their respective owners Software Licenses It is prohibited to use data contained in firmware or software developed by SUNGROW in part or in full for commercial purposes by any means It is prohibited to perform reverse engineering cracking or any other operations that compromise the origi...

Страница 4: ... to meet the following requirements Know electronic electrical wiring and mechanical expertise and be familiar with electri cal and mechanical schematics Have received professional training related to the installation and commissioning of elec trical equipment Be able to quickly respond to hazards or emergencies that occur during installation and commissioning Be familiar with local standards and ...

Страница 5: ...l Indicates high risk potential hazards that if not avoided may lead to death or seri ous injury Indicates moderate risk potential hazards that if not avoided may lead to death or serious injury Indicates low risk potential hazards that if not avoided may lead to minor or mod erate injury Indicates potential risks that if not avoided may lead to device malfunctions or fi nancial losses NOTE indica...

Страница 6: ......

Страница 7: ...3 Symbols on Product 10 2 4 LED Panel 11 2 5 Circuit Diagram 12 2 6 Function Description 13 3 Unpacking and Storage 17 3 1 Unpacking and Inspection 17 3 2 Inverter Storage 17 4 Mechanical Mounting 19 4 1 Safety During Mounting 19 4 2 Location Requirements 20 4 2 1 Environment Requirements 20 4 2 2 Carrier Requirements 20 4 2 3 Angle Requirements 21 4 2 4 Clearance Requirements 21 4 3 Installation ...

Страница 8: ...nnectors 40 5 7 WiNet S Connection 41 5 7 1 Ethernet Communication 41 5 7 2 WLAN Communication 43 5 8 Smart Meter Connection 44 5 9 DRM Connection 46 6 Commissioning 50 6 1 Inspection Before Commissioning 50 6 2 Powering on the System 50 6 3 App Preparation 50 6 4 Creating a Plant 51 6 5 Initializing the Device 58 6 6 Configuring the Plant 61 7 iSolarCloud App 65 7 1 Brief Introduction 65 7 2 Inst...

Страница 9: ...date 82 8 System Decommissioning 84 8 1 Disconnecting Inverter 84 8 2 Dismantling the Inverter 84 8 3 Disposal of Inverter 85 9 Troubleshooting and Maintenance 86 9 1 Troubleshooting 86 9 2 Maintenance 94 9 2 1 Maintenance Notices 94 9 2 2 Routine Maintenance 96 10 Appendix 97 10 1 Technical Data 97 10 2 Quality Assurance 101 10 3 Contact Information 101 ...

Страница 10: ......

Страница 11: ...ibited under any circumstances Tighten the screws with the specified torque using tools when fastening the prod uct and terminals Otherwise the product may be damaged And the damage caused is not covered by the warranty Learn how to use tools correctly before using them to avoid hurting people or dam aging the device Maintain the device with sufficient knowledge of this manual and use proper tools...

Страница 12: ...ot install the device and contact your distributor first If the problem persists con tact SUNGROW in time 1 2 Installation Safety Make sure there is no electrical connection before installation Before drilling avoid the water and electricity wiring in the wall Improper installation may cause personal injury If the product supports hoisting transport and is hoisted by hoisting tools no one is allow...

Страница 13: ... all safety instructions listed in relevant documents about PV strings The inverter must not be connected to a PV string that requires positive or neg ative grounding Danger to life due to a high voltage inside the inverter Be sure to use special insulation tools during cable connections Note and observe the warning labels on the product and perform operations strictly following the safety instruc...

Страница 14: ...and heat generating components or areas to protect the insulation layer of cables from aging and damage When the product is working Do not touch the product enclosure It is strictly forbidden to plug and unplug any connector on the inverter Do not touch any wiring terminal of the inverter Otherwise electric shock may occur Do not disassemble any parts of the inverter Otherwise electric shock may o...

Страница 15: ...aintain the inverter Even if the inverter is shut down it may still be hot and cause burns Wear pro tective gloves before operating the inverter after it cools down Touching the power grid or the contact points and terminals on the inverter con nected to the power grid may lead to electric shock The power grid side may generate voltage Always use a standard voltmeter to ensure that there is no vol...

Страница 16: ...aused is not covered by the warranty As the inverter contains no parts that can be maintained never open the enclo sure of the inverter or replace any internal components without authorization Otherwise the loss caused is not covered by the warranty 1 6 Disposal Safety Please scrap the product in accordance with relevant local regulations and stand ards to avoid property losses or casualties 1 Saf...

Страница 17: ...ss A It is not allowed for the positive pole or the negative pole of the PV strings to be grounded This can cause dam age to the inverter Do not connect any local load between the inverter and the AC circuit breaker The inverter applies only to the scenarios described in this manual The intended usage of the inverter is illustrated in the following figure figure 2 1 Inverter Application in PV Powe...

Страница 18: ...shows the common grid configurations 2 2 Product Introduction Model Description The model description is as follows take SG8 0RS as an example Appearance The following figure shows the appearance of the inverter The image shown here is for reference only The actual product received may differ 2 Product Description User Manual ...

Страница 19: ...verter 4 LCD panel The LCD screen indicates the running information and the LED indicator indicates the working state of the inverter 5 Nameplate To clearly identify the product including device model S N important specifications marks of certification institutions etc 6 Electrical connec tion area DC terminals AC terminal external grounding terminal and communication terminals Dimensions The foll...

Страница 20: ... the DC side Parameters on the AC on grid side Regulatory compliance mark TÜV mark of conformity CE mark of conformity EU EEA Importer UKCA mark of conformity Do not dispose of the inverter together with household waste The inverter does not have a transformer Disconnect the inverter from all the external power sources be fore maintenance 2 Product Description User Manual ...

Страница 21: ...he inverter figure 2 4 LED Panel a Normal state b Error state No Name Description 1 E day Today s energy yield 2 Pac Current AC power 3 LED indicator To indicate the working state of the inverter Touch it to switch the information in normal state or view multiple er ror codes in error state 4 Error code The error code in the figure is just an example In normal state the E day and Pac information w...

Страница 22: ...side circuits after the indicator is off Pay atten tion to the electricity safety during operating 2 5 Circuit Diagram The following figure shows the main circuit of the inverter figure 2 5 Circuit Diagram SG10RS for example DC Switches can safely disconnect the PV input when necessary to ensure the safe op eration of the inverter and the safety of personnel The DC SPD provides a discharge circuit...

Страница 23: ...f the product surge protection and overvoltage protection may fail resulting in electric shock and fatal injury 2 6 Function Description Basic Function Conversion function The inverter converts the DC power from the PV array to the AC power in conformity with the grid requirements Data storage The inverter logs running information error records etc Parameter configuration The inverter provides var...

Страница 24: ...ed in Limitation Set the feed in limitation value via iSolarCloud App When the smart energy meter detects that the export power is greater than the limit value the inverter will reduce the output power within the specified range PID Zero The PID Zero function is applicable for both PV and DC coupled PV plus storage systems It can suppress PID during the day and intelligently repair PV panels damag...

Страница 25: ... and re pairs PV panels caused by PID at night Details can be found in the PID Zero White Paper which can be obtained on www sungrowpower com or from your distributor figure 2 7 PID Risk of Inverters Equipped with PID Zero Keep the DC switch ON in the PID Zero process During the process there is volt age hazard between inverter PV panels live conductors and ground Do not touch any of them User Man...

Страница 26: ...tween PV and ground needs to be raised for PID recovery AFCI Function Optional AFCI activation This function can be enabled to detect whether arc occurs in the DC circuit of the inverter AFCI self test This function is intended to detect whether the AFCI function of the inverter is normal The arc detection function meets the standard requirements please test under the working conditions as require...

Страница 27: ...e appearance and structural parts of the device are damaged and check whether the packing list is consistent with the actual ordered product If there are problems with the above inspection items do not install the device and contact your distributor first If the problem persists con tact SUNGROW in time If any tool is used for unpacking be careful not to damage the product 3 2 Inverter Storage Pro...

Страница 28: ...sceptible to rodents and insects Carry out periodic inspections Inspection shall be conducted at least once every six months If any insect or rodent bites are found replace the packaging materials in time If the inverter has been stored for more than a year inspection and testing by professio nals are required before it can be put into operation Please store the inverter according to the storage r...

Страница 29: ...handling may cause personal injury When moving the inverter be aware of its weight and keep the balance to pre vent it from tilting or falling Wear proper protective equipment before performing operations on the inverter The bottom terminals and interfaces of the inverter cannot directly contact the ground or other supports The inverter cannot be directly placed on the ground Ensure that no device...

Страница 30: ...ure and relative humidity must meet the following requirements Install the inverter in a sheltered area to avoid direct sunlight and bad weather e g snow rain lightning etc The inverter will derate in high temperature environments for protec tion If the inverter is installed in direct sunlight it may cause power reduction as the tem perature rises The inverter should be well ventilated Ensure air ...

Страница 31: ...ally Never install the inverter horizontally or at forward backward tilted side tilted or upside down 4 2 4 Clearance Requirements Reserve enough clearance around the inverter to ensure sufficient space for heat dissipation User Manual 4 Mechanical Mounting ...

Страница 32: ... Installation tools include but are not limited to the following recommended ones If necessary use other auxiliary tools on site table 4 1 Tool specification Goggles Earplugs Dust mask Protective gloves Insulated shoes Utility knife Marker Wrist strap Wire cutter Wire stripper Hydraulic plier RJ45 crimping tool 4 Mechanical Mounting User Manual ...

Страница 33: ... drill φ10 Allen wrench T27 4 4 Moving the Inverter Before installation remove the inverter from the packing case and move it to the installation site Follow the instructions below as you move the inverter Always be aware of the weight of the inverter Lift the inverter using the handles positioned on both sides of the inverter Move the inverter by one or two people or by using a proper transport t...

Страница 34: ...uld be placed underneath the inverter Move the inverter by holding the handles on it Do not move the inverter by holding the terminals 4 5 Installing the Inverter Inverter is installed on the wall by means of wall mounting bracket and the expansion plug sets The expansion plug set shown below is recommended for the installation 1 Self tapping screw M6 2 Expansion tube 3 Fender washer 4 Spring wash...

Страница 35: ...ion tubes into the holes Then secure the wall mounting bracket to the wall firmly with the expansion bolt sets step 3 Lift the inverter and slide it down along the wall mounting bracket to make sure they match perfectly Use two screw sets to lock both left and right sides End User Manual 4 Mechanical Mounting ...

Страница 36: ...il the electrical connection is completed Do not damage the ground conductor Do not operate the product in the absence of a properly installed ground conductor Otherwise it may cause personal injury or product damage Please use measuring devices with an appropriate range Overvoltage can damage the measuring device and cause personal injury Damage to the product caused by incorrect wiring is not co...

Страница 37: ...minal closely When using a heat gun protect the device from being scorched Keep the PV cable and PV cable close to each other when connecting DC in put cables Before connecting a power cable such as the AC cable the DC cable etc confirm that the label and identifier on the power cable are correct When laying out communication cables separate them from power cables and keep them away from strong in...

Страница 38: ...n Decisive Volt age Classification 1 PV1 PV1 PV2 PV2 PV3 PV3 MC4 terminals for PV input The terminal number depends on in verter model DVC C 2 PV4 BAT PV4 BAT Reserved Not applicable 3 COM2 Communication connection for RSD DRM and smart energy meter DVC A 4 COM1 Communication accessory port to be connected to WiNet S communica tion module DVC A 5 BACKUP Reserved Not applicable 6 GRID AC terminal t...

Страница 39: ...S485 1 A1 B1 Reserved RSD RSD 1 RSD 2 Reserved DRM R C D4 8 D3 7 D2 6 D1 5 For external Demand Response Enabling Device AU NZ 5 3 Electrical Connection Overview The electrical connection should be realized as follows A PV string B Inverter C Grid D External device E AC circuit breaker F Smart energy meter User Manual 5 Electrical Connection ...

Страница 40: ...RS 10 mm2 16 mm2 5 Ethernet cable CAT 5E outdoor shielded network cable 4 8 mm 6 mm 8 0 08 0 2 mm2 1 The cable requirements for COM2 terminal connection are the same 2 All the AC wires should be equipped with correctly colored cables for distinguishing Please refer to related standards about the wiring color 3 Select appropriate OT terminals based on the diameter of the AC cable It is recommended ...

Страница 41: ...protective grounding terminal and the AC side grounding terminal are reliably grounded The external protective grounding point provides a reliable ground connection Do not use an improper grounding conductor for grounding Otherwise it may cause product damage or personal injury The grounding connection can be made by other means if they are in accordance with the local standards and regulations an...

Страница 42: ...the wires must contact the OT terminal closely When using a heat gun protect the device from being scorched step 2 Remove the screw on the grounding terminal and fasten the cable with a screwdriver step 3 Apply paint to the grounding terminal to ensure corrosion resistance End 5 Electrical Connection User Manual ...

Страница 43: ...been conducted AC circuit breakers should be installed on the output side of the inverter and the grid side to ensure safe disconnection from the grid Determine whether an AC circuit breaker with greater overcurrent capacity is re quired based on actual conditions Do not connect any local load between the inverter and the AC circuit breaker Multiple inverters cannot share one AC circuit breaker Re...

Страница 44: ...cables through pipes PVC or metal tubing lay the cables and in stall them 5 5 2 Connecting the AC Cable step 1 Disconnect the AC circuit breaker and secure it against reconnection step 2 Take out the AC waterproof cover unscrew the swivel nut and take out the sealing ring Thread the AC cable through the swivel nut appropriate sealing and waterproof cover in sequence step 3 Strip the cable jacket a...

Страница 45: ...erve the terminal assignment Do not connect any phase line to the PE termi nal or PE wire to N terminal Otherwise unrecoverable damage to the inverter may follow step 6 Secure the AC waterproof cover to the inverter with a torque of 1 0 N m and tighten the swiv el nut to a torque of 5 N m 6 N m User Manual 5 Electrical Connection ...

Страница 46: ... electric board step 8 Make sure all wires are firmly installed via the right torque tool or dragging the cables slightly End 5 6 DC Cable Connection The PV string will generate lethal high voltage when exposed to sunlight Respect all safety instructions listed in relevant documents about PV strings 5 Electrical Connection User Manual ...

Страница 47: ...se the inver ter may be damaged Please turn the DC switch to OFF and remove the DC connector to adjust the polarity of the strings when the string current is lower than 0 5 A Use the DC connectors supplied with the product for DC cable connection Us ing incompatible DC connectors may result in serious consequences and the device damage is not covered under warranty Inverters do not support full pa...

Страница 48: ...ng radius is less than 50 mm reserve a bending radius of 50 mm If the required bending radius is greater than 50 mm reserve the required mini mum bending radius during wiring 5 6 1 PV Input Configuration The inverters SG5 0RS ADA SG8 0RS SG9 0RS SG10RS have three PV inputs each with independent MPP tracker Each DC input area can operate independently The PV strings to each DC input may differ from...

Страница 49: ... use only the supplied connector step 1 Strip the insulation from each DC cable by 7 mm 8 mm step 2 Assemble the cable ends with the crimping pliers 1 Positive crimp contact 2 Negative crimp contact step 3 Lead the cable through cable gland and insert the crimp contact into the insulator until it snaps into place Gently pull the cable backward to ensure firm connection Tighten the ca ble gland and...

Страница 50: ...g the PV Connectors step 1 Rotate the DC switch to OFF position step 2 Check the cable connection of the PV string for polarity correctness and ensure that the open circuit voltage in any case does not exceed the inverter input limit of 600 V step 3 Connect the PV connectors to corresponding terminals until there is an audible click 5 Electrical Connection User Manual ...

Страница 51: ...For details see the quick guide for the WiNet S module Scan the following QR code for the quick guide 5 7 1 Ethernet Communication step 1 Optional Strip the insulation layer of the communication cable with an Ethernet wire strip per and lead the corresponding signal cables out Insert the stripped communication cable into the RJ45 plug in the correct order and crimp it with a crimper 1 RJ45 plug 2 ...

Страница 52: ...nut and gasket Afterwards route the cable into the opening of the sealing Finally insert the cable through the housing step 5 Insert the RJ45 plug into the front plug connector until there is an audible click and tighten the housing Install the gasket and fasten the swivel nut 5 Electrical Connection User Manual ...

Страница 53: ...ther it is installed firmly End 5 7 2 WLAN Communication step 1 Remove the waterproof lid from the COM1 terminal step 2 Install the module Slightly shake it by hand to determine whether it is installed firmly as shown below step 3 Refer to the guide delivered with the module for the set up End User Manual 5 Electrical Connection ...

Страница 54: ...l smart meter The export control functionality has not been tested to AS NZS 4777 2 2020 step 1 Unscrew the swivel nut from the connector step 2 Remove the seal and route the cable into the opening of the sealing step 3 Remove the cable jacket and strip the wire insulation 5 Electrical Connection User Manual ...

Страница 55: ... copper wire skip this step step 5 Plug the wires into the corresponding terminals as shown in the following figure Ensure that the wires are securely in place by slightly pulling them step 6 Insert the terminal plug into the COM2 terminal at the bottom side of the inverter and then in stall the housing User Manual 5 Electrical Connection ...

Страница 56: ...nnector with the screw End 5 9 DRM Connection In Australia and New Zealand the inverter supports the demand response modes as speci fied in the standard AS NZS 4777 The following figure shows the wiring between the inverter and the external DRED 5 Electrical Connection User Manual ...

Страница 57: ...re used for asserting the DRM0 mode step 1 Optional Strip the insulation layer of the communication cable with an Ethernet wire strip per and lead the corresponding signal cables out Insert the stripped communication cable into the RJ45 plug in the correct order and crimp it with a crimper 1 RJ45 plug 2 Protective cap Skip this step if a standard network cable with RJ45 plug is prepared step 2 Uns...

Страница 58: ...48 step 3 Remove the seal step 4 Lead the cable through the cable gland 5 Electrical Connection User Manual ...

Страница 59: ...erminals as shown in the following figure Ensure that the wires are securely in place by slightly pulling them step 6 Slightly pull out the cable and then fasten the swivel nut Lock the connector with the screw End User Manual 5 Electrical Connection ...

Страница 60: ...dards All warning signs labels are intact and legible 6 2 Powering on the System If all of the items mentioned above meet the requirements proceed as follows to start up the inverter for the first time step 1 Turn on the AC circuit breaker between the inverter and the grid step 2 Rotate the DC switch of the inverter to ON position step 3 Turn on the external DC switch if applicable between the inv...

Страница 61: ...assword for logging in to iSolarCloud App have been obtained from the distributor installer or SUNGROW The communication device is normally connected to the inverter System positioning is enabled and iSolarCloud App is allowed to access location information step 1 Open the App tap in the upper right corner of the interface and select the correct ac cess address figure 6 1 Select Access Address ste...

Страница 62: ...erface figure 6 2 Plant Creation Settings Parameter Name Description Plant name The name of the plant Plant type The type of the plant which should be set corresponding to the actual plant type Installed power The installed power of the plant Country Region The country region where the plant is located 6 Commissioning User Manual ...

Страница 63: ... place where the plant is located Plant image Take photos of the plant and upload them Feed in tariff The feed in tariff can be set in two ways Enter the feed in tariff directly in the input box Tap More Configurations select the tariff unit enter the feed in tariff and tap Confirm Enable Time of Use Tariff if needed Tap Add Time of Use Tariff add time intervals and price and tap Con firm Please n...

Страница 64: ...p Device and Commissioning to go to corresponding interface step 7 Tap Network Configuration to go to the WLAN connection interface Tap the home net work in the WLAN list enter the password and then tap Confirm 6 Commissioning User Manual ...

Страница 65: ...lly returns to the commissioning interface after the processing is completed Only the 2 4 GHz working band is supported under the networking mode If the Easyconnect fails please refer to other methods in the WiNet S manual to es tablish the connection step 9 Tap Device Initialization to go to the Device initialization interface Set the initialization protection parameters as needed and tap Setting...

Страница 66: ...ustralia additionally set the applicable network service provider and then the grid type The image shown here is for reference only Refer to the actual interface for the supported network service providers 6 Commissioning User Manual ...

Страница 67: ...ree phase 30 kVA three phase United Energy UE ST 2008 1 10 kVA for single phase 30 kVA for three phase UE ST 2008 2 30 kVA three phase PowerWater Embedded Generation Notice Photovoltaic Systems 2020 SA Power Networks TS129 2019 10 kW for single phase 30 kW for three phase TS130 2017 30 kW 200 kW TS131 2018 200 kW Horizon Power HPC 9DJ 13 0001 2019 10kVA for single phase 30 kVA for three phase HPC ...

Страница 68: ...e router If there is no latest equipment upgrade package skip steps 1 and 2 The actual initializing procedure may differ due to different countries Please follow the ac tual App guidance step 1 If a latest equipment upgrade package is available the following prompt window pops up Tap UPDATE NOW to download the latest update package figure 6 3 Upgrade Reminder step 2 After download it would take ar...

Страница 69: ... supported countries and corresponding settings are as follows Country Region Setting Australia AU Australia New Zealand NZ New Zealand Chile Chile Brazil BR Brazil The parameter Country Region must be set to the country region where the inver ter is installed at Otherwise the inverter may report errors step 4 When the country is set to Australia additionally set the applicable network service pro...

Страница 70: ...777 2 2015 AS NZS 4777 2 2020 Australia A AS NZS 4777 2 2020 Australia B AS NZS 4777 2 2020 Australia C ENERGEX Ergon Energy STNW1170 single phase 10 kVA three phase 30 kVA STNW1174 30 kVA Pn 1500 kVA Jemena 10 kVA per phase or 30 kVA per three phase ELE GU 0014 30 kVA 200 kVA Endeavour Energy MDI 0043 Ausgrid NS194 CitiPower Powercor 5 kVA for single phase 30 kVA for three phase 30 kVA three phas...

Страница 71: ... 30kVA 1MVA westernpower EDM 33612889 2019 AusNet Services Basic Micro Embedded Generation 2020 For compliance with AS NZS 4777 2 2020 please select from Australia A B C Please con tact your electricity grid operator for which region to use step 5 Initialize parameters according to local grid requirements including grid type reactive power regulation mode etc The screen displays that the inverter ...

Страница 72: ...red only once step 1 The App screen will display the added inverter Tap NEXT to configure the plant figure 6 6 Display the Added Inverter step 2 Fill in the plant information The fields marked with must be filled in figure 6 7 Entering Plant Information step 3 Optional Fill in the tariff information The electricity price can be set to a specific value or Time of Use tariff 6 Commissioning User Man...

Страница 73: ... will create an account for the end user and send an email to the end user The end user can activate the account via the email The Distributor installer creates plants for the end user and can manage the plants by default figure 6 9 Entering Owner s e mail step 5 Tap NEXT to wait for the inverter to connect to the iSolarCloud User Manual 6 Commissioning ...

Страница 74: ...t power or curve Contact Sungrow service to enable live data function of devices Once enabled live data function is available for 3 hours per day by default To make it available for 24 hours contact SUNGROW step 7 Tab BACK to the COMPLETED screen Tab PDF REPORT to export the plant configuration report step 8 Tab BACK to the COMPLETED screen Tab DASHBOARD to return and manually refresh the page unt...

Страница 75: ...ablish communi cation connection to the inverter via Ethernet connection This manual describes only how to achieve near end maintenance via WLAN direct connection Screenshots in this manual are based on the V2 1 6 App for Android system and the actual interfaces may differ 7 2 Installing App Method 1 Download and install the App through the following application stores MyApp Android mainland China...

Страница 76: ...eters share plants etc The distributor installer can help the end user to create plants manage install or main tain plants and manage users and organizations step 1 Tap REGISTER to enter the registration screen step 2 Select the relevant server for your area step 3 Select End user or Distributor Installer to enter the corresponding screen 7 iSolarCloud App User Manual ...

Страница 77: ...anization can you fill in the corresponding code step 5 Tick Accept privacy protocol and tap Register to finish the registration operation End 7 4 Login 7 4 1 Requirements The following requirements should be met The AC and DC sides or the AC side of the inverter is powered on The WLAN function of the mobile phone is enabled The mobile phone is within the coverage of the wireless network produced ...

Страница 78: ... inverter related data information cannot be found unplug and reinsert the Winet S or press the multi function button of the Winet S three times The default account is user and the initial password is pw1111 which should be changed for the consideration of account security Tap More at the lower right corner on home page and choose Change Password figure 7 2 WLAN Local Access step 5 If the inverter...

Страница 79: ... initialized The App will send start instructions and the device will start and operate step 7 After initialization settings the App will return automatically to the home page End 7 5 Initial Settings Tap Country Region and select the country where the inverter is installed The initialization is completed User Manual 7 iSolarCloud App ...

Страница 80: ...Please fol low the actual App guidance 7 6 Function Overview The App provides parameter viewing and setting functions as shown in the following figure figure 7 4 App Function Tree Map 7 7 Home Home page of the App is shown in the following figure 7 iSolarCloud App User Manual ...

Страница 81: ...ows the installed power of the inverter 5 Today yield Shows today power generation of the inverter 6 Total yield Shows accumulative power generation of the inverter 7 Navigation bar Includes menus of Home Run Infomation Records and More If the inverter runs abnormally the fault icon will appear on the upper left corner of the screen Users can tap the icon to view detailed fault information and cor...

Страница 82: ...reactive appa rent power total power factor grid frequency phase voltage and current Grid Information Shows total export active power total feed in energy total pur chased energy Load Information Shows total load active power Meter Information Shows active power and phase active power of the meter 7 9 Records Tap Records on the navigation bar to enter the screen showing event records as shown in t...

Страница 83: ...on of Power Curve Item Description Daily Daily curve that indicates the real time power Month Monthly curve that indicates daily yield and equivalent hours in a month Year Annual curve that indicates monthly yield and equivalent hours in a year Total A curve that indicates annual yield and equivalent hours since installation Fault Alarm Record Tap Fault Alarm Record to enter the screen as shown in...

Страница 84: ...g records Select one of the records in the list and click the record to view the detailed fault info as shown in following figure figure 7 9 Detailed Fault Alarm Information Event Record Tap Event Record to enter the screen as shown in the following figure 7 iSolarCloud App User Manual ...

Страница 85: ...reen as shown in the following figure figure 7 11 More In addition to viewing the WLAN configuration and App software version the More screen supports the following operations Set parameters including inverter system parameters operation parameters power reg ulation parameters and communication parameters Upgrade inverter firmware User Manual 7 iSolarCloud App ...

Страница 86: ...me Setting The correct system time is very important Wrong system time will directly affect the data logging and power generation value The clock is in 24 hour format Software Version Version information of the current firmware 7 10 2 Operation Parameters Running Time Tap Settings Operation Parameters Running Time to enter the corresponding screen on which you can set Connecting Time and Reconnect...

Страница 87: ...en connected to the grid Full Day PID Suppression The function is turned on and the PID is adjusted throughout the day AFCI Parameters Optional Tap Settings Operation Parameters AFCI Parameters to enter the corresponding screen on which you can set AFCI Parameters figure 7 15 AFCI Setting 7 10 3 Power Regulation Parameters Active Power Regulation Tap Settings Power Regulation Parameters Active Pow...

Страница 88: ...ower gradient control On Off Active Power Decline Gradient Decline gradient of inverter active power per minute 1 min 6000 min Active Power Rising Gradient Rising gradient of inverter active power per minute 1 min 6000 min Active Power Setting Persistence Switch for activating deactivating the function of active power setting persistence On Off Active Power Limit Switch for limiting active power O...

Страница 89: ...actor PF is fixed and the reactive power is regulated by the parameter PF The PF ranges from 0 8 leading to 0 8 lagging Leading the inverter is sourcing reactive power to the grid Lagging the inverter is injecting reactive power into the grid Qt Mode In the Qt mode the reactive power can be regulated by the parameter Q Var limits in The system rated reactive power is fixed the system injects react...

Страница 90: ...ode curve Curve A C 0 800 to 1 000 Curve B 0 600 to 0 600 QP_K2 Power factor at point P2 on the Q P mode curve QP_K3 Power factor at point P3 on the Q P mode curve QP_ EnterVoltage Voltage for Q P function activation in 100 0 110 0 QP_ ExitVoltage Voltage for Q P function deactivation in 90 0 100 0 QP_ ExitPower Power for Q P function deactivation in 1 0 100 0 QP_ EnableMode Unconditional activati...

Страница 91: ...20 0 QU_V4 Grid voltage limit at point P4 on the Q U mode curve in 100 0 120 0 QU_Q1 Value of Q Sn at point P1 on the Q U mode curve in 60 0 to 0 0 QU_Q2 Value of Q Sn at point P2 on the Q U mode curve in 60 0 to 60 0 QU_Q3 Value of Q Sn at point P3 on the Q U mode curve in 60 0 to 60 QU_Q4 Value of Q Sn at point P4 on the Q U mode curve in 0 0 to 60 0 QU_ EnterPower Active power for Q U function ...

Страница 92: ...ed to download the firmware package to the mobile device in advance step 1 Enable the Mobile data of the mobile device step 2 Open the App enter the account and password on the login screen Tap Login to enter the home screen step 3 Tap More Firmware Download to enter corresponding screen on which you can view the device list step 4 Select the device model before downloading the firmware Tap the de...

Страница 93: ... 7 Tap More on the App home screen and then tap Firmware Update step 8 Tap the upgrade package file a prompt box will pop up asking you to upgrade the firmware with the file tap CONFIRM to perform the firmware upgrade step 9 Wait for the file to be uploaded When the upgrade is finished the interface will inform you of the upgrade completion Tap Complete to end the upgrade End User Manual 7 iSolarC...

Страница 94: ...r completely discharge step 4 Ensure that the DC cable is current free with a current clamp End 8 2 Dismantling the Inverter Risk of burn injuries and electric shock After the inverter is powered off for 10 minutes measure the voltage and current with professional instrument Only when there is no voltage nor current can opera tors who wear protective equipment operate and maintain the inverter Bef...

Страница 95: ...he wall step 4 If the inverter will be used again in the future please refer to 3 2 Inverter Storage for a proper conservation End 8 3 Disposal of Inverter Users take the responsibility for the disposal of the inverter Please scrap the inverter in accordance with relevant local regulations and stand ards to avoid property losses or casualties Some parts of the inverter may cause environmental poll...

Страница 96: ...ltage and contact the local electric power company for solutions if the grid voltage is higher than the set value 2 Check whether the protection parameters are appropriately set via the App or the LCD Modify the overvoltage protection values with the con sent of the local electric power operator 3 Contact Sungrow Customer Service if the pre ceding causes are ruled out and the fault persists 4 5 Gr...

Страница 97: ...cted to the correct terminal whether the live wire and the N wire are correctly in place 4 Check whether the AC circuit breaker is connected 5 Contact Sungrow Customer Service if the pre ceding causes are ruled out and the fault persists 12 Excess Leakage Current 1 The fault can be caused by poor sunlight or damp environment and generally the inverter will be reconnected to the grid after the envi...

Страница 98: ...is of reverse polarity If so disconnect the DC switch and adjust the polarity when the string current drops below 0 5 A 2 Contact Sungrow Customer Service if the pre ceding causes are ruled out and the fault persists The code 28 to code 29 are corresponding to PV1 to PV2 respectively The code 448 to code 479 are corresponding to string 1 to string 32 respectively 532 547 564 579 PV Reverse Con nec...

Страница 99: ... to code 595 are corresponding to string 17 to string 32 respectively 37 Excessively High Ambient Temperature Generally the inverter will resume operation when the internal or module temperature returns to normal If the fault persists 1 Check whether the ambient temperature of the inverter is too high 2 Check whether the inverter is in a well venti lated place 3 Check whether the inverter is expos...

Страница 100: ...nals to ensure a reli able connection 5 Contact Sungrow Customer Service if the pre ceding causes are ruled out and the fault persists 106 Grounding Cable Fault 1 Check whether the AC cable is correctly connected 2 Check whether the insulation between the ground cable and the live wire is normal 3 Contact Sungrow Customer Service if the pre ceding causes are ruled out and the fault persists 88 Ele...

Страница 101: ...nication cable of the meter 3 Contact Sungrow Customer Service if the pre ceding causes are ruled out and the alarm persists 323 Grid Confrontation 1 Check whether the output port is connected to actual grid Disconnect it from the grid if so 2 Contact Sungrow Customer Service if the pre ceding causes are ruled out and the fault persists 75 Inverter Parallel Communication Alarm 1 Check whether the ...

Страница 102: ... 233 432 434 500 513 515 518 635 638 900 901 910 911 996 System Alarm 1 The inverter can continue running 2 Check whether the related wiring and terminal are abnormal check whether there are any for eign materials or other environmental abnormal ities and take corresponding corrective measures when necessary 3 If the fault persists please contact Sungrow Power Customer Service 264 283 MPPT Reverse...

Страница 103: ...re bat teries Close the AC and DC switches in turn 15 minutes later and restart the system 2 If the fault persists please contact Sungrow Power Customer Service 1548 1579 String Current Reflux 1 Check whether the number of PV modules of the corresponding string is less than other strings If so disconnect the DC switch and adjust the PV module configuration when the string current drops below 0 5 A...

Страница 104: ...Customer Service 1616 System Hardware Fault 1 It is prohibited to disconnect the DC switch when the DC current is greater than 0 5 A when the fault occurs 2 Disconnect the DC switch only when the inver ter DC side current drops below 0 5 A 3 It is prohibited to power up the inverter again Please contact Sungrow Customer Service Contact the dealer if the measures listed in the Troubleshooting Metho...

Страница 105: ...If there is no odor smoke or obvious abnormal appearance repair or restart the inverter according to the alarm corrective measures Avoid standing directly in front of the inverter during maintenance To prevent misuse or accidents caused by unrelated personnel Post prominent warning signs or demarcate safety warning areas around the inverter to prevent accidents caused by misuse Restart the inverte...

Страница 106: ... firmly con nected in place Check whether there is damage to the cables especially the surface in con tact with metal 6 months after commissioning and then once or twice a year General status of the system Visual check for any damage or de formation of the inverter Check any abnormal noise during the operation Check each operation parameter Be sure that nothing covers the heat sink of the inverter...

Страница 107: ...fault No of PV strings per MPPT 1 Max PV input current 48 A 16 A 16 A 16 A Max DC Short circuit current 60 A 20 A 20 A 20 A Output AC Rated AC output power 4999 W for AU 5000 W for others 8000 W Max AC output power 4999 VA for AU 5000 VA for others 8000 VA Rated AC output apparent power 4999 VA for AU 5000 VA for others 8000 VA Rated AC output current at 230 V 21 7 A for AU 21 8 A for others 34 8 ...

Страница 108: ...ency 97 8 96 9 97 8 97 3 Protection Grid monitoring Yes DC reverse polarity protection Yes AC short circuit protection Yes Leakage current protection Yes DC switch Yes PV string current monitoring Yes PID Zero Yes Arc fault circuit interrupter AFCI Yes Optional Surge protection DC Type II AC Type II General Data Dimensions W x H x D 490 mm x 340 mm x 170 mm Weight 19 kg Mounting method Wall mounti...

Страница 109: ...rol Parameter SG9 0RS SG10RS Input DC Recommended max PV in put power 13 5 kWp 15 kWp Max PV input voltage 600 V Min operating PV voltage Start up input voltage 40 V 50 V Rated PV input voltage 360 V MPP voltage range 40 V 560 V No of independent MPP inputs 3 Default No of PV strings per MPPT 1 Max PV input current 48 A 16 A 16 A 16 A Max DC Short circuit current 60 A 20 A 20 A 20 A Output AC Rate...

Страница 110: ...s Leakage current protection Yes DC switch Yes PV string current monitoring Yes PID Zero Yes Arc fault circuit interrupter AFCI Optional Surge protection DC Type II AC Type II General Data Dimensions W x H x D 490 mm x 340 mm x 170 mm Weight 19 kg Mounting method Wall mounting bracket Topology Transformerless Degree of protection IP65 Operating ambient temper ature range 25 to 60 Allowable relativ...

Страница 111: ...f Liability In the following circumstances SUNGROW has the right to refuse to honor the quality guarantee The free warranty period for the whole machine components has expired The device is damaged during transport The device is incorrectly installed refitted or used The device operates in harsh conditions beyond those described in this manual The fault or damage is caused by installation repairs ...

Страница 112: ... to provide you the best assistance Model of the device Serial number of the device Fault code name Brief description of the problem For detailed contact information please visit https en sungrowpower com contactUS 10 Appendix User Manual ...

Отзывы: