background image


45 


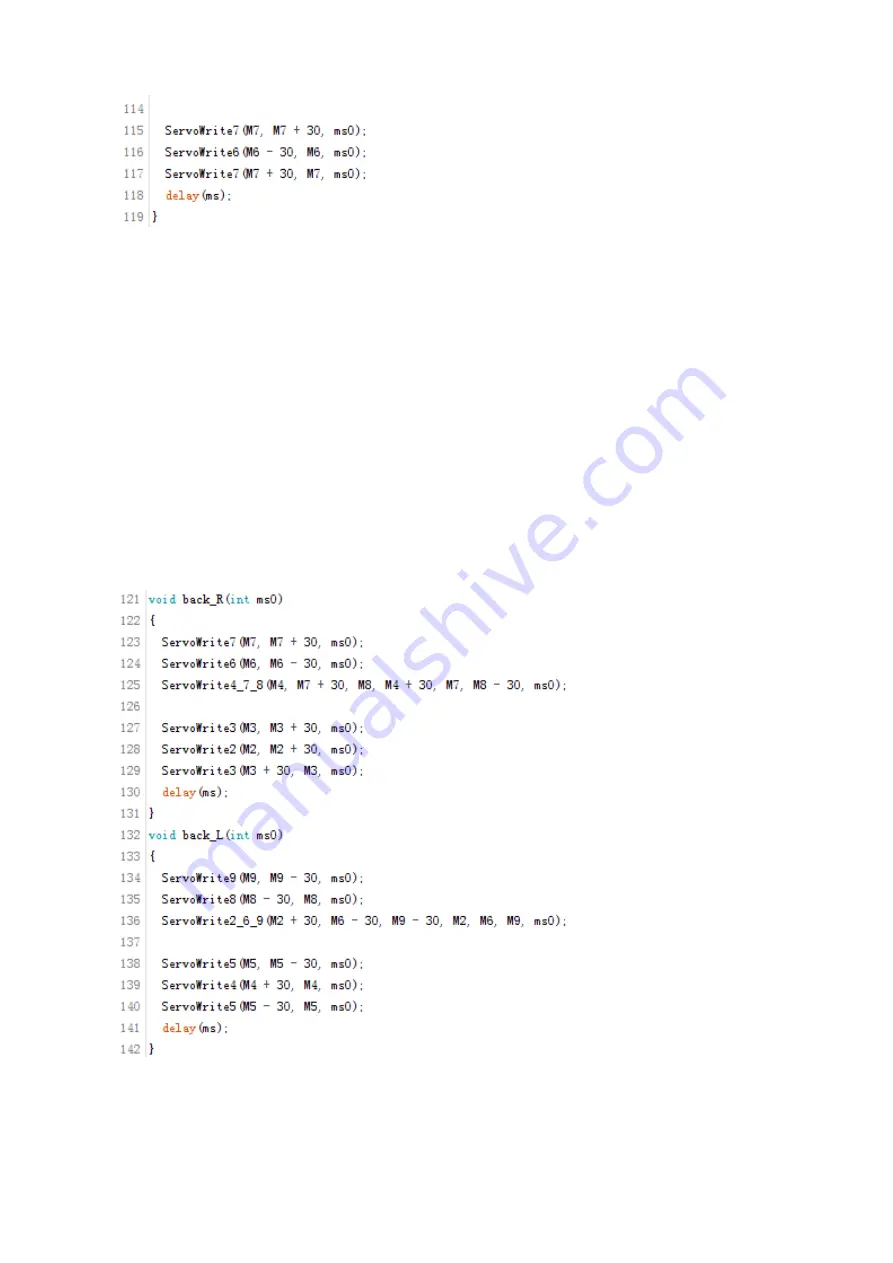
In the program above, the number 30, the value in the function 

ServoWrite()

 represents the 

pace of RollFlash. Due to its structure design (the servo installation), the moving pace is fixed.   

How can it move forward? It moves its feet diagonally in opposite directions: 

raise the right 

front foot and move forward 

->

 raise the left front foot and right hind foot at the same time 

to move the body


–>

 the right front foot gets on the ground


–>

 raise the left hind foot to 

move forward


–>

 the left hind foot gets on the ground

. It walks a step forward after all these 

actions.   

Then it continues from the other side: 

raise the left front foot and move forward


–>


raise the 

right front foot and left hind foot at the same time to move the body


–>


the left front foot 

gets on the ground


–>


raise the right hind foot to move forward


–>


the right hind foot gets 

on the ground

. It walks another step forward then.   

Therefore, it will keep walking forward by continuing these two loops. 


The program above is to control it move backward, which is similar to moving forward. The 
only difference is the walking direction: 

raise the right hind foot and move backward 

->

 raise 

the right front foot and left hind foot at the same time to move the body 

->

 the right hind 

SunFounder

Содержание RollFlash

Страница 1: ...e tortoise appearance design It applies an open source Arduino Nano control board a Servo Control Board and a Bluetooth Module With an ultrasonic sensor and an infrared sensor it can realize obstacle avoiding and line following functions What s more you can control it with an App on Android which makes it easy and interesting to play Through this kit you can feel the charm of assembling the robot ...

Страница 2: ... Servo 14 4 4 Upper Plate PCB 15 4 5 U Joint A U joint B 17 4 6 U Joint Unit 1 U Joint Unit 2 20 4 7 Crus Servo 22 4 8 Uploading Assembly Program 24 4 9 U Joint Unit Crus 26 4 10 Upper Plate Leg 28 4 11 Bottom Plate Sensor 30 4 12 Upper Plate Bottom Plate 33 4 13 Wiring 35 4 14 Shell 36 Experiments 37 5 1 App Control 37 5 2 Obstacle Avoidance 39 5 3 Line Following when Avoiding Obstacle 39 5 4 Dan...

Страница 3: ...h an open source Arduino Nano board for control a Servo Control Board and a Bluetooth Module it walks slowly with eight SF servos 9g driving four legs Equipped with an ultrasonic module on the front it can avoid obstacle easily with an infrared module at the bottom of the front it follows lines In addition you can control the movement of the RollFlash on your Android phone S u n F o u n d e r ...

Страница 4: ... Acrylic Plates 1 Bottom Plate x 1 2 Ultrasonic Fixing Plate x 1 3 Support Plate x 2 4 Joint Connector x 8 5 U3 Plate x 4 6 Upper Plate x 1 7 U2 Plate x 4 8 Crus x 4 9 U1 Plate x 8 10 Acrylic Washer x 6 S u n F o u n d e r ...

Страница 5: ...mple 1 Check whether there are some residues in the holes of the acrylic plate 2 Use a tool with a pointed end to remove the residue 3 Make sure that all the residues are cleared 4 Use the pointed tool to scratch off the sticker on the plate 2 2 Mechanical Fasteners Name Accessory Qty M1 2 4 Self tapping Screw 16 M1 6 10 Screw 4 M1 6 Nut 4 S u n F o u n d e r ...

Страница 6: ... 8 Screw 16 M2 Nut 16 M3 8 Flat Head Screw 2 M3 10 Screw 36 M3 Nut 38 M3 6 Corn Rivet 4 φ3 φ8 4 Flange Bearing 8 2 3 Electronic Components SunFounder Servo 9g 8 18650 2 Battery Holder 1 S u n F o u n d e r ...

Страница 7: ...5 SunFounder Nano V4 0 1 SunFounder Servo Control Board 1 SunFounder Bluetooth Module 1 SunFounder Ultrasonic Module 1 S u n F o u n d e r ...

Страница 8: ...6 SunFounder Infrared Module 1 4 Pin Jumper Wire 1 6 Pin Jumper Wire 1 Mini USB Cable 1 Riband 1 Heat Shrink Tubing 6 Wire Clip 2 S u n F o u n d e r ...

Страница 9: ...7 Sponge Bag 4 Transparent Tape 1 Shell 1 2 4 Tools Philips Screw Driver 1 2 5 Self Provided Components 18650 Battery 2 S u n F o u n d e r ...

Страница 10: ...O Robot Kit Rollflash Bionic Robot Turtle for Arduino 3 2About Arduino 3 2 1 Description Arduino is an open source platform that applies simple software and hardware You can get it in a short even when you know little of it It provides an integrated development environment IDE for code editing and compiling compatible with multiple control boards So you can just download the Arduino IDE upload the...

Страница 11: ... click Download On the page check the software list on the right side under Download the Arduino Software Find the one that suits your operation system and click to download There are two versions of Arduino for Windows Installer or ZIP file You re recommended to download the former Step 2 Double click the exe file and the following window will show up Click I Agree The following interface will sh...

Страница 12: ...10 Choose Next Click Browse to choose the installation path or enter a directory at the Destination Folder Click Install S u n F o u n d e r ...

Страница 13: ... goes to the end the Close button may be enabled for some PC Just click it to complete the installation Then a prompt appears Select Always trust software for Adafruit Industries and click Install Select Always trust software for Arduino srl and click Install S u n F o u n d e r ...

Страница 14: ...ll not be able to be recognized by your computer Therefore before using it please install appropriate driver For Windows users run PL2303_Prolific_DriverInstaller_v1 10 0 exe in the folder Rollflash Bionic Robot Turtle for Arduino For Mac users refer to the folder PL2303_MacOSX_1_6_1_20160309 in the folder Rollflash Bionic Robot Turtle for Arduino S u n F o u n d e r ...

Страница 15: ...asten the battery holder with two M3 8 screws and two M3 nuts It should be shown as below after it s done 1 Cut the 30cm ribbon into halves Thread the ribbon through the acrylic plate Leave the riband with one end longer on one side of the plate onto which to fix the battery holder Thread the other half through the upper plate in the similar way S u n F o u n d e r ...

Страница 16: ...de and cathode in case of inserting inversely 5 It should be like this after the installation 4 3Upper Plate Servo 1 Align a servo with a servo slot on the upper plate Pay attention to the direction of servo wires shaft toward the head 2 Assemble the servo into the plate S u n F o u n d e r ...

Страница 17: ...8 screws 4 It should look like this 5 Mount the other three servos in the same way Pay attention to the direction of servos shaft as shown below 4 4Upper Plate PCB 1 Align the four acrylic washers with the holes of the upper plate 2 Place the washers on the plate S u n F o u n d e r ...

Страница 18: ... Insert four M3 10 screws through holes on the Servo Control Board 4 acrylic washers and into 4 M3 nuts and tighten them The assembly should be like this 5 Plug the SunFounder Nano onto the Servo Control Board Pay attention to place its USB port close to the aforementioned power port Align the pins with female headers as shown below 6 Insert the pin into headers S u n F o u n d e r ...

Страница 19: ...the board 4 5U Joint A U joint B 1 Align the rocker arm with the mounting holes on U1 plate 2 Assemble the arm to the plate with two M1 2 4 self tapping screws in the first and last small holes of the rocker 3 Align the bulges of the assembled U1 plate with concaves of the Joint Connector 4 Insert the bulges into the concaves S u n F o u n d e r ...

Страница 20: ...e U2 plate into the connector plate Note The size of the end hole near its arc is different from U1 8 Place an M3 nut in the groove of U2 plate and insert an M3 10 screw from below into the nut 9 Tighten the screw Now such a U joint type A is assembled U1 U2 10 Assemble the other kind of U joint type B in the same way U1 U3 S u n F o u n d e r ...

Страница 21: ...1 So four type A U joints are assembled as shown below 12 Four type B U joints assembled Small hole on the side without rocker arm Tyep A Large hole on the side without rocker arm Type B S u n F o u n d e r ...

Страница 22: ...below Align all the 4 mounting holes in the middle of the two connector plates 2 Place them close 3 Insert two M3 10 screws from the type A U joint s side through the middle two holes in row and fix them with two M3 nuts on the other side 4 Tighten the screws Now a U joint unit type 1 is done S u n F o u n d e r ...

Страница 23: ...ay Now we have two type 1 units 6 Connect the rest U joint units in the similar way but remember to rotate the type B U joints 180 degrees when connecting Now we have two type 2 units as shown below Large hole on the right Large hole on the left S u n F o u n d e r ...

Страница 24: ...he crus plate with the servo Pay attention to the direction of the crus and the crus foot as shown below 2 Assemble the crus to the servo 3 Connect the two components with two M2 nuts and M2 8 screws 4 Tighten the screw S u n F o u n d e r ...

Страница 25: ...5 Now we have two assembled crura of this type 6 Assemble the other two symmetric crura in the same way Pay attention to the direction of the feet when inserting the servo into the hole S u n F o u n d e r ...

Страница 26: ...rd and configure the initial position of the servo Step 1 Hook the servo wires to D2 connect the Servo Control Board to PC via a USB cable and the PC will automatically install the driver The COM port connected will appear Step 2 Go to the folder Rollflash Bionic Robot Turtle for Arduino Code Basic 1 Servo and open the file Servo ino Step 3 Select the Board S u n F o u n d e r ...

Страница 27: ... USB cable and press the switch on the board You may hear the sound of gear moving or may not if the servo shaft happens to be at 90 degrees at the beginning but you GENTLY spin the rocker arm and you ll find it s unmovable So now the servo is adjusted to 90 degrees S u n F o u n d e r ...

Страница 28: ...cular to the U1 plate as shown below If not gently pull out the servo and insert it again in case of damage caused by spinning the shaft Slightly open the U1 joint to insert the servo shaft on the crus into the hole on the joint But don t open too wide or the plate will break up 4 Insert an M2 4 self tapping screw into the servo shaft and tighten them 90 S u n F o u n d e r ...

Страница 29: ...ne unplug the servo wires connected to D2 for connection of the next servo 6 Assemble the other similar leg DO adjust all servos by connecting to D2 before assembling each leg 7 Assemble the crus to the other Type 2 U joint unit S u n F o u n d e r ...

Страница 30: ... crura to the type 1 U joint units in the same way 4 10 Upper Plate Leg 1 Align the M3 6 Corn Rivet with the hole on U2 plate from the inside of the Type A U joint 2 The assembly should be like this S u n F o u n d e r ...

Страница 31: ...late Also DO NOT open too much in case of plate breaking 4 Note Remember to unplug the servo wires connected to D2 for connection of the next servo Align an M2 4 self tapping screw with the hole of the servo rocker arm on the upper plate 5 Tighten the screw 6 Assemble the other three legs in the same way Pay attention to the direction of foot since there are two types 45 S u n F o u n d e r ...

Страница 32: ...Align four M1 6 10 screws and four M1 6 nuts with the mounting holes as shown below 4 Tighten the screws There will have a small gap between them because of the pins on the ultrasonic module 5 Align the module with the slot on the bottom plate as shown below Make sure the module s port is upwards 6 Mount the module on the plate S u n F o u n d e r ...

Страница 33: ...neath as shown below 8 Tighten the screw 9 Insert two M3 10 screws into the infrared module from underneath 10 Insert the screws through two acrylic washers 11 Insert these two M3 10 screws through the bottom plate and two M3 nuts as shown below 12 Tighten the screws S u n F o u n d e r ...

Страница 34: ... the support plate 15 Place an M3 nut in the slot of the support plate Align an M3 10 screw from below 16 Tighten the screw 17 Fix the other support plate on the bottom plate in the same way 18 Align four φ3 φ8 4 flange bearings with the holes on the bottom plate S u n F o u n d e r ...

Страница 35: ...o the port of the infrared module as shown below 4 12 Upper Plate Bottom Plate 1 Thread the 6 pin anti reverse cable through the wire slot on the upper plate Align the bulges of the support plate and the ultrasonic plate with the mounting holes on the upper plate S u n F o u n d e r ...

Страница 36: ...he upper plate Before that you need to insert the four rivets on the U joints into the flange bearings on the bottom plate 3 Insert three M3 10 screws from the upper bottom plate through the bottom plate into M3 nuts S u n F o u n d e r ...

Страница 37: ...d be toward the tail direction Then insert the 6 pin cable into the 6 pin port Connect the ultrasonic module to the Servo Control Board with a 4 pin cable Here we provide six heat shrink tubing to wrap the servo wires 4 pin cable and 6 pin cable Then you can organize the shrink tubing for servo wires with two wire clips and fix them close to two sides of the servo control board with the 3M tape S ...

Страница 38: ...hell is shown as below 2 Fold the shell along the white lines and use the transparent tape to stick two adjacent plates together on the inside 3 Remove the sticker on the bulging edge of the shell as shown below 4 Fit the shell with the upper plate Press the shell gently to stick to the plate 5 Put on the sponge bag for the legs for the anti slip purpose S u n F o u n d e r ...

Страница 39: ...signals which will be received by the robot via the Bluetooth module onside Then the quadruped makes movements accordingly 1 Upload APP ino under path Rollflash Bionic Robot Turtle for Arduino Code 2 APP to the RollFlash via the USB cable Turn on the power switch of the Rollflash and power indicator LED will blink 2 Install RollmanAPP apk under the path Rollflash Bionic Robot Turtle for Arduino AP...

Страница 40: ...connected to the Bluetooth of the mobile successfully The icon Connect in the App will become connected The Status LED in the Bluetooth will keep constantly lighting instead of blinking Now you can control the RollFlash to go forward backward turn left and right just on your phone Have fun S u n F o u n d e r ...

Страница 41: ...Therefore after the sketch is run the RollFlash can smartly avoid the obstacle ahead when following a line Let s check how to make it 1 Open Following ino under Rollflash Bionic Robot Turtle for Arduino Code 4 Following and upload it to the robot 2 DIY a map Prepare a white board or a flat light color surface and some black tape or a black Marker not permanent Then draw some straight line or curve...

Страница 42: ...ance The code file Dance ino under Rollflash Rollflash Bionic Robot Turtle for Arduino Code 5 Dance Dance as the name suggests is to make the RollFlash dance Upload the code to the board and the robot will just dance That s quite cute and lovely just like a baby Note To learn more about the code in these experiments you can find details in the following chapter Code Explanation S u n F o u n d e r...

Страница 43: ...e program above is for control of a single servo By setting three parameters including c2 the starting angle s2 the end angle and ms0 the rotation speed we can control the rotating angle and speed of the servo Control the servos on pin 4 and pin 7 The program below is for controlling two servos simultaneously By setting five parameters including the starting angles c4 and c7 the end angles s4 and ...

Страница 44: ...42 Control the servos on pin 5 pin 6 and pin 8 S u n F o u n d e r ...

Страница 45: ...seven parameters including the starting angles c5 c6 and c8 end angles s5 s6 and s8 and the rotation speed ms0 we can control the rotating angle and speed of three servos at the same time Control the servos on pin 7 pin 2 pin 4 and pin 8 S u n F o u n d e r ...

Страница 46: ...ervos at the same time Movements of the RollFlash robot can be well controlled by calling those programs above Here we just take some examples about different controlling 6 2APP ino The servo control base program in last chapter lays a foundation for controlling the RollFlash to move forward and backward and turn left and right Next let s talk about the specific control program for some movements ...

Страница 47: ... a step forward after all these actions Then it continues from the other side raise the left front foot and move forward raise the right front foot and left hind foot at the same time to move the body the left front foot gets on the ground raise the right hind foot to move forward the right hind foot gets on the ground It walks another step forward then Therefore it will keep walking forward by co...

Страница 48: ...t and right hind foot at the same time to move the body the left hind foot gets on the ground raise the right front foot to move backward the right front foot gets on the ground It walks another step backward then Therefore it will keep walking backward by continuing these two loops The program above is for turning right RollFlash can realize turning right by keeping the left feet moving forward w...

Страница 49: ...e the right feet moving forwards The above code is for the RollFlash s basic movements It will follow the commands received from the Bluetooth module via the serial port and take the corresponding actions With the code above we can read the data from the Bluetooth module and save it with a variable S u n F o u n d e r ...

Страница 50: ...nd backward turning left and right etc 6 3Avoidance ino We have learnt a lot on servo and basic control for the RollFlash and how it moves Thus it would be quite easy to control it for obstacle avoiding The program can judge whether there is an obstacle in front of the RollFlash by reading data from ultrasonic module on it and further control the robot to avoid the obstacle by corresponding progra...

Страница 51: ...n know how far the obstacle is ahead Then write the code that if there is an obstacle 10cm away in the front control the RollFlash to move back to 15cm from the obstacle then turn left or right to avoid it and continue to move Thus the RollFlash can realize obstacle avoiding function S u n F o u n d e r ...

Страница 52: ...50 S u n F o u n d e r ...

Страница 53: ...d follow the line Meanwhile the RollFlash will walk away from the obstacle on a black line it s following bypass the obstacle and come back to follow the line The program above is to read the black line s position By comparing the AD value and the setting reference it can tell whether the black line is at the centre left or centre right position S u n F o u n d e r ...

Страница 54: ...ve forward That s how it works for line following Besides it needs to detect whether there re obstacles and avoid them if yes The program above is about detecting whether there s an obstacle 6cm in front of the RollFlash by the ultrasonic module If it detects an obstacle it will walk away from the obstacle and then walk back to follow the line Thus we can realize the line following obstacle avoidi...

Страница 55: ...d have lots of fun with the bot Show it to your friends and have fun You may have encountered with assembly or code issues during the course Though we have improved this manual and avoided some mistakes it still can be unsatisfactory We re sorry for the bothering and welcome to provide your feedbacks If you have any suggestions or ideas post forums on our website www sunfounder com S u n F o u n d...

Страница 56: ...al study investigation enjoyment or other non commercial or nonprofit purposes under the related regulations and copyrights laws without infringing the legal rights of the author and relevant right holders For any individual or organization that uses these for commercial profit without permission the Company reserves the right to take legal action S u n F o u n d e r ...

Отзывы: