background image

SunBriteTV Signature 2 Series 4K Ultra HD Operator’s Manual

Page 31

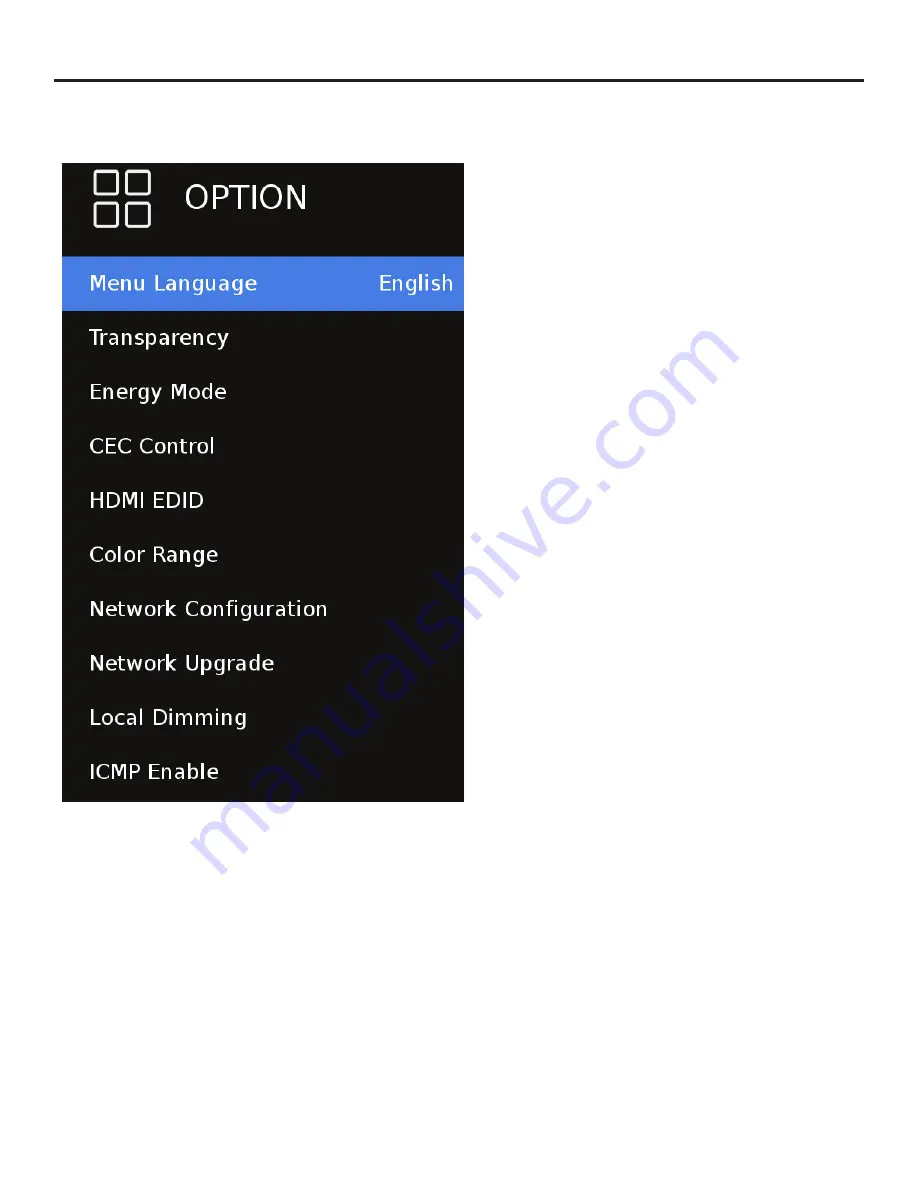
Adjusting On-Screen Displays – Option Menu

1. Press 

qp

 buttons on the remote or CH+/CH- on the TV) to move the cursor to the item to be selected.

2. Press 

t


u

 buttons on the remote or VOL+/VOL- on the TV to make the desired adjustments.

3. When your adjustments are complete, press MENU or EXIT on the remote or MENU on the TV to exit the main menu.

Menu Language

Press the 

qp

 buttons to highlight Menu Language, then use 

t


u

 to select English, French or Spanish.


Transparecy

Press the 

qp

 buttons to highlight Transparent, then use        

qp

  to select to what degree the picture shows through the 

on-screen menus: 0%, 25%, 50%, 75% or 100%.

Energy Mode

Press the 

qp

 buttons to highlight Transparent, then use 

<enter> to select On or Off.  On will dim the backlight to a 

preset level alowing the display to consume less power.

CEC Control

Press the 

qp

 buttons to highlight CEC control, then use


t


to select On or Off.  On will turn on the features in CEC 

control - including ARC (Audio Return Channel).

HDMI EDID 

Press the 

qp

 buttons to highlight the EDID Switch, then use 

qp

 to select EDID 1.4 or EDID 2.0 mode. 

EDID 1.4 should be used for older devices or with 4k extenders 
or cables which are limited to 4k @ 30hz.

EDID 2.0 should be used for newer source devices for full 4k @ 
60hz resolution

CEC Control options (not pictured)

Auto Standby On / Off - 

when On the TV will use CEC 

control to put the source device in standby / off.

TV Auto Power On - 

when On the source device will 

use CEC control to turn the TV on.

TV Auto Power Off - 

when On the source device will 

use CEC control to turn the TV off.

Audio Receiver (ARC)- 

when On the TV will use ARC 

to return audio using HDMI1 back to an audio reciver..

Device List  - 

used for CEC trouble shooting. CEC 

enabled devices should be display when selected.

Connect  - 

used for CEC trouble shooting. Scans the 

HDMI ports for CEC enabled devices.

Root Menu  - 

used for CEC trouble shooting. Attempts 

to send  a root menu command to the HDMI ports for 
CEC enabled devices.

Note: CEC must be turn on to enable ARC.

Содержание SB-S2-43-4K

Страница 1: ...Operator s Manual Revision Draft 20190823_200pm PN MSP 002 00 Signature 2 Series 4K Ultra HD Model SB S2 43 4K SB S2 55 4K SB S2 65 4K SB S2 75 4K...

Страница 2: ...Page 2...

Страница 3: ...SunBriteTV Signature 2 Series 4K Ultra HD Operator s Manual Page 3...

Страница 4: ...oid the user s authority to operate this equipment NOTE TO CATV SYSTEM INSTALLER This reminder is provided to call the CATV system installer s attention to Article 820 40 of the National Electrical Co...

Страница 5: ...otection against harmful interference in a residential installation This equipment generates uses and can radiate radio frequency energy and if not installed and used in accordance with the instructio...

Страница 6: ...ather Do not service SunBriteTV yourself Removal of the television screen cover may expose you to high voltage or other dangerous risks Refer all servicing to a qualified service professional Warranty...

Страница 7: ...creen Display Controls Adjusting On Screen Displays Channel Menu Picture Menu Sound Menu Time Menu Lock Menu Option Menu Media Menu Information Menu Troubleshooting Care of SunBriteTV Filter cleaning...

Страница 8: ...hat the following items are included in the carton and that they are in good condition If items are damaged or missing contact your dealer immediately SunBriteTV LCD Television Operator s Manual Remot...

Страница 9: ...er or gazebo Remember that the position of the sun changes during the day as seen in the drawing at right This means that the quality of the picture will change during the day If you intend to install...

Страница 10: ...sealing gasket Figure 3 3 Close the cover Route the cables as shown to provide a drip loop below the door This will prevent water from dripping down the cord and possibly entering the door area 4 Pre...

Страница 11: ...or a DVI video device Use a 3 5mm mini jack audio cable headphone jack to provide audio for a HDCP enabled DVI video device or PCs with VGA or DVI connection 12 AV CVBS Connects to devices that use le...

Страница 12: ...the HDBaseT compatible transmiter which supports IR repeating 20 Option Switches reserved for future use Swith settings do not effect the HDBaseT operation at this time HDBase T information The Signat...

Страница 13: ...rator s Manual Page 11 TV Installation Rear Panel Connections Red Green Blue Yellow Green Red White Connection Descriptions Cable Descriptions Legacy component input 3 5mm to RCA cable required for no...

Страница 14: ...n Screen Display to scan for channels Connecting to Digital Cable without Cable Box or Antenna Connecting to Cable or Antenna 1 Make sure the power of the TV is turned off 2 Connect the Coaxial RF cab...

Страница 15: ...d your DVD player is turned off 2 Connect a HDMI cable to the HDMI port of your DVD player and the other end to the HDMI port off the back of your TV 3 Turn on the TV and your DVD player 4 Use the rem...

Страница 16: ...our DVD player and Composite s white connector port off the back of your TV 4 Connect the red color connector to both your DVD player and Composite s red connector port off the back of your TV 5 Turn...

Страница 17: ...r port off the back of your TV 3 Connect the blue color connector to both your set top box and Component 1 s blue connector port off the back of your TV 4 Connect the red color connector to both your...

Страница 18: ...4 Connect the red color connector to both your DVD player and Composite s red connector port off the back of your TV 5 Turn on the TV and your DVD player 6 Use the remote control s source button or t...

Страница 19: ...est picture set your PC resolution to 1920 x 1080 at 60 Hz Refer to the PC or graphic card manual for further instructions on how to set your resolution and refresh rate 2 Refer to your PC manual for...

Страница 20: ...the remote control s source button or the source button the TV to switch to VGA Please Note 1 For the best results please set your PC resolution to 2 1920 x 1080at 60 Hz Refer to the PC or graphic ca...

Страница 21: ...these buttons function as up or down controls for the menu Vol Vol These buttons increase or decrease the volume If a sub menu is active pressing these buttons will move the selection left or right If...

Страница 22: ...HDMI 1 Shift 9 HDMI 2 Shift 0 TV Tuner ON Powers the TV On OFF Powers the TV Off 0 9 Allows you to set the channels directly To access a digital channel use these buttons with the button to switch ch...

Страница 23: ...the volume and functions as right direction in the OSD If the OSD is active use Vol Vol to select a choice This button is the UP direction in the OSD This button functions as the DOWN direction in the...

Страница 24: ...ss TV from the Input Select option Channel Menu This menu manages Channel functions including Antenna Select Air or Cable Auto Scan Signal Information Channel Edit Picture Menu This menu manages Pictu...

Страница 25: ...ound Audio Only Speaker On Screen Display Menu continued Time Menu This menu manages Time functions including Auto Sync Clock selectable if Auto Sync is off Sleep Timer Time Zone Time Format OSD Activ...

Страница 26: ...arency menu Energy Mode CEC Control HDMI EDID Color Range Network Configuration Network Upgrade Local Dimming IMCP Enable Option Menu page2 of 2 This menu manages Setup functions including Quick Start...

Страница 27: ...e Menu Auto Scan will automatically build a list of the stations your TV can receive through the antenna or cable The scan process will typically take 5 to 10 minutes Signal Information Displays curre...

Страница 28: ...light the desired channel and Press enter The channel will be displayed Using the Addq button on the remote you can change the text name of the learned channel Using the Deletep button on the remote y...

Страница 29: ...9 Noise Reduction Press the qp buttons to highlight noise reduction press enter then use t u to select off weak middle strong or auto This setting is used to determine the level of digital artifacts t...

Страница 30: ...igital Output adjustment press enter then use t u to select PCM or Raw bitstream Use Raw only if the connected audio system can decode Dolby Digital This function operates only when TV is selected as...

Страница 31: ...et to default Sleep Timer Press the qp buttons to highlight Sleep Timer then use qp to select Off or 10 20 30 60 90 120 180 or 240 minutes The TV will turn off automatically after the selected time ha...

Страница 32: ...nu shown at left To change the password use the numeric keypad on the remote to enter the current password 0000 unless you previously changed it then enter the new password twice If you enter a new pa...

Страница 33: ...t u to select On or Off On will turn on the features in CEC control including ARC Audio Return Channel HDMI EDID Press the qp buttons to highlight the EDID Switch then use qp to select EDID 1 4 or EDI...

Страница 34: ...ork Configuration then use enter to select then enter or wired network Use t u DHCP Auto assigned or Static network IPv4 address Network Configuration reserved for future use Local Dimming Press the q...

Страница 35: ...control will not function to turn the TV on Power On Mode Press the qp buttons to highlight the Power On Mode then use t u to select on off or memory Power on Mode Off by default sets the TV to retur...

Страница 36: ...Floor This adjustment sets the level to which the backlight will be lowered when the ambient light level falls below the level set on the Backlight Sensor Floor adjustment below Press the qp buttons...

Страница 37: ...Media and press enter Select Music or Photo and press enter If a USB flash drive can be accessed by the TV it will display as shown press enter to select it If there is an issue accessing the USB fla...

Страница 38: ...icture Highligh a thumbnail and press to select photo After a photo is selected a slide show will begin showing all photos in the folder During playback a menu will appear at the bottom of the screen...

Страница 39: ...ue ID number of the TV main board IP Adress When properly connected to an ethernet wired network the IP V4 network address will display IP Adress Unique hardware address of the TV ethernet network por...

Страница 40: ...udio Make sure you have a 3 5 mm mini jack cable connected from your HDCP video device sound output to theTV sVGA stereo input If your HDCP video device uses RCA audio jacks you ll need to obtain an a...

Страница 41: ...cial outdoor formula LCD Cleaning Kit is now available and can be ordered from SunBriteTV 2 When the TV is not in use keep it covered with the SunBriteTV Outdoor Dust Cover The fitted dust cover is de...

Страница 42: ...Control ConcealedrearIRWindow IP Control OvrC Audio Out Digital OpticalTosLink x 1 fixed Analog 1 8 headphone jack variable Accessory DC Power Out 5vdc 3 5amps1 3mmpowerjackorusbtypeAjack 12vdc 3amps2...

Страница 43: ...RS232Serial DiscreteIRControl ConcealedrearIRWindow IP Control OvrC Audio Out Digital OpticalTosLink x 1 fixed Analog 1 8 headphone jack variable Accessory DC Power Out 5vdc 3 5amps1 3mmpowerjackorusb...

Страница 44: ...er to detailed data sheet for supported resolutions refresh color depth and Cat5e Cat 6 cable lengths Control Set RS232Serial DiscreteIRControl ConcealedrearIRWindow IP Control OvrC Audio Out Digital...

Страница 45: ...epth and Cat5e Cat 6 cable lengths Control Set RS232Serial DiscreteIRControl ConcealedrearIRWindow IP Control OvrC Audio Out Digital OpticalTosLink x 1 fixed Analog 1 8 headphone jack variable Accesso...

Страница 46: ...d in size when a LCD TV screen displays a pure red green or blue pattern Adjacent dots are pixels located directly next to each other Your SunBriteTV will be replaced under warranty if it meets one of...

Страница 47: ...ther end of the emitter to the appropriate control block Note it may be necessary to use a small amount of glue to secure the IR emitter in place as most IR emitters dual stick tape does not adhere we...

Страница 48: ...te ESC X 1B 58 X MUTE Vol Up ESC Y 1B 59 Y VOL Vol Down ESC Z 1B 5A Z VOL Channel Up ESC V 1B 56 V CH Channel Down ESC W 1B 57 W CH 1 ESC 1 1B 31 1 na 2 ESC 2 1B 32 2 na 3 ESC 3 1B 33 3 na 4 ESC 4 1B...

Страница 49: ...SunBriteTV Signature 2 Series 4K Ultra HD Operator s Manual Page 47...

Страница 50: ...www sunbritetv com...

Отзывы: