Page 12
TV Installation – Rear Panel Connections
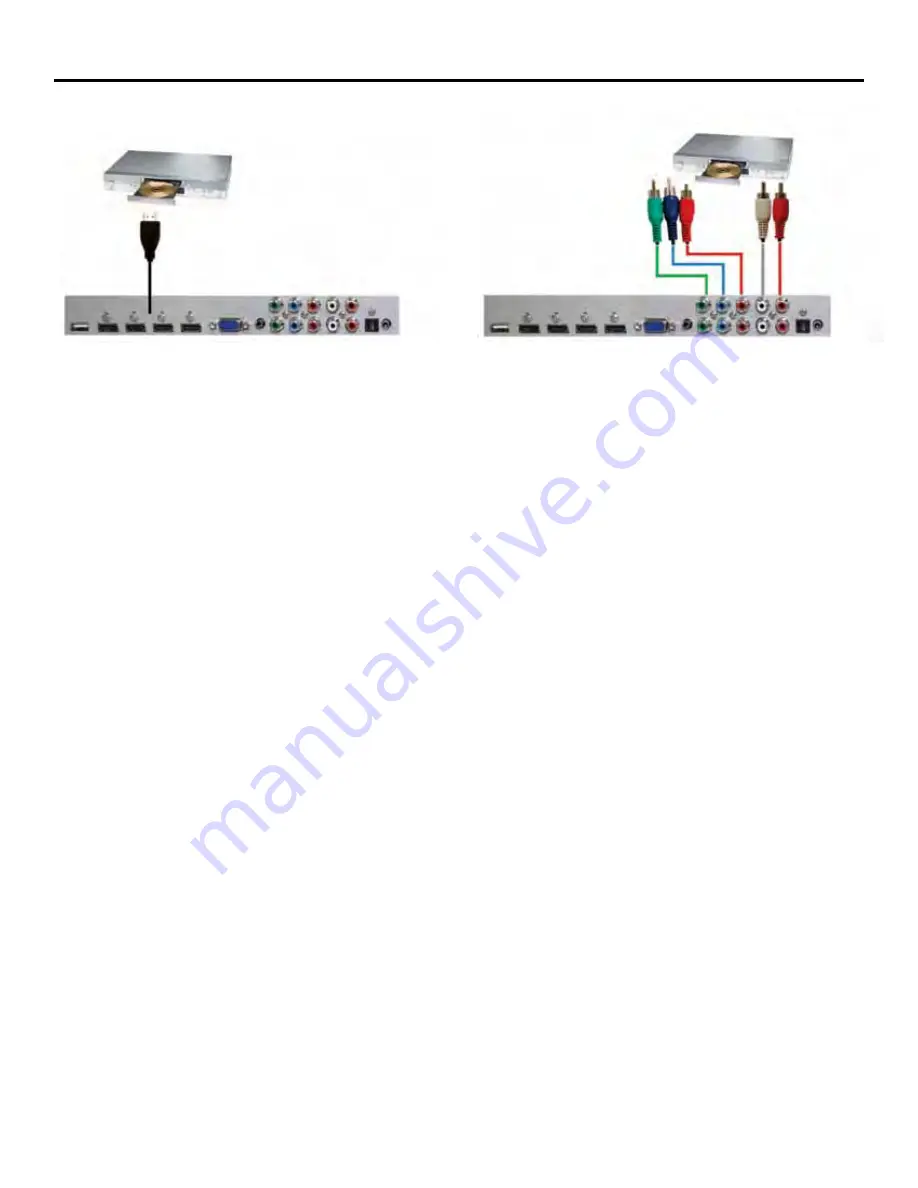
COnneCTing TO a DVD Player
1. Make sure the power of the TV and your DVD player is
turned off.
2. Connect a HDMI cable to the HDMI port of your DVD
player and the other end to the HDMI port off the back of
your TV.
3. Turn on the TV and your DVD player.
4. Use the remote control’s source button or the source
button on the TV to switch to HDMI.
Please Note :
Refer to the DVD player’s manual to make sure the DVD player
is configured to output correctly to the TV.
1. Make sure the power of TV and your DVD player is turned off.
2. With a Component Cable, connect the green connector to the
DVD player and Component 1’s green connector port on the TV.
3. Connect the blue color connector to your DVD player and
Component 1’s blue connector port on the TV.
4. Connect the red color connector to both your DVD player and
Component 1’s red connector port on the TV.
5. With an RCA Audio Cable, connect the white color connector to
both your DVD player and Component 1’s white connector port on
the TV.
6. Connect the red color connector to both your DVD player and
Component 1’s red connector port on the TV.
7. Turn on the TV and your DVD player.
8. Use the remote control’s source button or the source button on
the TV to switch to YPbPr.
Please Note :
1. If Component 1 is already occupied, please use Component 2 as
your connection port and switch to source YPbPr2.
2. Refer to the DVD player’s manual to make sure the DVD player
is configured to output correctly to the TV.
4. This TV will turn off automatically if there’s no signal present for
more than 15 minutes.
Connecting with HDmi (Best)
Connecting with
Component (Better)
Please Note :
1. Refer to the DVD player’s manual to make sure the DVD
player is configured to output correctly to the TV.
2. This TV does not decode Bit stream digital audio, so make
sure the DVD is setup for PCM digital audio through HDMI.
3. If HDMI 1 is occupied, use HDMI 2 as your connection port.
Содержание 4660HD
Страница 1: ...Owner s Manual Model 4660HD All Weather Outdoor LCD Television Revision M46 006 4660HD 111005 ...
Страница 18: ...Page 18 TV Installation Starting the TV ...
Страница 22: ...Page 22 On Screen Display Menu Video Menu ...
Страница 23: ...SunBriteTV Model 4660HD Operator s Manual Page 23 Adjusting On Screen Displays Video Menu ...
Страница 24: ...Page 24 Adjusting On Screen Displays Audio Menu AUDIO Menu ...
Страница 25: ...SunBriteTV Model 4660HD Operator s Manual Page 25 Adjusting On Screen Displays TV Menu TV Menu ...
Страница 26: ...Page 26 Adjusting On Screen Displays Set Up Set Up Menu ...
Страница 27: ...SunBriteTV Model 4660HD Operator s Manual Page 27 Adjusting On Screen Displays Set Up Menu Set Up Menu ...
Страница 28: ...Page 28 Adjusting On Screen Displays Set Up Menu Parental Menu Set Up Menu Parental Menu ...
Страница 29: ...SunBriteTV Model 4660HD Operator s Manual Page 29 Adjusting On Screen Displays Parental Menu Parental Menu ...
Страница 30: ...Page 30 Adjusting On Screen Displays Parental Menu Parental Menu ...
Страница 32: ...Page 32 Closed Captioning ...
Страница 33: ...SunBriteTV Model 4660HD Operator s Manual Page 33 Shortcuts to Browsing Channels ...
Страница 34: ...Page 34 Shortcuts to Browsing Channels ...
Страница 35: ...SunBriteTV Model 4660HD Operator s Manual Page 35 Preset Modes Explained ...
Страница 36: ...Page 36 TROUBLESHOOTING ...
Страница 37: ...SunBriteTV Model 4660HD Operator s Manual Page 37 TROUBLESHOOTING ...
Страница 38: ...Page 38 ...
Страница 43: ...SunBriteTV Model 4660HD Operator s Manual Page 43 This page is left blank intentionally ...
Страница 44: ...www sunbritetv com ...


