background image

6

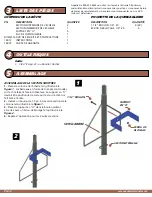
Wire Loop

Tie-Off Rope

7

8


INSTALLATION

1.  

Prior to hanging any Climbing Aid, the use of a Full Body Fall Arrest Harness System 

is required using the Lineman’s Belt included with the FBFAHS.  

The FBFAHS is NOT included with this product but it is REQUIRED for installation, 
removal and use of this product.  If you do not have a FBFAHS, do not use this 
product.  Failure to properly attach and use a FBFAHS from the moment you leave 
the ground until you return to the ground could lead to serious injury or death.

2.  

Select a straight, healthy tree without any obstructions (branches or limbs).

3.  

Two (2) or more able adults are required when attaching climbing aid to a tree. 

4.  

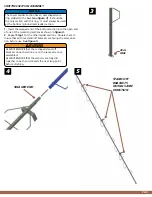
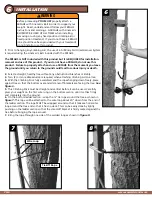
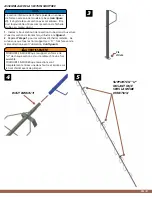
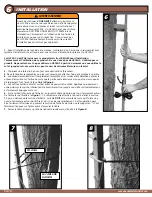
With the Climbing Stick fully assembled and the ropes hanging down freely, place 

against tree so that the bottom oval and all stand-off brackets are facing the tree. 

See 

figure 6.

5.  

This Climbing Stick must be straight and vertical before it can be used. Carefully 

press your weight on the first wire rung on the bottom section until it settles firmly 
and completely into the ground.

6.  

On the bottom ladder section - wrap the ¼” tie rope around the tree as shown in 

figure 7.

 This rope will be attached to the wire loop about 20” down from the end of 

the ladder section. The rope MUST be wrapped around so that it makes a horizontal 
loop around the tree and so that it has no slack. This can be easily done by lightly 
pushing on the ladder section so that the stand-off bracket is firmly seated against the 
tree before bringing the rope around.

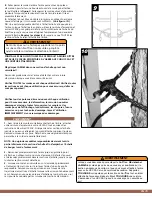
7.  

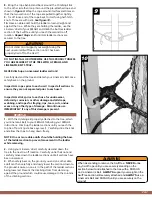
Bring the rope through one side of the welded loop as shown in 

figure 8.

WARNING

!

Before proceeding 

YOU MUST

 properly attach a 

FBFAHS with Lineman’s Belt in order to support your 
weight.  Read, understand and follow your FBFAHS 
instructions and warnings.  A FBFAHS with Lineman’s 
Belt MUST BE USED AT ALL TIMES when installing, 
removing or using any fixed position climbing aid or 
fixed position treestand.  If you do not have a FBFAHS 
(one should have been provided with your treestand) 
do not install or use this product.

PG 6

www.summitstands.com

Содержание SwifTree SU82051

Страница 1: ...USPENSION IN A HARNESS CAN BE FATAL IT IS IMPORTANT TO EXERCISE THE LEGS BY PUSHING AGAINST THE TREE OR DOING OTHER FORMS OF CONTINUOUS LEG EXERCISES TO AVOID BLOOD POOLING WHILE BEING SUSPENDED HUNTE...

Страница 2: ...T ELEVATED POSITIONS REPLACE ALL ROPES EVERY THREE 3 YEARS OR SOONER IF INSPECTION FINDS FRAYING LOSS IN COLOR OR A WEAK KNOT SWIFTREE ONLY DO NOT TRIM ANY TREE BRANCHES OR BREAK OFF ANY BRANCHES WHIL...

Страница 3: ...ING LABEL WARNING DO NOT REMOVE ANY WARNING LABELS FROM THE PRODUCT 260 lb Rated Climbing Aid SU82051 SwifTree Stand Minimum and Maximum Tree Size 8 20 Diameter ALL MODELS Weight Limits includes hunte...

Страница 4: ...oes not play Tools 7 16 Wrench Socket with Ratchet STANDOFF ASSEMBLY 1 Position the ladder column as shown in figure 1 The triangle shaped rungs are welded on the side facing the user The stand off br...

Страница 5: ...WARNING ALWAYS ENSURE that the U shaped stand off brackets on each section are on the same side once assembled ALWAYS ENSURE that the sections are fully slid together so each end contacts the rivet s...

Страница 6: ...arefully press your weight on the first wire rung on the bottom section until it settles firmly and completely into the ground 6 On the bottom ladder section wrap the tie rope around the tree as shown...

Страница 7: ...ully untie the knot and allow the rope to hang down freely NOTE One or more able adults should be holding the base of the ladder section to prevent movement in the ladder while removing 2 Using your L...

Страница 8: ...warranty period This warranty shall not apply to any product which has been subjected to misuse misapplication neglect including but not limited to improper maintenance accident improper installation...

Страница 9: ...SONNE N EST AU COURANT DE VOTRE EMPLACEMENT DE CHASSE ET QUE LA COMMUNICATION EST INFRUCTUEUSE VOUS DEVEZ AVOIR UN PLAN PERSONNEL POUR R CUP RER OU VOUS LIB RER AVANT L ASCENSION DANS L ARBRE UNE SUSP...

Страница 10: ...EZ JAMAIS CE PRODUIT EN FAISANT DES R PARATIONS EN REMPLA ANT DES PI CES EN LE MODIFIANT EN Y AJOUTANT OU EN Y ATTACHANT DES PI CES SAUF SI LE MANUFACTURIER LE RECOMMANDE PAR CRIT PRATIQUEZ L INSTALLA...

Страница 11: ...TS OU LES TIQUETTES INDIQUANT LES COMPOSANTES DES PRODUITS SUR LE MIRADOR AVERTISSEMENT Vous devez galement visionn le DVD ci joint AVANT d utiliser votre nouveau mirador LIMITE DE POIDS LIMITE DE POI...

Страница 12: ...ace l utilisateur Le support en U devrait tre positionn de sorte qu il est sur le c t qui fait face l arbre 2 Ins rez un boulon de 1 5 po travers la section de la colonne tel qu illustr la figure 1 3...

Страница 13: ...e de l chelle poss de un anneau de forme ovale en acier soud la base voir figure 3 Il s agit de la seule section avec cet anneau Elle doit toujours tre utilis e comme section de l chelle du bas au niv...

Страница 14: ...oir tre utilis Appliquez prudemment votre poids sur la marche inf rieure de la premi re section jusqu ce qu elle soit compl tement et fermement appuy e sur le sol 6 Sur la section inf rieure de l chel...

Страница 15: ...permettre la corde de pendre librement NOTE Un ou plusieurs adultes responsables devraient tenir la partie inf rieure de la section d chelle afin d emp cher l chelle de bouger lors de l enl vement 2...

Страница 16: ...es modifications ou transformations ses produits en tout temps qui selon son opinion pourrait am liorer la performance et l efficacit du produit Summit n est pas oblig de faire ces modifications ou tr...

Отзывы: