background image

13

ENGLISH 


www.sulion.es

ATC: 

916749481 - [email protected]  /  

SAT :

 916749483 - [email protected]

Remote control

Instructions for synchronizing the 

receiver and the remote control

The control is already factory-linked with its receive. 

Make sure all connections are correctly made.

Make sure that the remote control contains batteries.

Make sure that all switches (main and isolation) are on.

The control of this fan have two mode of synchronization, 

Universal mode and Unit mode:

- Unit Mode:

This type of synchronization allows you to control two or 

more nearby fans independently, each with its remote con-

trol.

Synchronization:

The control of this fan does not require synchronization 

with the receiver, the control is already factory-linked with 

its receiver

- Universal Mode:

This type of synchronization allows you to control one or 

more nearby fans with the same remote control.

Synchronization:

1.-Connect the power (wall switch) of the fan or fans that 

you want to control, and then just within the following

15 seconds, press the key    &    of the remote control 

for 10 continuous seconds.

2.-A “beep” sound indicates that the connection has been 

executed and the equipment can function normally.

3.-Now, transmitter and receiver of the fan / s will have 

been synchronized. Turn off the fan / s current using the

switch or automatic and then turn it back on / s, this step 

is the one that closes the synchronization process.

It is not possible for a controller to forget a fan once it has 

been linked, if you want a fan to leave

to obey a command, another one must be linked to 

“overwrite it”.

Preparing for installation

Note: 

The estimated installation time is 120 minutes. This 

product can only be installed by a certified electrician Ca-

refully separate the fan’s parts, avoiding the use of cutters 

or blades that could scratch any part of it.

Remove the fan from the packaging carefully, avoiding the 

use of knives which could scratch any part of it.
Remove all the components. Place the motor on a cloth or 

wet surface so as not to damage its surface finish. Carefully 

handle the unit to make sure that its casing does not bend 

or get scratched.
The fan must be mounted on the floor or a large enough 

table to prevent any component from falling off.

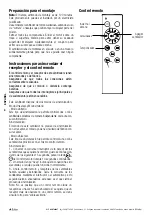
Timer

Turn off

the fan

Speeds

Summer

/ Winter

Содержание MERIDA 075695

Страница 1: ...deos instrucciones y una gu a de preguntas frecuentes In the event of any questions incidents or missing parts before consulting with your retailer call our customer service department at 916749481 em...

Страница 2: ...2 ESPA OL Calle Verano 51 Pol gono Industrial Las Monjas 28850 Torrej n de Ardoz Madrid ESPA A CIF A28763647 34 916774540...

Страница 3: ...3 ESPA OL www sulion es ATC 916749481 info sulion es SAT 916749483 sat sulion es...

Страница 4: ...06 EN T l chargez le guide de l utilisateur sur notre site Web sulion es ean 8426107026606 FR Baixe o guia do usu rio em nossa web sulion es ean 8426107026606 PT DE Laden Sie die Bedienungsanleitung i...

Страница 5: ...arantizar total aislamiento del suministro el ctrico Espa ol 05 English 11 Instalaci n del ventilador Fan installation 16 ndice Indice Index1 Componentes Parts Repuestos Spares Herramientas requeridas...

Страница 6: ...y deben ser aportados por el usuario que cuida y disfruta de este ventilador La instalaci n debe de ser realizada por personal cualificado para realizar instalaciones el ctricas de acuerdo a la norma...

Страница 7: ...IP20 Temperatura de trabajo 5 40 C Inclinaci n m xima del techo en el que se puede instalar 15 Peso 7 1Kg Consumo de energ a en modo de espera W 0 5 Norma de medici n del valor de servicio EN 62879 2...

Страница 8: ...entro de los siguientes 15 segundos pulsar la tecla del control remoto durante 10 segundos continuados 2 Un sonido de tipo beep indica que la conexi n ha sido ejecutada y el equipo puede funcionar nor...

Страница 9: ...do tal y como se explica a continuaci n 3 Encienda el ventilador en la velocidad m s alta para que se produzca mayor balanceo 4 Apague el ventilador Seleccione un aspa y coloque el clip ver figura en...

Страница 10: ...alejado del agua y la humedad pues en caso contrario perder su garant a El sistema de anclaje del soporte del ventilador al techo depender del tipo de techo en el que se realiza la insta laci n La dec...

Страница 11: ...acket must be attached to a ceiling structure that is capable of supporting a minimum of 30 kg using the two screws provided At least 30 mm of the length of the screws must be screwed into the bracket...

Страница 12: ...in standby mode W 0 5 Service value measurement standard EN 62879 2020 Fan Speed 6 Power W 40 RPM 175 Airflow m min 200 Airflow m h 12000 Max noise level dB 45 Service value SV m min W 5 Maximum air...

Страница 13: ...te control for 10 continuous seconds 2 A beep sound indicates that the connection has been executed and the equipment can function normally 3 Now transmitter and receiver of the fan s will have been s...

Страница 14: ...to the highest speed so that the greatest amount of wobbling is produced 2 Turn off the fan Select a blade and place a clip on it see diagram halfway between the fastening and the far edge of the blad...

Страница 15: ...supplier does not assume any liability for physical or bodily damage caused by the in correct use or installation of the fan If you are unsure consult an electrician Wobbling All ceiling fans tend to...

Страница 16: ...16 Calle Verano 51 Pol gono Industrial Las Monjas 28850 Torrej n de Ardoz Madrid ESPA A CIF A28763647 34 916774540 Instalaci n ventilador Fan installation 1 2 3 2 1 1 2 3 OFF 03 04 02 01 05 06 07...

Страница 17: ...17 www sulion es ATC 916749481 info sulion es SAT 916749483 sat sulion es 1 2 70 NO INCLUIDOS NOT INCLUDED Green Yellow B la c k Brown Blue G re e n Y e ll o w W h it e Click 1 2 09 11 12 08 10...

Страница 18: ...18 Calle Verano 51 Pol gono Industrial Las Monjas 28850 Torrej n de Ardoz Madrid ESPA A CIF A28763647 34 916774540 ON ON 1 2 3 15 13 14...

Страница 19: ...uredinaccordancewiththefollowingEuropean standards DECLARACI N DE CONFORMIDAD CE DECLARATION OF CONFORMITY Madrid 05 11 2021 C Schuller CEO RED 2014 53 EU Article 3 1a EN 60335 1 2012 A11 2014 A13 201...

Страница 20: ...www sulion es...

Отзывы: