

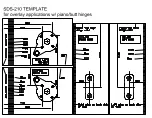

Inset Single Knuckle(Piano, Butt, etc) Hinge
Overlay Concealed Hinge(Euro Hinge) Installation
Overlay Single Knuckle(Piano, Butt, etc) Hinge
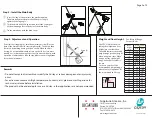
SDS-210 Installation
For Top Opening Door
Step 1 - Position and Install Mounting Plates
The hinge type and the coverage affect the placement of the mounting plate and arm
fixing plate. Please use the corresponding diagram(Fig. 1 ~3) to determine the mounting
dimensions for your application. Position and install mounting plate and arm fixing plate
using supplied screws.
Fig. 1
Fig. 2
Fig. 3
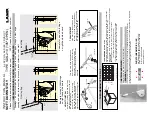
* Steps 2~3 continued on following page
Page 1 of 2
Before installation, please check the Door Weight Range Table on page 2
to determine if the SDS-210 is the correct stay for the size and weight door.
13/32”
(10.5mm)
B
1-17/64” (32mm)
Arm Fixing Plate
Mounting Plate
D
oor Back E
dge
Door
Back B
oar
d
Side Board
Back B
oar
d
Door
Arm Fixing Plate
A
13/32” + Overlay
(10.5mm + Overlay)
Door Side Edge
E
G
D
13/32”
(10.5mm)
1-17/64” (32mm)
Arm Fixing Plate
H
inge C
en
ter
Back B
oar
d
Side Board
Back B
oar
d
Door
Arm Fixing Plate
13/32” + Overlay
(10.5mm + Overlay)
Door Side Edge
A
B
Mounting Plate
E
G
D
13/32”
(10.5mm)
1-17/64” (32mm)
Arm Fixing Plate
Door
Side Board
Door
Arm Fixing Plate
Hinge Center
3/4”
(19mm)
A
B
Mounting Plate
E
G
D
105
1-11/32” (34.2mm) 2-3/16” (55.8mm)
2-13/16” (71.8mm)
3-9/16” (90.2mm)
A
B
D
G
E
4-5/8” (117.5mm)
1-19/64” (32.8mm) 2-1/4” (57.2mm)
2-15/32” (62.9mm)
3-1/32” (77.1mm)
A
B
D
G
E
4-1/4” (108.3mm)
G
1-5/16” (33.1mm)
2-1/4” (57mm)
3-1/8” (79.3mm)
3-47/64” (94.7mm)
A
B
D
G
E
4-7/8” (123.5mm)
Содержание LAMP Lapcon SDS-210
Страница 5: ......


