background image

3

1010

412

456

100

16

54

63

130

580 / 680 / 780

55

93

66

70

63

10 cm

10

8

7

7

7

2,5

3

5

10

ph 2

0,4 x 2,5

2

1

3

4

5

6

7

8

9

10

11

12

13

14

15

16

17

18

19

2

1

3

4

5

6

7

8

9

10

11

10 cm

10

8

7

7

7

2,5

3

5

10

ph 2

0,4 x 2,5

2

1

3

4

5

6

7

8

9

10

11

12

13

14

15

16

17

18

19

2

1

3

4

5

6

7

8

9

10

11

10 cm

10

8

7

7

7

2,5

3

5

10

ph 2

0,4 x 2,5

2

1

3

4

5

6

7

8

9

10

11

12

13

14

15

16

17

18

19

2

1

3

4

5

6

7

8

9

10

11

10 cm

10

8

7

7

7

2,5

3

5

10

ph 2

0,4 x 2,5

2

1

3

4

5

6

7

8

9

10

11

12

13

14

15

16

17

18

19

2

1

3

4

5

6

7

8

9

10

11

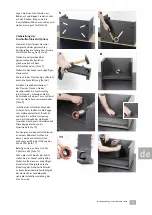
Arrivée d'air pour la combustion

Le foyer a besoin d'air pour la 
combustion. 

Lors de l'installation avec le kit 
d'arrivée d'air extérieur [photo 1], 
contrôler les axes de d'arrivée à l'aide 
des cotes [schéma 2]. Le kit d'arrivée 
d'air ne pourra pas être installé sans 
redémonter le foyer.

Veiller à ne pas écraser le conduit lors 
du montage.

PRÉPARATION DU CHANTIER

1

2

Capacité portante de la structure

S'assurer que la résistance du plancher 
est suffisante pour supporter le foyer 
et sa base ; en cas de doute, consulter 
un spécialiste.

fr

7 & 13

Torx 10 & 20

Outils à prévoir

instruction - installation base Stûv 16-H - 0710

Содержание 16-H

Страница 1: ...instalaci n insta la o instalace installation installatie installazione instalaci n instala o instalace installation installatie installazione instalaci n instala o instalace installation installatie...

Страница 2: ...us les r glements locaux et nationaux et toutes les normes nationales et europ ennes Les bases sont compatibles avec les 16 cube partir des num ros de s rie suivants 16 58 cube partir du n 90817 16 68...

Страница 3: ...rriv e d air ext rieur photo 1 contr ler les axes de d arriv e l aide des cotes sch ma 2 Le kit d arriv e d air ne pourra pas tre install sans red monter le foyer Veiller ne pas craser le conduit lors...

Страница 4: ...liers de serrage 4 crous M4 D ballage instruction installation base St v 16 H 0710 Pr paration du socle de pr pose et de la base du St v 16 cube D baller le St v 16 cube voir pages 8 9 notice d instal...

Страница 5: ...r le collier de serrage autour du flexible Ins rer le buselot dans le flexible jusqu but e l aide de la cl de 7 visser le collier pour solidariser l ensemble photo 9 Dans le cas d une arriv e d air pa...

Страница 6: ...oto 2 Fixation des pattes de liaison foyer plateau de pr pose l aide des vis M5x12 t te hexagonale visser les 2 pattes de liaison avant gauche et droit photo 3 D serrer les 2 pattes de liaison arri re...

Страница 7: ...sup rieure du capot doit tre solidaris e avec le foyer un verrou est pr vu cet effet photos 3 4 d bloquer la vis hexagonale du verrou photo 3 le faire pivoter de 3 4 de tour photo 4 et rebloquer la vi...

Страница 8: ...nale reglementeringen en alle nationale en Europese normen De onderstellen passen bij de 16 cube die beginnen met de volgende serienummers 16 58 cube vanaf nr 90817 16 68 cube vanaf nr 95166 16 78 cub...

Страница 9: ...t foto 1 de inlaatassen met behulp van de maataanduidingen schema 2 De luchttoevoerkit zal niet kunnen worden ge nstalleerd zonder de haard weer te demonteren Let op dat de buis niet platgedrukt wordt...

Страница 10: ...Voorbereiding van de bodemplaat en het onderstel van de St v 16 cube Neem de St v 16 cube uit de verpakking zie pagina s 8 9 van de installatiehandleiding van de 16 cube Neem de bodemplaat en de 4 ve...

Страница 11: ...mondstuk in de flexibele buis aan tot aan de aanslag Schroef met behulp van een sleutel nr 7 de buisklem vast zodat het geheel netjes aansluit foto 9 In het geval van een luchttoevoer via de achterka...

Страница 12: ...ing van de verbindingspoten haard bodemplaat Schroef met behulp van de schroeven M5x12 met zeskante kop de 2 voorste verbindingspoten links en rechts vast foto 3 Schroef de 2 achterste verbindingspote...

Страница 13: ...e voorzien foto s 3 en 4 deblokkeer de zeskantschroef van de grendel foto 3 maak een 3 4 draai en zet opnieuw vast foto 4 Uitlijning van de kap van de haard met het onderstel Controleer de afstelling...

Страница 14: ...erfolgen Die Sockel sind f r die Modelle ab den folgenden Seriennummern geeignet 16 58 cube ab Nr 90817 16 68 cube ab Nr 95166 16 78 cube ab Nr 81637 Die Montage des Sockels muss vor dem eigentlichen...

Страница 15: ...tzufuhrset Foto 1 anhand der angegebenen Ma e Schemazeichnung 2 die Achsen der Luftzufuhr Ein sp terer Einbau des Luftzufuhrsets ist nur mit einer Demontage des Kaminofens m glich Achten Sie darauf da...

Страница 16: ...2 Rohrschellen 4 Muttern M4 Auspacken 1 2 3 4 Vorbereitung der Bodenplatte und des Sockels f r den St v 16 cube Packen Sie den St v 16 cube aus siehe Seite 8 und 9 der Installationsanleitung des St v...

Страница 17: ...m Anschlag in das Flexrohr Schrauben Sie die Rohrschelle mit einem 7 mm Schl ssel fest um die Teile zusammenzuhalten Foto 9 Im Falle einer Luftzufuhr durch den hinteren Teil erhalten Sie die Kappe vom...

Страница 18: ...auf die Bodenplatte Foto 2 Befestigung der Bodenplatte Kaminofen Verbindungsst cke Schrauben Sie die 2 Verbindungsst cke links und rechts mit den Sechskantschrauben M5 x 12 fest Foto 3 Lockern Sie di...

Страница 19: ...rkleidung wird mithilfe einer Verriegelung am Kaminofen fixiert Foto 3 und 4 Lockern Sie die Sechskantschraube der Verriegelung Foto 3 Drehen Sie den Riegel um 270 Foto 4 und ziehen Sie die Schraube w...

Страница 20: ...ompatible with the 16 cube from the following serial numbers 16 58 cube from no 90817 16 68 cube from no 95166 16 78 cube from no 81637 This base has to be installed before the installation of the sto...

Страница 21: ...ck the inlet axes using the reference measurements diagram 2 The air inlet kit cannot be installed without dismantling the stove Ensure you do not crush the duct during assembly PREPARATION OF THE ARE...

Страница 22: ...rs 4 M4 nuts Unpacking Preparation of the support plate and the base of the St v 16 cube Unpack the St v 16 cube see pages 8 and 9 of the installation instructions for the 16 cube Take the support pla...

Страница 23: ...llar around the flexible tubing Insert the union into the flexible tubing up to the stopper Using the size 7 key screw the collar to connect the unit photo 9 In case of back airflow recover the cap yo...

Страница 24: ...rt plate photo 2 Attachment of the link lugs stove support plate Using the M5x12 screws with hexagonal heads screw in the 2 link lugs at the front left and right photo 3 Untighten the 2 link lugs at t...

Страница 25: ...tove a bolt is provided for this purpose photos 3 4 remove the hexagonal screw from the bolt photo 3 swivel it 3 4 of a turn photo 4 and retighten the screw Alignment of the cover of the stove with th...

Страница 26: ...e standarder nationella och europeiska De olika baserna r kompatibla med 16 cube fr n f ljande serienummer 16 58 cube fr n no 90817 16 68 cube fr n no 95166 16 78 cube fr n no 81637 Denna bas m ste in...

Страница 27: ...trollera placeringarna av intagsaxlarna med h nvisade m ttangivelser diagram 2 Tilluftsanslutningskitet kan inte installeras utan att demontera kaminen f rst Se till att inte krossa kanalen under mont...

Страница 28: ...flexibelt r r 2 kl mringar 4 M4 muttrar Uppackning F rberedelse av st dplattan och basen f r St v 16 cube Packa upp ST V 16 cube se sidor 8 och 9 i monteringsanvisningen f r 16 cube Ta st dplattan oc...

Страница 29: ...tt in unionen i det flexibla r ret fram till gummiringen Anv nd storlek 7 nyckeln och skruva t kl mringen f r att ansluta enheten bild 9 Om tilluften tas bakifr n ta locket som du tog bort fr n basen...

Страница 30: ...kaminen p st dplattan bild 2 Fasts ttning av link lugs kamin st dplatta Anv nd M5x12 skruvar med sexkantiga huvuden f r att skruva i de 2 link lugs l ngst fram v nster och h ger bild 3 Lossa de 2 link...

Страница 31: ...pan m ste anslutas med kaminen en bult tillhandah lls f r detta endam l bild 3 4 ta bort den sexkantiga skruven fr n bulten bild 3 vrid den varv bild 4 och dra t skruven Inriktning av k pan med basen...

Страница 32: ...alaci n insta la o instalace installation installatie installazione instalaci n instala o instalace installation installatie installazione instalaci n instala o instalace installation installatie inst...

Отзывы: