Studebaker SB6055 Скачать руководство пользователя страница 9


E-8 

CONNECTING TO A COMPUTER FOR RECORDING 

 
Before getting start, please install the “ AUDACITY ” recording software to your computer. 
Below is an example using a computer with Microsoft XP and the Audacity software 
installed. For other Windows OS or Mac OS, please visit Audacity website for details. 

http://audacity.sourceforge.net/ 
 
INSTALLING THE AUDACITY SOFTWARE


1.    Insert the Audacity disc (included) into the CD drive of your computer. 
2.    Click on “MY COMPUTER” on the desktop. 
3.    Double click “CD DRIVE” drive to view the contents of the CD and select “Windows” 
under “Audacity” folder. 
4.    Open “Windows” folder and select “Audacity 2.0.3 (Windows 2000, XP, Vista, 7, 8)”. 
5.    Double click the Audacity set up icon with file name “audacity-win-2.0.3” to install the 
 

Audacity software according to the instructions. Please read license agreements of     

Audacity   before installation. 

 
NOTE: 

Free software (AUDACITY) licensed under the GNU general public license (GPL). 
More information as well as open source code can be found on the provided CD or on 
the website at: http://audacity.sourceforge.net/ 


INSTALL THE USB DRIVE   

1.  Use the included USB cable to connect the turntable to your computer. 
2.  Your computer will detect the SB6055 as “USB PnP Audio Device” and start to install 

USB drivers for it automatically. 

3.  Wait until your computer shows a pop up a message that it is installed properly and 

ready to use.   


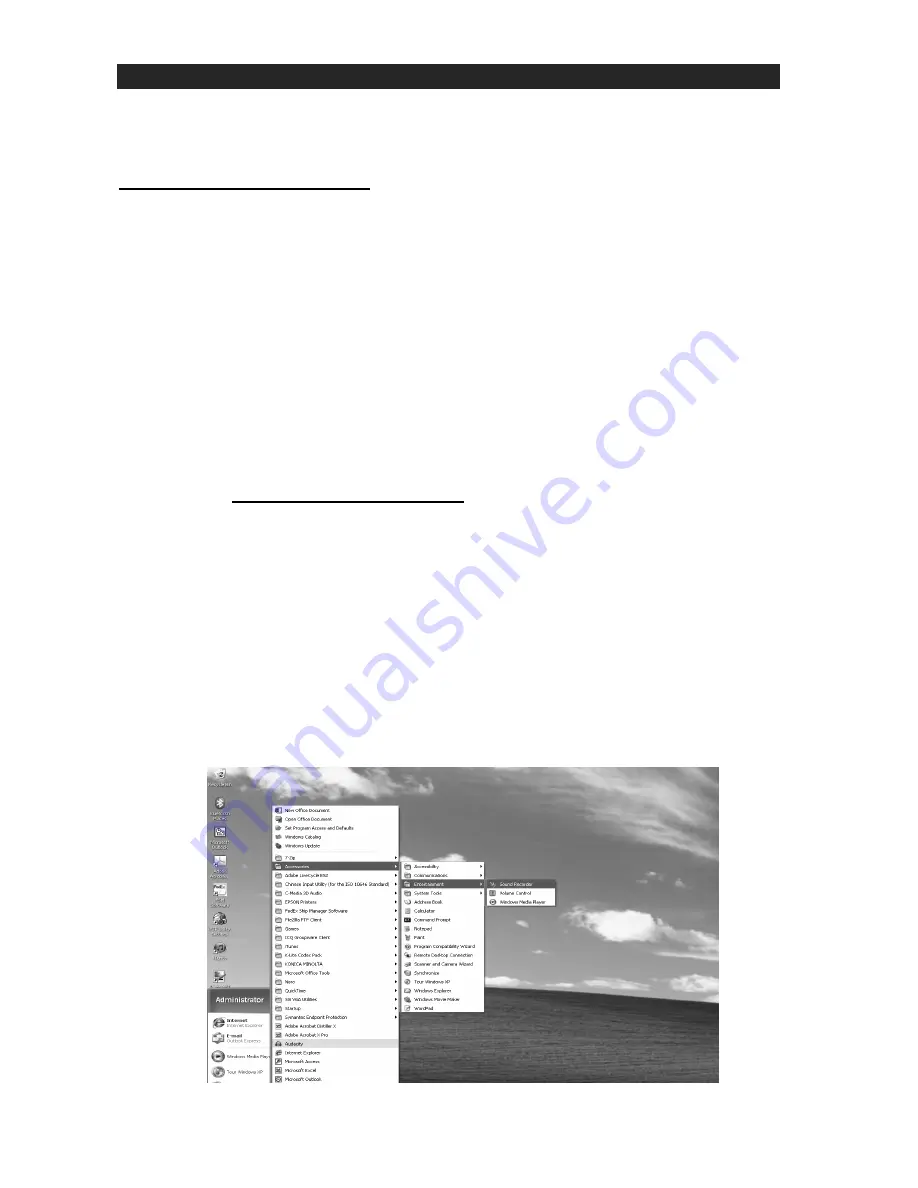
SET RECORDING INPUT LEVEL (USE WINDOWS XP COMPUTER) 

1.  Click the “Start“ in the left corner of your computer 
2.  Select “All Programs“ 

 “Accessories”


“Entertainment“

 “Sound Recorder“ to 

open the sound record interface. 


Содержание SB6055

Страница 1: ......

Страница 2: ...third grounding prong The wide blade or the third prong is provided for your safety If the provided plug does not fit into your outlet consult an electrician for replacement of the obsolete outlet 10 Protect the power cord from being walked on or pinched particularly at plugs convenience receptacles and the point where they exit from the apparatus 11 Only use attachments accessories specified by t...

Страница 3: ...is damaged b If liquid has been spilled or objects have fallen into the product c If the product has been exposed to rain or water d If the product does not operate normally by following the operating instructions Adjust only those controls that are covered by the operating instructions as an improper adjustment of other controls may result in damage and will often require extensive work by a qual...

Страница 4: ... digital device pursuant to Part 15 of the FCC Rules These limits are designed to provide reasonable protection against harmful interference in a residential installation This equipment generates uses and can radiate radio frequency energy and if not installed and used in accordance with the instructions may cause harmful interference to radio communications However there is no guarantee that inte...

Страница 5: ...r without annoying blaring or distortion and most importantly without affecting your sensitive hearing Sound can be deceiving Over time your hearing comfort level adapts to higher volumes of sound So what sounds normal can actually be loud and harmful to your hearing Guard against this by setting your equipment at a safe level BEFORE your hearing adapts To establish a safe level Start your volume ...

Страница 6: ... USB Port on your computer via the USB cable provided 2 Please refer to CONNECTING TO A COMPUTER FOR RECORDING section of this manual for details LOCATION OF CONTROLS 1 FM STEREO INDICATOR 2 POWER LED INDICATOR 3 PWR VOL ON OFF SWITCH 4 FUNCTION SELECTOR 5 TUNING KNOB 6 DIAL POINTER 7 TURNTABLE SHAFT 8 TURNTABLE PLATTER 9 45 RPM ADAPTER 10 LIFT LEVER 11 TONE ARM REST 12 AUTO STOP SWITCH 13 33 45 7...

Страница 7: ...RM REST 11 prior to operating Lock the TONE ARM 15 in place again when not in use 1 Rotate the FUNCTION SELECTOR 4 to select the PHONO position 2 Raise the turntable DUST COVER 16 3 Place a record on the TURNTABLE PLATTER 8 use the 45 RPM ADAPTER 9 if required 4 Set the SPEED SELECTOR 13 to the proper position depending on the record to be played 5 Lift the TONE ARM 15 from the TONE ARM REST 11 by...

Страница 8: ... external device is connected then you may need to adjust both the volume control of your external device and the volume control of this system to find the most desirable volume setting 2 Slide the POWER ON OFF SWITCH 3 to turn off the system when you finish listening Don t forget to switch off the power on your external device as well LINE OUT CONNECTION You can connect this unit to an external H...

Страница 9: ...on with file name audacity win 2 0 3 to install the Audacity software according to the instructions Please read license agreements of Audacity before installation NOTE Free software AUDACITY licensed under the GNU general public license GPL More information as well as open source code can be found on the provided CD or on the website at http audacity sourceforge net INSTALL THE USB DRIVE 1 Use the...

Страница 10: ...t USB PnP Audio Device as Default device of sound recording 5 Click the Volume button under the Sound recording tab to open Recording Control interface 6 Adjust the line in volume to a level without distortion You can play a record on the turntable and use the Sound Recorder to record a short clip of music for testing The sound wave will show on the interface screen when recording ...

Страница 11: ...ttp audacity sourceforge net 1 Run the Audacity software from the Windows start menu or double click the Audacity icon on your computer desktop 2 The Audacity main screen appears You will find the Record Play Pause Stop Skip to Start and Skip to End control buttons here Use the File Edit View Transport Tracks Generate Effect and Analyze menus from your computer screen to Save Export or Edit the mu...

Страница 12: ...e sure the USB Turntable is connected then re start Audacity Software and try again 4 Adjust the input and output volume by sliding the Input and Output Volume bars 5 Click the record button to start recording left and right tracks will show on your computer screen If you cannot see the sound waves appear on the Interface when recording adjust the Input volume bar Output Volume Input Volume ...

Страница 13: ...ode your recorded music to MP3 format you need to click the Download in POP UP window to download the LAME MP3 encoder either in the CD provided or under the page Other Audacity Downloads for Windows from the website http audacity sourceforge net INSTALL THE MP3 ENCODER 1 Insert the included CD into your computer and select Audacity 2 0 Windows 2000 XP Vista 7 8 under Windows folder 2 Open the fol...

Страница 14: ...mage the finish of your unit CAUTION Never allow any water or other liquids to get inside the unit while cleaning TROUBLESHOOTING GUIDE SHOULD YOU EXPERIENCE DIFFICULTIES IN THE USE OF THIS PLAYER PLEASE REFER TO THE FOLLOWING CHART OR CALL CUSTOMER SERVICE PROBLEM POSSIBLE CAUSE SOLUTION AC power cord is not plugged into a wall outlet or the connector is not plugged into the power supply jack on ...

Страница 15: ...lure to provide reasonable care and necessary maintenance as outlined in the user manual 3 Warranty of all SPECTRA products applies to residential use only and is void when products are used in a nonresidential environment or installed outside the United States This warranty gives you specific legal rights and you may also have other rights which vary from state to state TO OBTAIN SERVICE please r...

Отзывы: