STT Condigi CareCom IP Скачать руководство пользователя страница 11

11

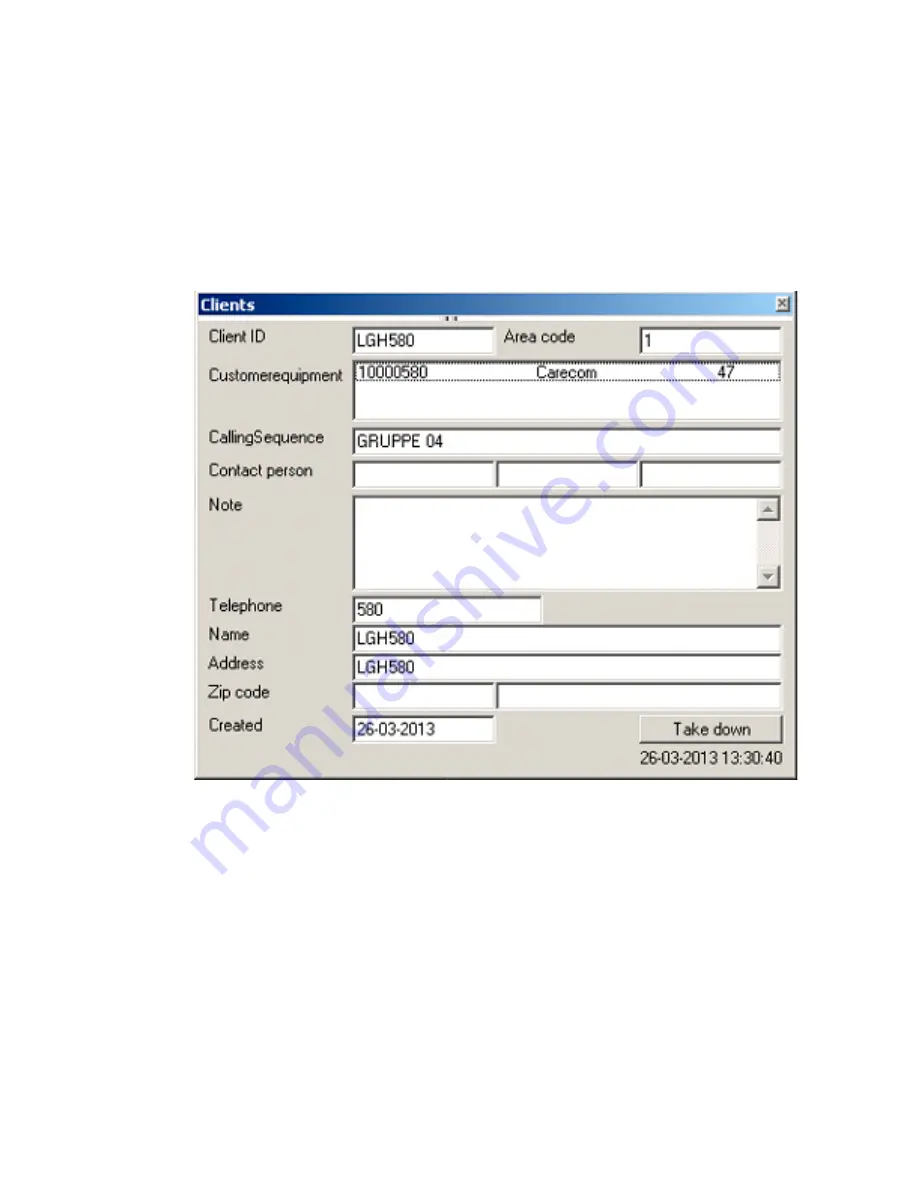
7. Create new “Customer Equipment” and drag the newly created  

  “Customer Equipment List” into the field “Customer Equipment”.

8. Drag the correct “Call Sequence” to the field “Calling Sequence”.

9. Type in the “Extension Number” into the field “Telephone”.

10. Type “Name” and “Address” of the new CareCom IP

11.  Click the menu “Save” to save the changes.

Содержание CareCom IP

Страница 1: ...CareCom IP K1122 Installation Guide STT Condigi Agnesfridsv gen 113 A 212 37 Malm Sweden...

Страница 2: ...t default EE 5 3 Mounting 5 4 Power Supply and Connection to Network 6 4 1 Power Supply and Network Cable 6 4 2 Connection 6 5 How to add a CareCom IP Room Unit to the Swan CareCom System 7 5 1 Config...

Страница 3: ...a display with the possibility to view active alarms If viewing alarms is activated it is possible to acknowledge the alarms and to establish a 2 way conversation between the CareCom IP and the devic...

Страница 4: ..._________ ESC ENT 2 2 The Buttons Functions in Programming Mode Below the display you will find four buttons which are used for pro gramming The four buttons are Escape back Up Down Enter forward 2 3...

Страница 5: ...e network and may not conflict with existing IP addresses See appendis and plan for IP addresses from page 10 2 5 Server IP Server IP is setup in the same way as a local number 2 6 ARM Flash Edit Addr...

Страница 6: ...work 4 Power Supply and Connecting to Network 4 1 Power Supply and Network Cable CareCom IP has two RJ45 connectors For power supply For network I O 4 2 Connection When the CareCom IP is connected the...

Страница 7: ...V 5 How to add a CareCom IP Room Unit to the Swan CareCom System In the below mentioned examples the screen shots are only indicative Prerequisite The CareCom Server must be version 5 2 0 or above The...

Страница 8: ...ck OK to save the changes 5 2 Configuring the CareCom IP Follow these steps to configure the CareCom IP in the ctLinkCareComServer User Interface 1 Start the ctLinkCareComServer User Interface from th...

Страница 9: ...guration 3 Set the Input Notification to Input I O Normally Open 4 Set the Display Group 5 Click SIP Account 6 Type in the Extension Number defined in the 3CX and click OK 7 Type in the password defin...

Страница 10: ...leVagt Data Base 1 Start the Swan CareCom TeleVagt Data Base 2 Double click any equipment in the Customer Equipment List 3 Click the menu New 4 In the Field Equipment ID type in 10000 new extension wh...

Страница 11: ...stomer Equipment List into the field Customer Equipment 8 Drag the correct Call Sequence to the field Calling Sequence 9 Type in the Extension Number into the field Telephone 10 Type Name and Address...

Страница 12: ...t 2 Click the ctCareComServer 3 Ensure that Display_AutoDisplay is set to Show Alarms on Presence 4 Ensure that Display_NoAcknowledge is set to Alarms can be ac knowledged 5 Ensure that IO_InputNotifi...

Страница 13: ...r Follow these steps to configure the CareCom IP in the ctLinkCareComServer 1 Start the ctLink Configuration Manager from the Windows programs list 2 Click the ctDisplayServer1 3 Ensure Display_AlarmS...

Страница 14: ...14...

Страница 15: ...15...

Страница 16: ...in_K1122_UK_v03_STT www sttcondigi com STT Condigi Agnesfridsv gen 113 A 212 37 Malm Sweden...

Отзывы: