


n
STRONG cannot guarantee compatibility with all types of USB storage devices.
n
It is advised not to store important information on USB storage devices used with the
receiver. Always make backups of data on your USB storage device before using it with this
receiver. STRONG will not take responsibility for any loss of information or circumstances
caused by loss of information.
n
Please ensure that either the USB device is already formatted to NTFS
n
STRONG cannot guarantee the playback of all files although extensions are listed, as it
depends on file size, codec, bit rate and resolution.
2.0 YOUR RECEIVER
2.1 PIN-CODE
The PIN code is set during the first installation, each user is free to choose their own code. In case there is
need to modify it see the chapter 4.2
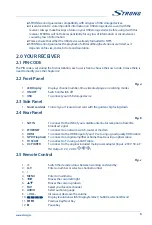
2.2 Front Panel
Fig. a
1.
LED Display
Displays channel number, time, videotext page or recording modes
2.
ON/OFF
Switch on/Switch off
3.
USB
To connect your USB storage device
2.3 Side Panel
1.
Smart card slot
To insert your Tivùsat smart card with the golden chip facing down.
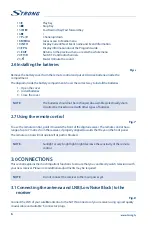
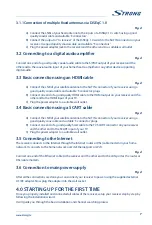
2.4 Rear Panel
Fig. b
1.
SAT IN
To connect to the LNB of your satellite antenna for reception of satellite
broadcast signal
2.
ETHERNET
To connect to a network switch, router or modem
3.
HDMI
To connect to the HDMI input of your TV set using a good quality HDMI cable
4.
S/PDIF (optical)
To connect to a digital amplifier or home theatre using a optical cable
5.
TV SCART
To connect to TV using a SCART cable
6.
DC POWER
To connect to the original included main power adapter (Input ~230 V 50~60
Hz/ Output 12 V, 2 A DC
)
2.5 Remote Control
Fig. c
1.
q
Switch the decoder status between working and standby.
2.
0~9
Enters a number or selects a channel number
3. \
4.
MENU
Enter to mainmenu
5.
t
u
Moves the cursor left/right
6.
pq
Moves the cursor up/down.
7.
FAV
Select your favorite channel
8.
AUDIO
Select audio language.
9.
+ VOL -
Increase or decrease the volume
10.
Display resolution switch/Display teletext / Subtitle selection/Recall
11.
7 8
Previous Key/Next Key
12.
2
Pause Key
5