Strong SRT 24HY4003 Скачать руководство пользователя страница 15

5.4.6 ATV Manual Tuning (in DVB-T/C mode only)

First select the source type of ATV. Then in the 

Channel

 menu, select 

ATV Manual Tuning

 and press 

ENTER

 to access. Highlight and press 



 to select 

Storage To 1

 (maybe other number), 

Sound System


and 

Channel No.

. Then select search and press 

ENTER

 to start the search. Press 

 for the unit to search 

towards higher frequency. Press 

 for the unit to search towards lower frequency. The search stops when 

a programme is found and this programme will be stored in the current channel position. If you want to 

stop the search, press 

MENU

.

Fine-Tune

Use this option to make small adjustments to tuning of an individual channel. Fine-tune is not
necessary under normal conditions. However, in area of inferior broadcast conditions where adjustments 

is necessary for a better picture and sound, use fi ne-tune. Select a channel that you want to fi ne tune. In 

the 

Channel

 menu, select 

ATV Manual Tuning

 and press 

 to highlight 

Fine-Tune

. Press 


 to fi ne tune 

until the best possible picture and sound are obtained.

5.4.7 Channel settings

Programme Edit


 Edit the programmes. You can press the 

COLOUR BUTTONS

 on the remote 

control to skip programmes, rename and delete programmes or move 

programmes, and add programmes to the favourite list by pressing 

FAV

.

Signal Information


 Showing the information of current DTV channel.

Cl information


 Enables the user to select from the CAM-provided menu. Select the 

Cl

 menu 

based on the menu PC card.

5 V Antenna Power


 This option is only available in DVB-T source, select 

On

 to supply power for 

the TV's antenna. Select 

Off 

 to turn off  this function.

5.4.8 Options

OSD Language


 Select the OSD language.

Audio Languages/Subtitle Languages

 Select as you prefer.

TTX Language


 Select TTX Ianguage for diff erent regions.

Time


 Can  setup 

Auto Sync, Clock, Time Zone, Summer Time, Sleep Timer

 and 

Auto 

Sleep

.

HDMI CEC


 Press to enter into submenus.


HDMI CEC: Turn on or off  HDMI CEC function.


Auto Standby: Turn the TV to standby automatically.


Device List: When HDMI CEC is 

ON

, you can check the list of connected 

devices.

Factory Default


 Restore user setting to the default.

SW Version


 Displays the current software version and the model name

Software Update (USB)


 Connect a USB device with upgrading software to upgrade the TV system.

Note

:


Audio Languages, Subtitle languages

 only works under DVB-S/DVB-C/DVB-T mode.


User data on this TV will be completely lost after operating this feature.

11

English

Содержание SRT 24HY4003

Страница 1: ...nuale utente Manual del Usuario Manual do Utilizador Gebruiksaanwijzing Instrukcja obs ugi U ivatelsk p ru ka Pou vate sk pr ru ka Korisni ki priru nik Uputsvo za rukovanje Haszn lati tmutat Instruc i...

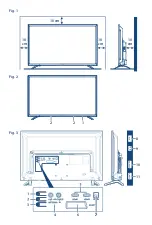
Страница 2: ...10 cm Fig 1 Fig 2 Fig 3 10 cm 10 cm 10 cm PCMCIA USB SERVICE 10 8 9 11 2 2 1 4 6 3 7 7...

Страница 3: ...Fig 4 Fig 5 2 5 8 11 13 23 26 34 37 29 17 14 20 33 14 1 3 6 4 22 25 15 18 9 10 12 21 32 31 36 35 24 28 27 16 19 14 14 30 7 1 3 2...

Страница 4: ...www strong tv 22May201713 31 Supplied by STRONG Co Japan Represented by STRONG Ges m b H Franz Josefs Kai 1 1010 Vienna Austria Email support_at strong tv...

Страница 5: ...osure in whole or in part or the production of derivative works therefrom without the express permission of Dolby Laboratories is prohibited Copyright 2003 2009 by Dolby Laboratories All rights reserv...

Страница 6: ...es Dolby and the double D symbol are trademarks of Dolby Laboratories HDMI the HDMI logo and High Definition Multimedia Interface are trademarks or registered trademarks of HDMI Licensing LLC in the U...

Страница 7: ...risk of damage to hearing one should lower the volume to a safe comfortable level and reduce the amount of time listening at high levels The mains plug or appliance coupler is used as disconnect devic...

Страница 8: ...fectly protected in the event of repair or warranty 1 3 Accessories 1x Installation instructions 1x stand assembly instruction 1x remote control 2x AAA batteries 1x power adapter 12V DC 3 A 1 4 Equipm...

Страница 9: ...Access Module CAM 2 4 Remote control Fig 4 1 q Press to turn theTV on or standby 2 Press to mute or restore the volume 3 PICTURE Change picture mode 4 SOUND Change sound mode 5 ZOOM Change aspect rat...

Страница 10: ...eletext display Press this button once to enlarge upper half of the screen Press this button again to enlarge lower half of the screen Press this button again to resume to normal screen size 5 6 Press...

Страница 11: ...so please change the lighting orTV s position or operate the remote control closer to the remote sensor 3 0 FIRSTTIME INSTALLATION After all connections have been made properly switch on yourTV The l...

Страница 12: ...by pressing EPG on the remote control Press EPG to bring up the EPG interface The second bar from the top will display the current date and time On the list below the channel you are currently watchi...

Страница 13: ...iddle and High MPEGNR Eliminates noise generated while creating digital picture signals Available choices are Off Low Middle and High 5 3 Sound menu SoundMode Select your favourite sound mode for each...

Страница 14: ...to select Full or NetworkScan recommended Selecting Full scan theTV will perform a complete scan on the most used frequencies Selecting NetworkScan it is also possible to insert a specific frequency...

Страница 15: ...OLOUR BUTTONS on the remote control to skip programmes rename and delete programmes or move programmes and add programmes to the favourite list by pressing FAV SignalInformation Showing the informatio...

Страница 16: ...case of a storage device formatted as a different utility programme which is not supported byWindows it may not be recognized 7 When using a USB Hard Disk Drive which is not powered independently ensu...

Страница 17: ...the Input search time screen Press to move the cursor and use the number buttons to insert the time Press ENTER theTV will start playing from the set time AspectRatio Highlight the button and press E...

Страница 18: ...t modes None to disable the function 1 to repeat one track only and All to repeat the entire list once it is finished Info Highlight the button and press ENTER to check the information of the shown ph...

Страница 19: ...ture may be marred by dots show blocking or break ups When the signal is extremely weak it may be necessary to install 1 a special antenna to improve the reception 2 Adjust the position and orientatio...

Страница 20: ...nal is too strong dish is oversized Connect a signal attenuator to the LNB input Ask a local satellite specialist for advice Bad picture blocking error during heavy rain Heavy rain will attenuate sate...

Страница 21: ...e Remark MP4 MOV mp4 rnov m4v Motion JPEG MPEG 4 SP ASP XviD MPEG AUDIO AVI avi MotionJPEG MPEG 4 SPIASP XviD LPCM MPEG AUDIO ASFI wmv3 xvid MPEG 4 SPIASP XviD MS ADPCM Intel ADPCM MKVI mkv xvid MPEG...

Страница 22: ...18...

Отзывы: