background image

Country


 To select the country you prefer.

Tuner Type


 Choose between Antenna and Cable.

Auto Scan


 Select DTV to reach digital broadcasting, ATV to reach analogue broadcasting 
or DTV+ATV to receive both.

LCN


 To switch On or Off numbering LCN.

Auto Channel Update


 Turn On if you want to activate this function.

Then, once you finished with the settings, select START at the end of the list and confirm with 

oK

 on your 

remote control, the TV will start searching for channels.

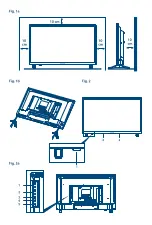
3.1 Antenna/cable connection

To receive digital or analogue signals, your TV has to be connected to a terrestrial indoor or outdoor
antenna. Use the antenna cable to connect the antenna with the ANTENNA IN connector on the back of 
your TV. Please ensure that a properly shielded antenna cable and suitable connectors are used.
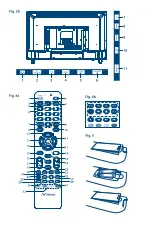
3.2 input source

Press 

soURce

 to display the input source list. Press 

pq

 to highlight the present options in the list: 

DTV

 for digital terrestrial or cable transmissions (depending on which scan you have performed), 

ATV


for analogue transmissions, 

MEDIA

 for devices connected to USB input, 

AV

SCART

YPbPr

HDMI1

PC

 for 

other connected devices. Confirm with 

oK

.

4.0 MenU conTRoL

4.1 Picture

Press 

MenU

 to display the main menu, and press 

t


u

 to select the submenus and then press 

oK

 to 

enter.

Picture Mode

Press 

pq

 to select 

Picture Mode

, then press 

t


u

 to select. Available picture modes are: 

Standard, Mild, 

Personal

 and 

Dynamic

.

brightness/contrast/sharpness/saturation Hue

Press 

pq

 to select an option, then press 

t


u

 to adjust.

Brightness


 Adjust the visual perception output of the entire picture, it will affect the 
luminousness of the picture.

Contrast


 Adjust the highlight intensity of the picture, but the shadow of the picture is 
invariable.

Sharpness


 Adjust the peaking in the detail of the picture.

Saturation


 Adjust the saturation of the colour based on your own like.

Hue


 Use in compensation colour changed with the transmission in the NTSC 
mode.

colour Temp

Change the overall colour cast of the picture.
Press 

pq

 to select 

Colour Temp

, then press 

t


u

 to select 

Standard, Cool

 or 

Warm

.

8

English

Содержание SRT 24HX1001

Страница 1: ...tilisateur Manuale utente Manual del Usuario Manual do Utilizador Manual do Utilizador Instrukcja obs ugi Korisni ki priru nik Uputsvo za rukovanje Pou vate sk pr ru ka Manual de Utilizare U ivatelsk...

Страница 2: ......

Страница 3: ......

Страница 4: ...21 Oct 2016 11 33 Supplied by STRONG Co Japan Represented by STRONG Ges m b H Franz Josefs Kai 1 1010 Vienna Austria Email support_at strong tv...

Страница 5: ...VC VIDEO AND OR ii DECODE AVC VIDEO THAT WAS ENCODED BY A CONSUMER ENGAGED IN A PERSONAL AND NON COMMERCIAL ACTIVITY AND OR WAS OBTAINED FROM A VIDEO PROVIDER LICENSED TO PROVIDE AVC VIDEO NO LICENSE...

Страница 6: ...005 EN61000 3 3 1995 A1 2001 A2 2005 LOWVOLTAGE EN60065 2002 Amd 1 2006 It also complies with the Ministerial Decree no 548 1 dated Aug 28th 1995 concerning the frequencies used in Italy by broadcast...

Страница 7: ...evels and for extended durations can damage one s hearing In order to reduce the risk of damage to hearing one should lower the volume to a safe comfortable level and reduce the amount of time listeni...

Страница 8: ...ted in the event of repair or warranty 1 3 Accessories 1x installation instruction 1x remote control 2x AAA batteries 2x bases feet 4x BT4X12 screws 1 4 Equipment set up Fig 1a Install the display on...

Страница 9: ...Use an RCA cable to connect your TV to a compatible digital amplifier or Home theatre set 6 ANTENNA IN Connect an antenna or cable to the TV for searching and receiving programmes 7 CI Connect a Cond...

Страница 10: ...gned favourite channels Press pq to cycle through your assigned favourite channels press OK to confirm 23 TEXT Press to enter the teletext menu 24 4 No function 25 FREEZE Press to freeze or unfreeze t...

Страница 11: ...ge you should replace it with a new battery Remove the batteries from the remote control unit if you do not intend to use it for a long time 3 Do not use different types of batteries for example Manga...

Страница 12: ...cable transmissions depending on which scan you have performed ATV for analogue transmissions MEDIA for devices connected to USB input AV SCART YPbPr HDMI1 PC for other connected devices Confirm with...

Страница 13: ...to select DynamicContrast then press t u to select Available settings are Off Weak Medium and Strong 4 2 Sound Press MENU to display the main menu and press t u to select the Sound menu Press pq to s...

Страница 14: ...in menu and press t u to select the submenus Channel Press OK to enter Press p q to select the option you want to select in the Channel menu Press OK and MENU to return to the previous menu TunerType...

Страница 15: ...he sub menu The three coloured keys are the shortcut keys for programming the channels First press pq to highlight the channel you want to move skip or delete and then Press the RED button to delete t...

Страница 16: ...d until 18 Select None to deactivate this function Lock Keypad Press pq to select LockKeypad then press t u to select On or Off Set to prevent the keypad from being used by young children or other une...

Страница 17: ...he sub menu Turn the Subtitle mode On if you want to enable the subtitle function of Off to disable it With pq you can select SubtitlePrimaryLanguage to set the language that you want to be displayed...

Страница 18: ...OSDTime press t u to select the duration time for displaying the info bar on screen available settings are Off 10seconds 20seconds 30seconds 60seconds SleepTimer Set a timer for the TV to turn off au...

Страница 19: ...ction 4 6 2 EPG Menu Press EPG to enter the EPG menu and display the ProgrammeGuide Press pq to scroll the programme list of the channel you are watching Press the RED button to display the previous d...

Страница 20: ...he file information will appear on the right side of the screen 2 Press to play or pause 7 Press to play the previous song 8 Press to play the next song 5 Press to play backward 6 Press to play faster...

Страница 21: ...interference such as cars daylight lamps and hair driers Adjust the antenna to minimize the interference Blank screen in pc mode Perhaps the TV cannot recognize the resolution set by the PC Suggest c...

Страница 22: ...r system does not apply to all models Connectors 1 x AIR CABLE 1x CI 1x HDMI 1x SCART 1x USB 1x S PDIF coax 1x YPbPr 1x VGA 1x AV 1x PC Audio 1x Headphones General Data Working voltage 100 240 V AC 50...

Страница 23: ...AVC HP LEVEL 4 MPEG mpeg mpg dat vob MPEG 1 MP MPEG 2 MP TS ts trp tp MPEG 1 MPEG 2 MP H 264 AVC MP LEVEL 4 H 264 AVC HP LEVEL 4 flv H 264 AVC MP LEVEL 4 H 264 AVC HP LEVEL 4 MKV mkv MPEG 1 MPEG 2 MP...

Страница 24: ...support Remark jpg jpeg Baseline Mode 72 72 Baseline resolution 7680 4320 Progressive Mode Size 1280 1024 File Size 10MB Progressive Mode Text FileType File Extension Version support Remark txt UTF 8...

Отзывы: