background image

10

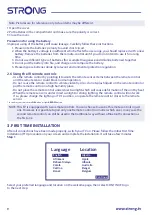
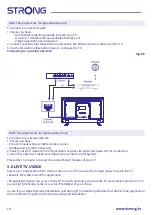
Step 2

Press 

 and 

-

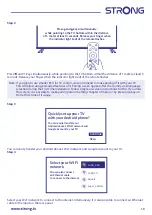
 key simultaneously, while pointing to the TV bottom within the distance of 1 meter at least 3 

seconds, Release your finger when the indicator light (red) of the remote flashes. 

Note:  If you plan to use smaller RCU for TV control, we recommend to make pairing of it with your TV. 

This will allow using extended features of it. Pairing screen appear after the country and language 

selection during the First Time Installation. Follow simple on-screen instructions for this. If you miss 

this screen, it is possible to make pairing later in Settings chapter of menu or by pressing   key on 

RCU at first time of it usage.

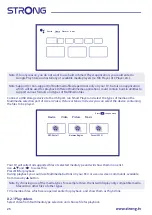
Step 3

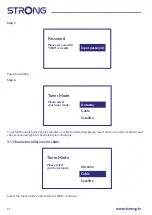
You can easily transfer your Android phone’s Wi-Fi network and Google Account to your TV. 

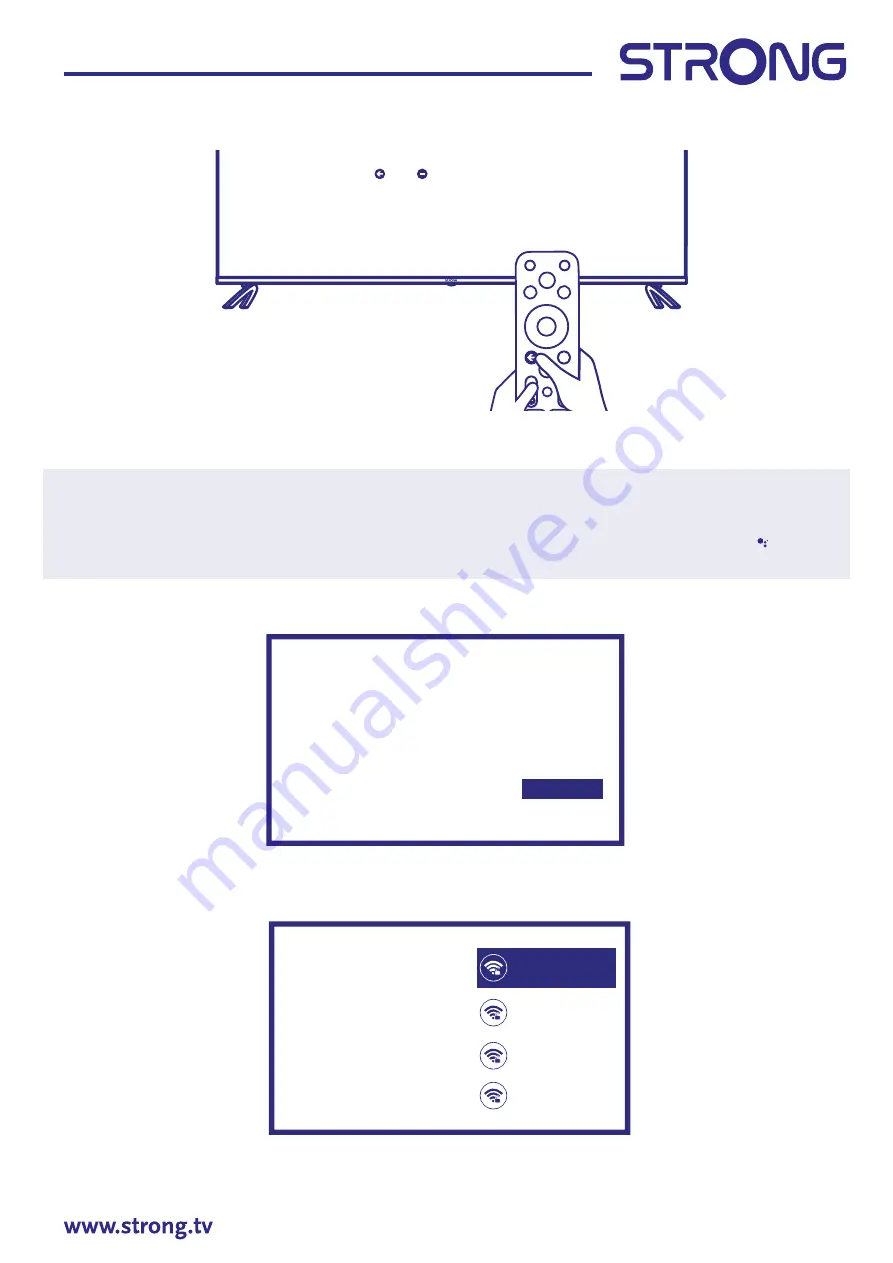
Step 4

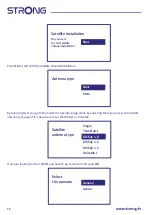
Select your Wi-Fi network to connect to the internet. Alternatively, it is also possible to connect an Ethernet 

cable to the input on the rear panel.

Press    and    key simultaneously,

while poinng to the TV boom within the distance

of 1 meter at least 3 seconds. Release your finger when 

the indicator light (red) of the remote flashes.

Connue

Skip

Quickly set up your TV

with your Android phone?

You can easily transfer your 

Android phone’s Wi-Fi network and 

Google Account to your TV

Select your Wi-Fi

network

You can also connect

an Ethernet cable

to connect to the internet.

1600_2.4G

1600_5G

Airport

Super_2.4GHz

Содержание 32HD5553-HD

Страница 1: ...do utilizador Használati útmutató Uživatelský manuál Brugervejledning Brukerveiledning Gebruiksaanwijzing Användarhandbok Korisnički priručnik Ръководство на потребителя Посібник користувача SMART ANDROID TV with DVB T2 C S2 32HD5553 HD 43UD7553 50UD7553 55UD7553 UHD Picture similar ...

Страница 2: ... tv 351 2 100 06 125 support_sk strong tv 0850 15 05 50 support_ua strong tv 380 44 238 61 50 386 1 828 08 58 support_nl strong tv support_it strong tv 199 404 032 Da rete fissa 24 8 cent al min 12 5 cent scatto alla riposta Da rete mobile max 49 cent al min 15 6 cent scatto allo risposta support_bg strong tv 359 32 634451 support_es strong tv 34 91 119 61 76 support_cz strong tv 844 44 44 90 supp...

Страница 3: ...ED BY THE OWNER OF THE PRODUCT THIS PRODUCT MAY NOT BE USED IN CONNECTION WITH HEVC ENCODED CONTENT CREATED BY A THIRD PARTY WHICH THE USER HAS ORDERED OR PURCHASED FROM A THIRD PARTY UNLESS THE USER IS SEPARATELY GRANTED RIGHTS TO USE THE PRODUCT WITH SUCH CONTENT BY A LICENSED SELLER OF THE CONTENT YOUR USE OF THIS PRODUCT IN CONNECTION WITH HEVC ENCODED CONTENT IS DEEMED ACCEPTANCE OF THE LIMIT...

Страница 4: ...stallations for Antenna 13 3 3 Channel installations for Satellite 14 4 HOME SCREEN 17 4 1 Inputs 17 4 2 Network Internet 18 5 0 LIVE TV USAGE 19 5 1 Channel installation 20 5 2 Watching TV channels 20 5 3 Electronic Program Guide EPG 21 5 4 TV Menus 21 6 SMART TV POSSIBILITIES 22 7 SYSTEM SETTINGS 23 7 1 Settings main menu 23 7 2 Device Preferences menu 23 8 MULTIMEDIA 24 8 1 Reminder when using ...

Страница 5: ...something like that It shall be free from sharp edges or similar which can cause abrasion of the power cord set When put into use again please make sure the power cord is not damaged In case of damages please get the power cord replaced by a similar one with the same specifications The absence of a light indication on the apparatus does not mean that it is fully disconnected from the mains To disc...

Страница 6: ... unsafe situations please do not place any objects on top of the set This apparatus can be used in tropical and or moderate climates This user manual provides complete instructions for installing and using this TV The symbols serve as follows WARNING Indicates warning information NOTE Indicates any other additional important or helpful information MENU Represents a button on the remote control or ...

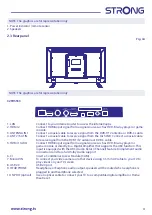
Страница 7: ...e DVB T T2 antenna or DVB C cable 5 HDMI 1 ARC Connect HDMI input signal from a signal source such as DVD Blu ray player or game console or directly to a Digital Amplifier that supports the ARC function This input is equipped with the ARC Audio Return Channel feature to implement audio connections and for a full Dolby Audio support 6 CI Insert a Conditional Access Module CAM 7 Mini AV IN To connec...

Страница 8: ...ugged in and headphone selected 9 LAN Connect to your Internet router to access the internet apps 10 HDMI 3 Connect HDMI input signal from a signal source such as DVD Blu ray player or game console 11 HDMI 2 Connect HDMI input signal from a signal source such as DVD Blu ray player or game console 12 USB 2 0 USB 2 0 port 50UD7553 55UD7553 1 LAN Connect to your Internet router to access the internet...

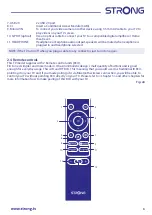
Страница 9: ... when you plug a cable to any connector just turn it on again 2 4 Remote controls This TV model supplies with 2 Remote control units RCU First one is simpler and more modern It has minimalistic design small quantity of buttons and is good enough for everyday usage This is IR and RF RCU This meaning that you could use it as traditional IR RCU pointing it on your TV and if you made pairing of it via...

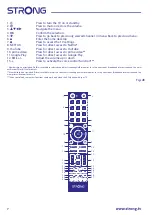
Страница 10: ...Google Play 12 VOL Adjust the volume up or down 13 Press to activate the voice control function Membership is not included Netflix is available in selected countries Streaming Netflix requires to set up an account Broadband Internet required See www netflix com TermsOfUse for details Membership is not included Prime is available in selected countries Streaming prime video requires to set up an acc...

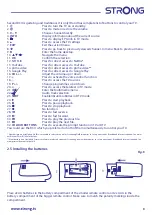
Страница 11: ...mode 21 USB Enter the Multimedia menu 22 Audio track selection 23 SUBT Enable disable subtitles in DTV mode 24 1 Press to start playback 25 2 Press to pause playback 26 3 Press to stop playback 27 4 No function 28 5 Press to fast reverse 29 6 Press to fast forward 30 7 Press to play the previous file 31 8 Press to play the next file 32 COLOUR BUTTONS Press to execute the prompt function in TV or D...

Страница 12: ...ntly Also do not splash liquid on the remote control or put the remote control in a high humidity place Do not place the remote control under direct sunlight which will cause deformation of the unit by heat When the remote sensor is under direct sunlight or strong lighting the remote control will not work If so please change the lighting or TV s position or operate the remote control closer to the...

Страница 13: ...menu or by pressing key on RCU at first time of it usage Step 3 You can easily transfer your Android phone s Wi Fi network and Google Account to your TV Step 4 Select your Wi Fi network to connect to the internet Alternatively it is also possible to connect an Ethernet cable to the input on the rear panel Press and key simultaneously while poin ng to the TV bo om within the distance of 1 meter at ...

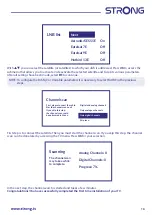
Страница 14: ...llite and choose required type of channels Digital Analogue 3 1 Channel installations for cable Select the tuner mode Cable and press OK to continue Antenna Cable Satellite Tuner Mode Please select your tuner mode Input password Password Please set password 0000 is invalid Tuner Mode Please select your tuner mode Antenna Cable Satellite ...

Страница 15: ... can choose to perform a full scan by selecting Full while selecting Advance you can perform a scan using the Frequency and Network ID data provided by your operator Use the OK button for setting the value and to start the channel scan Select the operator You can select only one operator from the following list Ziggo Others Channel scan First please connect the cable Star the channel scan now If y...

Страница 16: ...utomatic channel ordering when Pay TV ordering cannot install channels Press OK to continue Scan direc on Select the channel ordering method Automa c channel ordering is the default method Pay TV ordering enable user presenta on of channel numbers in a convenient form dedicated to Pay TV customers Use Automa c channel ordering in case Pay TV ordering fails to install channels Automa c Channel Orde...

Страница 17: ...search is started and takes a few minutes 3 3 Channel installations for Satellite Select the tuner mode Satellite and press OK to continue Antenna Cable Satellite Tuner Mode Please select your tuner mode Channel scan First please connect the cable Star the channel scan now If you skip this step the channel scan could be performed in Menu Digital and analog channels Only analogue channels Only digi...

Страница 18: ...te antenna type page if it is necessary to set the DiSEqC or Unicable If you are looking for the LNB list you have to go to General and press OK Select the operator General vùsat Satellite installa on Do you want to start satellite channel installa on Start Antenna type Next More Satellite antenna type DiSEqC 1 0 DiSEqC 1 1 DiSEqC 1 2 Unicable I Tone Burst Single ...

Страница 19: ...p this step the channel scan can be done later by accessing the TV menu Press OK for your selection In the next step the channel search is started and takes a few minutes Congratulations You have successfully completed the First time installation of your TV LNB list Next Astra4A SES5 5E On Eutelsat 7E Off Eutelsat 9E Off Hotbird 13E Off Channel scan First please connect the cable Star the channel ...

Страница 20: ...ecific for each application It is possible to customize this area Use Customize channels to make changes Please note S Channel line contains the list of recommended but not installed on your TV applications To access Ho me screen and exit from any active application press button on the remote control unit RCU Use and to move around and OK to enter the option or application 4 1 Inputs TV has such p...

Страница 21: ...k panel Wireless using the internal wireless and your home wireless network NOTE To access the Internet you must subscribe to a highspeed broadband Internet service with your Internet service provider NOTE Instructions below are just the usual ways to connect your TV to a wired or wireless network The connection method may differ depending on your actual network configuration If you have any quest...

Страница 22: ...speed Internet connection 2 Select your Wi Fi network from the Available networks list and enter password for connection 3 Use other options of menu to configure the connection if required Please refer to chapter 6 to read more about Smart features of your TV 5 0 LIVE TV USAGE Select Live TV application from Home screen or one of TV sources from input menu to watch live TV channels Press OK to sta...

Страница 23: ... set the correct source press then button to get to Channels chapter Select Channel and follow the instructions for the channels installation 5 2 Watching TV channels When the installation is completed you can use TV set for watching of installed TV programs Some helpful features for comfortable watching Changing channels Following ways are possible for changing channels Via direct access using th...

Страница 24: ...isplay details BLUE Type Filter NOTE Vertical line in time bar shows current time Selected program has progress bar in different colour which shows how much time passed from the beginning of the program 5 4 TV Menus You can use access to menus of Live TV application to make changes in channels viewing and set other options It has 2 levels Channels and TV options default This menu organized as line...

Страница 25: ...er off in case of no signal CI Card if an CAM device is used this option allows access to the main menu of the CAM or the Card connected to it Advanced Options allows you to manage among other things the primary and secondary audio language subtitles HbbTV and other settings and system information Settings it is the same menu that can also be reached from the Home screen and allows you to view or ...

Страница 26: ...e refer to Chapter 4 2 It is possible to pair external devices such as audio speakers headphones or a remote control to the TV using the Bluetooth technology Selecting the Remote accessories option starts the search function for devices to be paired Before starting this function make sure that the device you intend to connect is also in search mode 7 2 Device Preferences menu To get access to all ...

Страница 27: ... for the losses by misuse or malfunction Data backup is consumer s responsibility 3 For large file sizes the loading speed may be slightly longer 4 The recognition speed of a USB storage device may depend on each device 5 When connecting or disconnecting the USB storage device make sure the TV is not in USB mode otherwise the USB storage device or the files stored in it may be damaged 6 Please use...

Страница 28: ...n Video Picture or Music In Device you can select the device containing the files to be played Your TV will collect all supported files of selected media type and will show them in one list Use and to select file Press OK for playback During playback you could use Multimedia buttons on your RCU or use on screen commands available from menu by button Note By choosing one of the media types for exam...

Страница 29: ...ives access to all settings relating to the screen Sound gives access to all settings relating to audio Aspect Ratio this option allows you to adapt the video format to the screen Play Mode video file playback settings Subtitle to show subtitles on screen if available Audio Track to select the audio track if available Menu Sound Sub tle Picture Aspect Ra o Auto Play Mode Normal Audio Track Audio T...

Страница 30: ...mation about file Menu access the menu to set the background music 8 2 3 Play music Select Music from Multimedia type selection and choose file for playback To control playback use on screen or RCU Multimedia buttons Note An over modulated mp3 file may cause some sound distortion during playback 8 2 4 Browse files Select Device from Multimedia type selection and choose folder to enter or file for ...

Страница 31: ...is working or turned on 3 The power plug is in bad contact with the outlet 4 Check the signal source No colour 1 Change the colour system 2 Adjust the saturation 3 Try another channel Black white programme may be received The remote control does not work 1 Change the batteries 2 The batteries are not installed correctly 3 Main power is not connected No picture normal sound 1 Adjust the brightness ...

Страница 32: ...B storage device with sufficient speed and space Pen drives USB sticks may not support sufficient speed No signal or weak signal intermittent reception a Cables might have loosened moisture might have entered into cables or connectors heavy rain at present or heavy storm at present Check the cable connections LNB and other equipment connected between the LNB and the receiver or peak the dish Wait ...

Страница 33: ... IN 1x CI 3x HDMI 65 4x 2x USB 1x LAN RJ 45 1x S PDIF optical 1x AV IN 3 5 mm 1x HEADPHONES General Data Operating voltage 100 240 V AC 50 60 Hz Power consumption 32 max 55 W typ 33 W 43 max 110 W typ 66 W 50 max 135 W typ 80 W 55 max 160 W typ 100 W Power consumption in standby 0 5 W Operating temperature 5 C 35 C Storage temperature 15 C 45 C Operating humidity 20 80 RH non condensing Storage hu...

Страница 34: ...ay use such information to improve its products or to provide services or technologies to you as long as it is in a form that does not personally identify you Additionally please keep in mind that some services provided already in the device or installed by you may request a registration for which you have to provide personal data Besides that please be aware that some services which are not pre i...

Отзывы: