Strix Systems EWS150 Скачать руководство пользователя страница 15

EWS150 Configuration Guide

9

     EWS150 Configuration Guide

Setting Up the Radio Parameters

To set up the 802.11 radio parameters, click on the 

Configure

 tab then click on 

Radio Parameters

 to display

the 

Radio Parameters

 window. The following procedure assumes that the EWS150 is using an 802.11g radio.

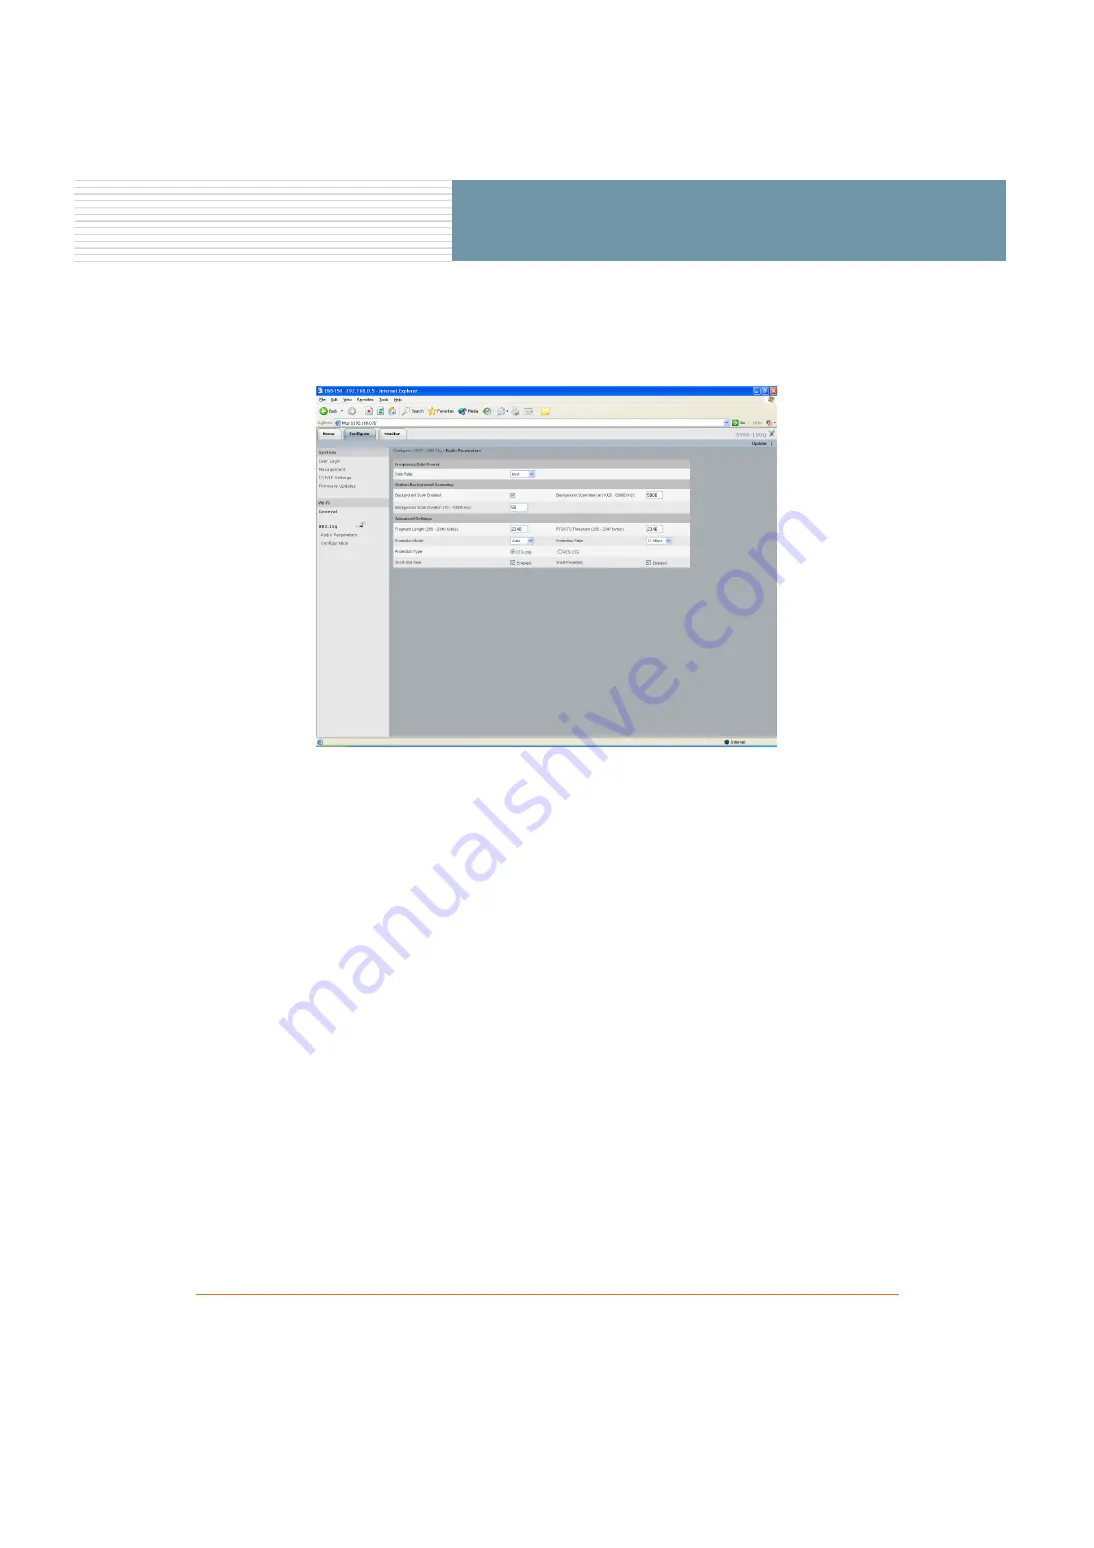
Figure 9. Radio Parameters Window

1.

In the Data Rate field, choose the preferred data rate from the pull-down list. The default for this field
is 

Best

, which means the EWS150 will select the best data rate available automatically.

2.

In the Background Scan Enabled field, check this box to enable background scanning for wireless
client stations. the default for this field is 

enabled

.

3.

In the Background Scan Interval field—If you enabled background scanning—enter a value between
1000 and 60000 ms to define the interval (elapsed time) between scans. The default for this field is
5000 milliseconds.

4.

In the Background Scan Duration field—If you enabled background scanning—enter a value
between 10 and 10000 ms to define the duration of each scan. The default for this field is 50
milliseconds.

5.

In the Fragment Length field, enter a value between 256 and 2346. This setting determines the size of
the wireless frame. Wireless frames are reassembled by the EWS150 before being forwarded to the
Ethernet port, but only if the frame is smaller than the Ethernet MTU (1536 bytes). The default value
for this field is 

2346

.

Содержание EWS150

Страница 1: ...er Edge Wireless System EWS150 Introducing the EWS150 Configuration Updating the Firmware June 10th 2007 210 0028 01 Rev D Copyright 2003 2007 Strix Systems Inc 26610 Agoura Road Calabasas CA 91302 US...

Страница 2: ...ii EWS150 Configuration Guide EWS150 Configuration Guide...

Страница 3: ...ision reception which can be determined by turning the wireless network device off and on the user is encouraged to try to correct the interference by one or more of the following measures Reorient or...

Страница 4: ...duct family supports both 802 11a and 802 11b g technologies This configuration guide assumes the use of the EWS150 802 11b g model Product Images Some of the images used in this document have been mo...

Страница 5: ...ology 2 LED Indicators 2 Installing the EWS150 3 Factory Default Settings 3 Resetting the EWS150 to its Factory Default State 3 Managing the EWS150 4 Connecting to the Unit 4 Logging In 4 The Home Pag...

Страница 6: ...vi EWS150 Configuration Guide EWS150 Configuration Guide...

Страница 7: ...he EWS150 also offers a suite of management features including a powerful Web Management Interface WMI and SNMP that have been tailored for residential users including the ability to upgrade the EWS15...

Страница 8: ...LAN port the DC power receptacle and the reset button Figure 2 EWS150 Rear View LED Indicators After applying power to the unit the Power LED PWR will flash for approximately 20 seconds Following that...

Страница 9: ...shows the default settings established at the factory for the EWS150 Resetting the EWS150 to its Factory Default State To reset the EWS150 to its factory default state use a paper clip or other simila...

Страница 10: ...no DHCP server is available the unit can only be reached via its default IP address 169 254 1 250 To establish a connection the EWS150 and your computer must be on the same IP segment Use your Web br...

Страница 11: ...wireless neighbor information will refresh themselves automatically every 10 seconds but you can force a refresh of these frames at any time by clicking on the Refresh button The bottom frame contain...

Страница 12: ...ogin to display the User Login window Figure 6 User Login Window 1 In the User Name field select the type of user either Admin or Guest from the pull down list 2 In the Password field enter a password...

Страница 13: ...Any MIB I or MIB II compliant SNMP management console such as HP OpenView can be used to manage the unit To set up the system management options click on the Configure tab then click on Management to...

Страница 14: ...t port see also DHCP Over LAN below To set up the TCP IP options click on the Configure tab then click on TCP IP to display the TCP IP Settings window Figure 8 TCP IP Settings Window If you want to as...

Страница 15: ...anning for wireless client stations the default for this field is enabled 3 In the Background Scan Interval field If you enabled background scanning enter a value between 1000 and 60000 ms to define t...

Страница 16: ...ar to Send packets are sent either 1 Mbps 2 Mbps 5 5 Mbps or 11 Mbps The default data rate for this field is 11 Mbps 9 In the Protection Type field choose either CTS only or RTS CTS With CTS only sele...

Страница 17: ...D field 3 If BSSID is selected as the AP selection method enter a value in seconds in the BSSID Timeout field to define the elapsed time before the EWS150 defaults to the SSID to locate the AP 4 In th...

Страница 18: ...n choose either 64 bit 128 bit or 152 bit encryption After choosing the encryption type enter the key then click on the Update button Figure 11 Defining a Shared Key The shared key you entered is disp...

Страница 19: ...page Monitoring functions include Event Log L2NAT Troubleshooting Wireless Neighbors Statistics Wireless History Because the EWS150 monitors are intuitive and to avoid redundancy this document does no...

Страница 20: ...as a convenient tool for testing your wireless configuration and associations To initiate the troubleshooting tool click on the Monitor tab then click on Troubleshooting to display the Troubleshootin...

Страница 21: ...tool is provided to assist users when attempting to find the optimum placement for the EWS150 The process is dynamic and interactive which means that when you reposition the unit or its antennas you...

Страница 22: ...Firmware updates window Figure 15 Firmware Updates Window After entering the FTP location parameters click on Update to apply your change then click on Reboot to reboot the unit When the unit has com...

Страница 23: ...6 flashing LED 2 fragment length 9 H home page 5 I installation 3 introduction 1 IP address 3 L L2NAT 13 layer 2 NAT 3 LEDs 2 Local Area Network 1 logging in 4 M Manager One plugin 3 managing the unit...

Страница 24: ...tion configuration 11 Strix contact information i structured mesh 1 system management options 7 T TCP IP settings 8 troubleshooting 14 U updating the firmware 16 user login parameters 6 user name 3 6...

Отзывы: