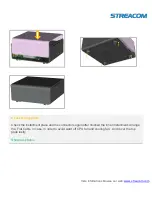
Streacom F7C Скачать руководство пользователя страница 4

Open top plate 

Take off 4 top plate screws, and 
take out the top plate  

Shown as photos 


Take out case bracket 

Take off 4 case bracket screws, 
and then take out the case 
bracket  

Shown as photos 

 
Motherboard installment 

Put the I/O baffle plate, and then 
put the motherboard. Alignment 
hole and lock it  

Shown as photos 

 
Connecting  relevant line in 
motherboard


Connect the DC connector ,insert  
power, connect the power line , 
and IR line , etc. 

Shown as photos 

Put the DC connector, power , and  
other electronic components 

more infomations browse our web: 

www.streacom.com


Содержание F7C

Страница 1: ...F7C WESENA STREACOM moreinfomations browse our web www streacom com Computer Chassis Installation Guide ...

Страница 2: ...e our web www streacom com CONTENT ITX7 overview 3 Open the Top panel 4 Montherboard installation 4 HDD installation 5 ODD installation 6 PCI or PCIE slot installation 6 Close the Top pane l 7 PCB cables reference diagram 8 ...

Страница 3: ... 17 14 16 15 Model F7C 2 Material 100 full Aluminum Color Silver black Gold Motherboard Mini ITX HDD drive bay 1x2 5 1X3 5 HDD drive bay ODD drive bay an ultra thin standard slot in optical drive Front I O Port 2 USB ports Card Reader Multi card Reader Cooling 1 80 80 25mm fans Dimension 240mm 250mm 100mm L W H Power Supply Optional build in DC power Remote control Optional the MCE remote control ...

Страница 4: ...Shown as photos Motherboard installment Put the I O baffle plate and then put the motherboard Alignment hole and lock it Shown as photos Connecting relevant line in motherboard Connect the DC connector insert power connect the power line and IR line etc Shown as photos Put the DC connector power and other electronic components moreinfomations browse our web www streacom com ...

Страница 5: ...ssories Alignment hole and lock Shown as photos ODD installment Put the ODD on the ODD bracket Alignment and lock screws Shown as 2 5 inch HDD installment Put the 2 5 inch HDD lock the 3 HDD screws PM3 5 shown as photos Shown as photos moreinfomations browse our web www streacom com ...

Страница 6: ... lines into the right place of case To check the correction of all the line connection Put the ODD button secondly and then put the bracket in the case by its sideway Alignment hole and lock screws Shown as photos PCI or PCIE installment Exit screws firstly take out the baffle plate and plate locking piece Put the PCI or PCIE expand card in and then put the plate locking piece and lastly lock the ...

Страница 7: ...place and the connectors again after finished the inner installment Arrange the Flat Cable in case in order to avoid ward off CPU fan and cooling fan And cover the top plate lastly Shown as photos moreinfomations browse our web www streacom com ...

Страница 8: ...WESENA STREACOM Thankyou for usage of our Products moreinfomations browse our web www streacom com ...

Отзывы: