STRATO LCD3207 Скачать руководство пользователя страница 19

19

6.3 OSD Option Adjustment

    Learning about the menu system

    After you have installed the batteries into the remote control, you will need to 

    set some preferences on the TV using the menu system. 

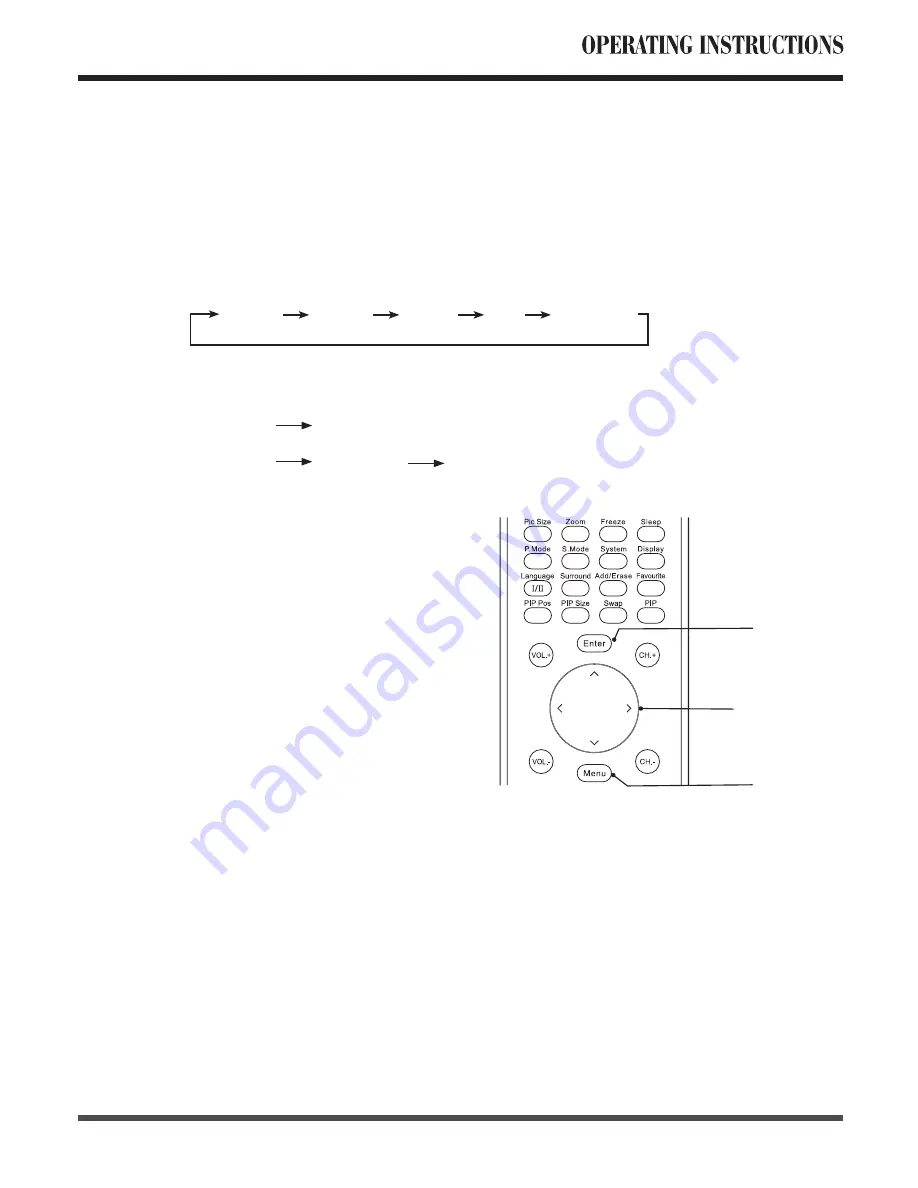
    -  The buttons for OSD option adjustment include: 

Menu, 

,

 Enter

 buttons.

     -  Press the 

Menu

 button to open the OSD Menu then press 

,


> 

button to select the pages. 

      The pages are displayed in the following sequence (circular display):

    -  Press the 

Menu

 button on the remote control or on the front panel, it will change in the 

      following sequence:

Sub Menu

Main Menu

exit

Video

Audio

Misc

TV

Geometric

Main Menu

exit


  Press the 

Menu

 button to display the 

      menu system.


  Press 

,

 >

 button to select the menu 

      pages.


  Press 

 ∧

 button to select an item.


  Press 

 button to select 

      or adjust a setting.


  If you do not make a selection within 

      15 seconds, the main menu closes 
      automatically; the other menus close 
      automatically within 6 seconds.


  Press the 

Menu

 button to return or exit 

      OSD-menu.

Enter

,

,

,

Menu

Содержание LCD3207

Страница 1: ...marked on the product Restriction of the Use of Certain hazardous Substances in Electrical and Electronic Equipment RoHS Directive 2005 95 EC The available evidence indicates that measures on the collection treatment recycling and disposal of waste electrical and electronic equipment WEEE as set out in the WEEE Directive are necessary to reduce the waste management problems inked to the heavy meta...

Страница 2: ...Ignorance or inappropriate use may cause injury to the user Prohibition Warning Attention symbol indicating Electric Shock Do not install the product on sloping or unstable surface The product may drop or tip over Only the marked power source can be used for the product Any power source other than the specified one may cause fire or electric shock Keep the product away from moisture Do not expose th...

Страница 3: ...he product is dropped and the housing is damaged the internal components may function abnormally Unplug the connector immediately and contact the manufacturer for repair Continuous use of the product may cause fire or electric shock WARNING Do not touch the power cord during lightning To avoid electric shock avoid handling the power cord during electrical storms Never use a damaged power cord Heavy...

Страница 4: ...ver cover the vents with towels blankets or dusters Unplug the connector Unplug the power connector when the product will not be used for a long time ATTENTION Unplug the connector Unplug the connector Use extreme care to make sure you are never in a position where your body or any item you are in contact with such as a ladder or screwdriver can accidentally touch overhead power lines Never locate...

Страница 5: ...rs stoves or other apparatus including amplifiers that product heat 9 Do not defeat the safety purpose of the polarized or grounding type plug A polarized plug has two blades wider than the other A grounding type plug has two blades and a third grounding prong The wide blade or the third prong are provided for your safety If the provided plug does not fit into your outlet consult an electrician for ...

Страница 6: ...ng 21 Selection of Colour Temperature 22 Selection of Advance Picture Adjust 22 6 5 2 Audio Page Menu 23 Adjustment of Bass Treble and Balance 23 Selection of Surround 23 6 5 3 Misc Page Menu 23 Selection of Language 23 Selection of Blue Back 23 Using Default 24 6 5 4 TV Page Menu 24 Selection the Region Selection 24 Using the Auto Search 24 Using the Manual Scan 25 Using the Fine Tune 25 Selectio...

Страница 7: ...ion and that all standard accessories and items are included 1 2 Installation Please use caution if wall mounting this product Follow all directions from the manufacturer of the wall mount and be sure to securely fasten the product to the mount While the TV can be wall mounted improper wall installation may void the warranty Due to the higher power consumption always use the cord exclusively desig...

Страница 8: ...480p 720p 1080i The product provides composite video RCA input connectors The product provides three sets of stereo audio input connectors one set of audio output connector RCA Note For the supported signal modes please refer to page 30 2 Power Management Function This device provides an automatic power control function 3 WXGA LCD TV Panel The WXGA LCD TV panel provides high resolution and high co...

Страница 9: ... channels To scan quickly through channels press and hold down either of the two buttons MENU Press to display the menu Press again to exit the menu SOURCE Press to cycle display TV AV YPbPr SCART 1 SCART 2 VGA or HDMI source your choice is highlighted on the display When displaying the OSD menu press to confirm Sketch map 4 2 Front View IR Infrared Receiver Receives IR signals from the remote cont...

Страница 10: ...udio amplifier or other TV set that has an audio input E Y Pb Cb Pr Cr IN Connect the Component video input terminal to the Component output terminal of the video output device Y Pb Cb Pr Cr AUDIO IN Connect the audio input terminal to the audio output terminal of the video output device F VIDEO IN Connect the component video input terminal to the video output terminal of the video output device VI...

Страница 11: ... 60 Min 90 Min 120 Min and Off that require the TV to remain on before shutting off To cancel sleep time press Sleep button repeatedly until sleep Off appears S Mode Press repeatedly to select the sound mode Normal News Cinema Concert and User P Mode Press repeatedly to cycle through the picture mode Cinema Normal Vivid Hi Bright and User System This button is activated for AV TV input source When...

Страница 12: ...o exit Hold Press to hold the current page and press again to release holding of the page Reveal Press the button once to reveal hidden information solutions to puzzles riddles ect Txt Size Press repeatedly to double the character size in the following order Upper half of the page Lower half of the page Return to normal size Mix Press repeatedly to turn on Teletext Teletext blending with TV progra...

Страница 13: ... is within 5 8 meters from the front of the remote control window and 30 to the left or right side and 20 above or below the control window Care For Remote Control Avoid spilling liquids on the remote Avoid dropping or otherwise jarring the remote Always store the remote control in dry and normal room temperatures If the remote is not performing satisfactorily replaced the batteries The batteries ...

Страница 14: ... and a DVI to HDMI conversion cable should be adopted Please ensure the Power Cord is connected and the Power Switch button turned on before it is operated Press Standby button to turn on the LCD TV then turn on external equipment The LCD TV and DVD or Set top box are working at the same time Press Source button to select HDMI signal source Note The above step 2 is used if you connect DVI output t...

Страница 15: ...king at the same time Press Source button to select VGA signal source Connecting the DVD player or HDTV Set top box using YPbPr input Switch off the LCD TV and external equipment before connecting cables Connect the YPbPr output of the DVD or HDTV Set top box to the YPbPr input of the LCD TV Connect the audio output of the DVD player or HDTV Set top box to the audio input of the LCD TV Please ensu...

Страница 16: ...turn on the Power Switch button before it is operated Press Standby button to turn on the LCD TV then turn on external equipment To watch the VCR or other video apparatus please press Source button to select AV Connecting audio amplifier or other TV set Switch off the LCD TV and external equipment before connecting cables Connect the AUDIO OUTPUT of the LCD TV to the AUDIO INPUT of the audio amplifi...

Страница 17: ... s SCART In terminal Press the Power button to turn on the LCD TV then turn on the external equipment Press the Source button to select SCART1 or SCART2 signal source VCR DVD Player Connecting directly to cable or an antenna Switch off the LCD TV and external equipment before connecting cables Using 75 Ohm coaxial Aerial Connect directly to the RF terminal of the tuner ...

Страница 18: ...cator changes from green to red 6 2 Selection of Input Mode Press the Source button to select the signal source you desire The signal sources are displayed in the following sequence When there is no signal from the selected source the warning message will be displayed as per illustration Either change the channel in TV mode or press Source button to change source When selecting the signal source t...

Страница 19: ... following sequence circular display Press the Menu button on the remote control or on the front panel it will change in the following sequence Sub Menu Main Menu exit Video Audio Misc TV Geometric Main Menu exit Press the Menu button to display the menu system Press button to select the menu pages Press button to select an item Press button to select or adjust a setting If you do not make a selec...

Страница 20: ...ded pages can be selected quickly by pressing the corresponding coloured buttons Red Green Yellow or Blue on the remote control Useful features for Teletext Mix Press the Mix button to switch to Mix mode and press twice to switch off teletext The previous program reappears Index Press this button to select the index page that displays the list of teletext contents Hold The teletext page you have s...

Страница 21: ...rs Press or button to highlight the item Press or button to adjust Press the Menu button to return or exit Adjustment of Sharpness Adjustment of Hue only for NTSC Press the Menu button and then press or button until the Video menu appears Press or button to highlight the item Press or button to adjust Press the Menu button to return or exit Selection of Phase setting only for YPbPr Press the Menu ...

Страница 22: ...he Video menu appears Press or button to highlight the item Press the Enter button to confirm the sub selection as shown as below Press or button to highlight the item Press or button to select Press the Menu button to return or exit Selection of Colour Temperature Press the Menu button and then press or button until the Video menu appears Press or button to highlight the item Press or button to se...

Страница 23: ...tem Press or button to select On or Off Press the Menu button to return or exit 6 5 3 Misc Page Menu Selection of Language Press the Menu button and then press or button until the Misc menu appears Press or button to highlight the item Press or button to select English Deutsch Francese Italiano Español Português or PycckNÑ Press the Menu button to return or exit Selection of Blue Back Press the Me...

Страница 24: ... Menu button and then press or button until the TV menu appears Press or button to highlight the item Press or button to select HK UK SA Asia WE Australia France Russia Vietnam UK Germany Spain or Italy Press the Menu button to return or exit Press the Menu button and then press or button until the TV menu appears Press or button to highlight the item Press the Enter button to start searching The ...

Страница 25: ...on to return or exit Using the Fine Tune Press the Menu button and then press or button until the TV menu appears Press or button to highlight the item Press the Enter button to confirm Press or button to tune Press the Menu button to return or exit Press the Menu button and then press or button until the TV menu appears Press or button to highlight the item Press or button to select I B G B G A2 ...

Страница 26: ...ant to cancel this operation move cursor to Cancel and press the Enter button for close this setting Press the Menu button to return or exit Using the Program Edit Using the Channel Skip Press the Menu button and then press or button until the TV menu appears Press or button to highlight the item Press or button to select On or Off Press the Menu button to return or exit Press the Menu button and ...

Страница 27: ...s the Enter button to pop up a menu as illustration for you to adjust the colour temperature to you desirable value Channel Selection Press the CH button to search the channels the channel number will increase or decrease by 1 for each pressing excluding the skipped channels Press the number buttons 0 9 to select the corresponding channel content If the channel number is bigger than 9 just press t...

Страница 28: ...he Menu button and then press or button until the Geometric menu appears Press or button to highlight the item Press or button to adjust Press the Menu button to return or exit Using Display Adjustment Press the Menu button and then press or button until the Geometric menu appears Press or button to highlight the item Press the Enter button to confirm for sub selection as illatrution Press or butto...

Страница 29: ...lions of colours Gray Scale 256 R G B each 8 bit Brightness Peak Value Typical 400cd m2 Panel Only Contrast Dark Room Typical 1000 1 Panel Only Colour System PAL SECAM NTSC Sound System BG DK I L L Audio Output Power Internal 7W x 2 Power Supply AC 100 240V 50 60 Hz Power Consumption 200W Input Terminal Antenna Input DIN Type x 1 VGA D Sub 15 Pin Type x 1 HDMI Ver 1 1 connector x 1 SCART input x 2...

Страница 30: ...Frequency Hz 640 x 480 31 50 60 00 37 86 72 81 800 x 600 35 16 56 25 37 90 60 32 46 90 75 00 48 08 72 19 1024 x 768 48 40 60 00 Resolution Horizontal Frequency KHz Vertical Frequency Hz 480p 31 468 59 94 720p 45 00 60 00 1080i 33 75 60 00 B YPbPr Mode C HDMI Mode Resolution Horizontal Frequency KHz Vertical Frequency Hz 480i 15 734 59 94 576i 15 625 50 00 576p 31 25 50 00 480p 720x480 31 468 59 94...

Страница 31: ...ng Wipe the Display with a dry cloth after cleaning 3 Cleaning of Screen Use a soft cotton cloth to clean the screen gently The screen glass is very fragile so do not scrape it with any sharp object Do not press or tap the screen to avoid cracking When the screen is seriously contaminated use a soft cloth moistened with water to clean the Display Wring water out of the cloth before cleaning to pre...

Страница 32: ... the Remote Control Window For more information about the Remote Control refer to Chapter 4 Flashing spots or stripes appear on the screen Check that there are no emission sources Car HV cable or Neon lamp or other possible interference sources Image colour or quality deteriorates Check that all the video settings are adjusted appropriately such as brightness contrast colour etc For more informati...

Страница 33: ......

Отзывы: